


Framebuffers
Advanced-OpenGL/Framebuffers
So far we've used several types of screen buffers: a color buffer for writing color values, a depth buffer to write and test depth information, and finally a stencil buffer that allows us to discard certain fragments based on some condition. The combination of these buffers is stored somewhere in GPU memory and is called a
The rendering operations we've done so far were all done on top of the render buffers attached to the
The application of framebuffers may not immediately make sense, but rendering your scene to a different framebuffer allows us to use that result to create mirrors in a scene, or do cool post-processing effects for example. First we'll discuss how they actually work and then we'll use them by implementing those cool post-processing effects.
Creating a framebuffer
Just like any other object in OpenGL we can create a framebuffer object (abbreviated to FBO) by using a function called
unsigned int fbo;
glGenFramebuffers (1, &fbo);
This pattern of object creation and usage is something we've seen dozens of times now so their usage functions are similar to all the other object's we've seen: first we create a framebuffer object, bind it as the active framebuffer, do some operations, and unbind the framebuffer. To bind the framebuffer we use
glBindFramebuffer (GL_FRAMEBUFFER, fbo);
By binding to the GL_FRAMEBUFFER target all the next read and write framebuffer operations will affect the currently bound framebuffer. It is also possible to bind a framebuffer to a read or write target specifically by binding to GL_READ_FRAMEBUFFER or GL_DRAW_FRAMEBUFFER respectively. The framebuffer bound to GL_READ_FRAMEBUFFER is then used for all read operations like
Unfortunately, we can't use our framebuffer yet because it is not
- We have to attach at least one buffer (color, depth or stencil buffer).
- There should be at least one color attachment.
- All attachments should be complete as well (reserved memory).
- Each buffer should have the same number of samples.
Don't worry if you don't know what samples are, we'll get to those in a later chapter.
From the requirements it should be clear that we need to create some kind of attachment for the framebuffer and attach this attachment to the framebuffer. After we've completed all requirements we can check if we actually successfully completed the framebuffer by calling
if(glCheckFramebufferStatus (GL_FRAMEBUFFER) == GL_FRAMEBUFFER_COMPLETE)
// execute victory dance
All subsequent rendering operations will now render to the attachments of the currently bound framebuffer. Since our framebuffer is not the default framebuffer, the rendering commands will have no impact on the visual output of your window. For this reason it is called 0:
glBindFramebuffer (GL_FRAMEBUFFER, 0);
When we're done with all framebuffer operations, do not forget to delete the framebuffer object:
glDeleteFramebuffers (1, &fbo);
Now before the completeness check is executed we need to attach one or more attachments to the framebuffer. An
Texture attachments
When attaching a texture to a framebuffer, all rendering commands will write to the texture as if it was a normal color/depth or stencil buffer. The advantage of using textures is that the render output is stored inside the texture image that we can then easily use in our shaders.
Creating a texture for a framebuffer is roughly the same as creating a normal texture:
unsigned int texture;
glGenTextures (1, &texture);
glBindTexture (GL_TEXTURE_2D, texture);
glTexImage2D (GL_TEXTURE_2D, 0, GL_RGB, 800, 600, 0, GL_RGB, GL_UNSIGNED_BYTE, NULL);
glTexParameter i(GL_TEXTURE_2D, GL_TEXTURE_MIN_FILTER, GL_LINEAR);
glTexParameter i(GL_TEXTURE_2D, GL_TEXTURE_MAG_FILTER, GL_LINEAR);
The main differences here is that we set the dimensions equal to the screen size (although this is not required) and we pass NULL as the texture's data parameter. For this texture, we're only allocating memory and not actually filling it. Filling the texture will happen as soon as we render to the framebuffer. Also note that we do not care about any of the wrapping methods or mipmapping since we won't be needing those in most cases.
Now that we've created a texture, the last thing we need to do is actually attach it to the framebuffer:
glFramebufferTexture2D (GL_FRAMEBUFFER, GL_COLOR_ATTACHMENT0, GL_TEXTURE_2D, texture, 0);
The
target: the framebuffer type we're targeting (draw, read or both).attachment: the type of attachment we're going to attach. Right now we're attaching a color attachment. Note that the0at the end suggests we can attach more than 1 color attachment. We'll get to that in a later chapter.textarget: the type of the texture you want to attach.texture: the actual texture to attach.level: the mipmap level. We keep this at0.
Next to the color attachments we can also attach a depth and a stencil texture to the framebuffer object. To attach a depth attachment we specify the attachment type as GL_DEPTH_ATTACHMENT. Note that the texture's
It is also possible to attach both a depth buffer and a stencil buffer as a single texture. Each 32 bit value of the texture then contains 24 bits of depth information and 8 bits of stencil information. To attach a depth and stencil buffer as one texture we use the GL_DEPTH_STENCIL_ATTACHMENT type and configure the texture's formats to contain combined depth and stencil values. An example of attaching a depth and stencil buffer as one texture to the framebuffer is given below:
glTexImage2D (
GL_TEXTURE_2D, 0, GL_DEPTH24_STENCIL8, 800, 600, 0,
GL_DEPTH_STENCIL, GL_UNSIGNED_INT_24_8, NULL
);
glFramebufferTexture2D (GL_FRAMEBUFFER, GL_DEPTH_STENCIL_ATTACHMENT, GL_TEXTURE_2D, texture, 0);
Renderbuffer object attachments
Renderbuffer objects store all the render data directly into their buffer without any conversions to texture-specific formats, making them faster as a writeable storage medium. You cannot read from them directly, but it is possible to read from them via the slow
Because their data is in a native format they are quite fast when writing data or copying data to other buffers. Operations like switching buffers are therefore quite fast when using renderbuffer objects. The
Creating a renderbuffer object looks similar to the framebuffer's code:
unsigned int rbo;
glGenRenderbuffers (1, &rbo);
And similarly we want to bind the renderbuffer object so all subsequent renderbuffer operations affect the current rbo:
glBindRenderbuffer (GL_RENDERBUFFER, rbo);
Since renderbuffer objects are write-only they are often used as depth and stencil attachments, since most of the time we don't really need to read values from them, but we do care about depth and stencil testing. We need the depth and stencil values for testing, but don't need to sample these values so a renderbuffer object suits this perfectly. When we're not sampling from these buffers, a renderbuffer object is generally preferred.
Creating a depth and stencil renderbuffer object is done by calling the
glRenderbufferStorage (GL_RENDERBUFFER, GL_DEPTH24_STENCIL8, 800, 600);
Creating a renderbuffer object is similar to texture objects, the difference being that this object is specifically designed to be used as a framebuffer attachment, instead of a general purpose data buffer like a texture. Here we've chosen GL_DEPTH24_STENCIL8 as the internal format, which holds both the depth and stencil buffer with 24 and 8 bits respectively.
The last thing left to do is to actually attach the renderbuffer object:
glFramebufferRenderbuffer (GL_FRAMEBUFFER, GL_DEPTH_STENCIL_ATTACHMENT, GL_RENDERBUFFER, rbo);
Renderbuffer objects can be more efficient for use in your off-screen render projects, but it is important to realize when to use renderbuffer objects and when to use textures. The general rule is that if you never need to sample data from a specific buffer, it is wise to use a renderbuffer object for that specific buffer. If you need to sample data from a specific buffer like colors or depth values, you should use a texture attachment instead.
Rendering to a texture
Now that we know how framebuffers (sort of) work it's time to put them to good use. We're going to render the scene into a color texture attached to a framebuffer object we created and then draw this texture over a simple quad that spans the whole screen. The visual output is then exactly the same as without a framebuffer, but this time it's all printed on top of a single quad. Now why is this useful? In the next section we'll see why.
First thing to do is to create an actual framebuffer object and bind it, this is all relatively straightforward:
unsigned int framebuffer;
glGenFramebuffers (1, &framebuffer);
glBindFramebuffer (GL_FRAMEBUFFER, framebuffer);
Next we create a texture image that we attach as a color attachment to the framebuffer. We set the texture's dimensions equal to the width and height of the window and keep its data uninitialized:
// generate texture
unsigned int textureColorbuffer;
glGenTextures (1, &textureColorbuffer);
glBindTexture (GL_TEXTURE_2D, textureColorbuffer);
glTexImage2D (GL_TEXTURE_2D, 0, GL_RGB, 800, 600, 0, GL_RGB, GL_UNSIGNED_BYTE, NULL);
glTexParameter i(GL_TEXTURE_2D, GL_TEXTURE_MIN_FILTER, GL_LINEAR );
glTexParameter i(GL_TEXTURE_2D, GL_TEXTURE_MAG_FILTER, GL_LINEAR);
glBindTexture (GL_TEXTURE_2D, 0);
// attach it to currently bound framebuffer object
glFramebufferTexture2D (GL_FRAMEBUFFER, GL_COLOR_ATTACHMENT0, GL_TEXTURE_2D, textureColorbuffer, 0);
We also want to make sure OpenGL is able to do depth testing (and optionally stencil testing) so we have to make sure to add a depth (and stencil) attachment to the framebuffer. Since we'll only be sampling the color buffer and not the other buffers we can create a renderbuffer object for this purpose.
Creating a renderbuffer object isn't too hard. The only thing we have to remember is that we're creating it as a depth and stencil attachment renderbuffer object. We set its internal format to GL_DEPTH24_STENCIL8 which is enough precision for our purposes:
unsigned int rbo;
glGenRenderbuffers (1, &rbo);
glBindRenderbuffer (GL_RENDERBUFFER, rbo);
glRenderbufferStorage (GL_RENDERBUFFER, GL_DEPTH24_STENCIL8, 800, 600);
glBindRenderbuffer (GL_RENDERBUFFER, 0);
Once we've allocated enough memory for the renderbuffer object we can unbind the renderbuffer.
Then, as a final step before we complete the framebuffer, we attach the renderbuffer object to the depth and stencil attachment of the framebuffer:
glFramebufferRenderbuffer (GL_FRAMEBUFFER, GL_DEPTH_STENCIL_ATTACHMENT, GL_RENDERBUFFER, rbo);
Then we want to check if the framebuffer is complete and if it's not, we print an error message.
if(glCheckFramebufferStatus (GL_FRAMEBUFFER) != GL_FRAMEBUFFER_COMPLETE)
std::cout << "ERROR::FRAMEBUFFER:: Framebuffer is not complete!" << std::endl;
glBindFramebuffer (GL_FRAMEBUFFER, 0);
Be sure to unbind the framebuffer to make sure we're not accidentally rendering to the wrong framebuffer.
Now that the framebuffer is complete, all we need to do to render to the framebuffer's buffers instead of the default framebuffers is to simply bind the framebuffer object. All subsequent render commands will then influence the currently bound framebuffer. All the depth and stencil operations will also read from the currently bound framebuffer's depth and stencil attachments if they're available. If you were to omit a depth buffer for example, all depth testing operations will no longer work.
So, to draw the scene to a single texture we'll have to take the following steps:
- Render the scene as usual with the new framebuffer bound as the active framebuffer.
- Bind to the default framebuffer.
- Draw a quad that spans the entire screen with the new framebuffer's color buffer as its texture.
We'll render the same scene we've used in the depth testing chapter, but this time with the old-school container texture.
To render the quad we're going to create a fresh set of simple shaders. We're not going to include fancy matrix transformations since we'll be supplying the vertex coordinates as normalized device coordinates so we can directly forward them as output of the vertex shader. The vertex shader looks like this:
#version 330 core
layout (location = 0) in vec2 aPos;
layout (location = 1) in vec2 aTexCoords;

out vec2 TexCoords;

void main()
{
    gl_Position = vec4(aPos.x, aPos.y, 0.0, 1.0);
    TexCoords = aTexCoords;
}
Nothing too fancy. The fragment shader is even more basic since the only thing we have to do is sample from a texture:
#version 330 core
out vec4 FragColor;

in vec2 TexCoords;

uniform sampler2D screenTexture;

void main()
{
    FragColor = texture(screenTexture, TexCoords);
}
It is then up to you to create and configure a VAO for the screen quad. A single render iteration of the framebuffer procedure has the following structure:
// first pass
glBindFramebuffer (GL_FRAMEBUFFER, framebuffer);
glClear ColorglClear (GL_COLOR_BUFFER_BIT | GL_DEPTH_BUFFER_BIT); // we're not using the stencil buffer now
glEnable (GL_DEPTH_TEST);
DrawScene();
// second pass
glBindFramebuffer (GL_FRAMEBUFFER, 0); // back to default
glClear ColorglClear (GL_COLOR_BUFFER_BIT);
screenShader.use();
glBindVertexArray (quadVAO);
glDisable(GL_DEPTH_TEST);
glBindTexture (GL_TEXTURE_2D, textureColorbuffer);
glDrawArrays (GL_TRIANGLES, 0, 6);
There are a few things to note. First, since each framebuffer we're using has its own set of buffers, we want to clear each of those buffers with the appropriate bits set by calling
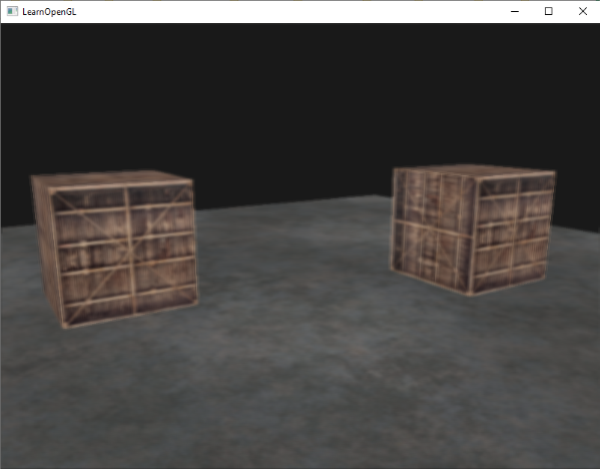
There are quite some steps that could go wrong here, so if you have no output, try to debug where possible and re-read the relevant sections of the chapter. If everything did work out successfully you'll get a visual result that looks like this:
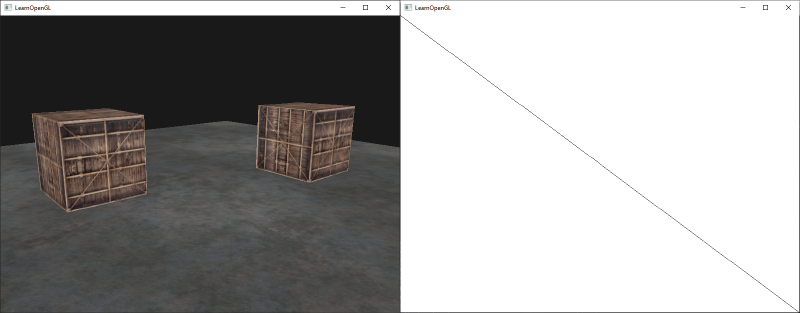
The left shows the visual output, exactly the same as we've seen in the depth testing chapter, but this time rendered on a simple quad. If we render the scene in wireframe it's obvious we've only drawn a single quad in the default framebuffer.
You can find the source code of the application here.
So what was the use of this again? Well, because we can now freely access each of the pixels of the completely rendered scene as a single texture image, we can create some interesting effects in the fragment shader.
Post-processing
Now that the entire scene is rendered to a single texture we can create cool
Let's start with one of the simplest post-processing effects.
Inversion
We have access to each of the colors of the render output so it's not so hard to return the inverse of these colors in the fragment shader. We can take the color of the screen texture and inverse it by subtracting it from 1.0:
void main()
{
    FragColor = vec4(vec3(1.0 - texture(screenTexture, TexCoords)), 1.0);
}
While inversion is a relatively simple post-processing effect it already creates funky results:
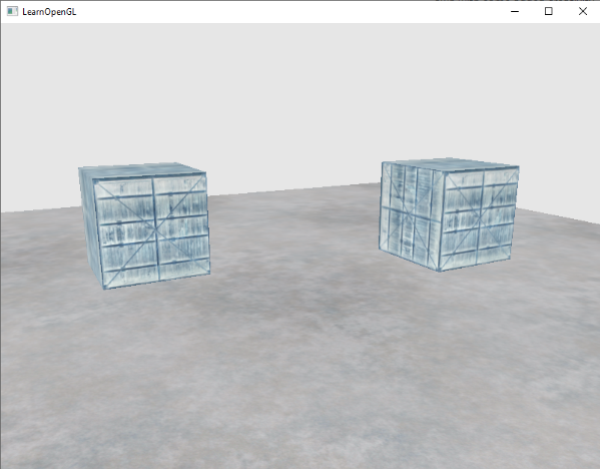
The entire scene now has all its colors inversed with a single line of code in the fragment shader. Pretty cool huh?
Grayscale
Another interesting effect is to remove all colors from the scene except the white, gray and black colors; effectively grayscaling the entire image. An easy way to do this is by taking all the color components and averaging their results:
void main()
{
    FragColor = texture(screenTexture, TexCoords);
    float average = (FragColor.r + FragColor.g + FragColor.b) / 3.0;
    FragColor = vec4(average, average, average, 1.0);
}
This already creates pretty good results, but the human eye tends to be more sensitive to green colors and the least to blue. So to get the most physically accurate results we'll need to use weighted channels:
void main()
{
    FragColor = texture(screenTexture, TexCoords);
    float average = 0.2126 * FragColor.r + 0.7152 * FragColor.g + 0.0722 * FragColor.b;
    FragColor = vec4(average, average, average, 1.0);
}
You probably won't notice the difference right away, but with more complicated scenes, such a weighted grayscaling effect tends to be more realistic.
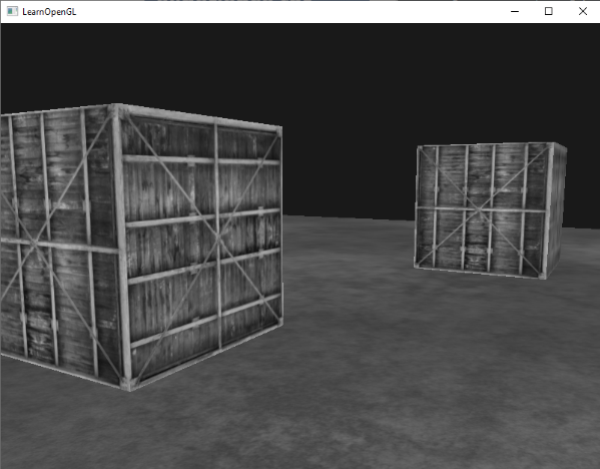
Kernel effects
Another advantage about doing post-processing on a single texture image is that we can sample color values from other parts of the texture not specific to that fragment. We could for example take a small area around the current texture coordinate and sample multiple texture values around the current texture value. We can then create interesting effects by combining them in creative ways.
A
This kernel takes 8 surrounding pixel values and multiplies them by 2 and the current pixel by -15. This example kernel multiplies the surrounding pixels by several weights determined in the kernel and balances the result by multiplying the current pixel by a large negative weight.
1 if you add all the weights together. If they don't add up to 1 it means that the resulting texture color ends up brighter or darker than the original texture value.
Kernels are an extremely useful tool for post-processing since they're quite easy to use and experiment with, and a lot of examples can be found online. We do have to slightly adapt the fragment shader a bit to actually support kernels. We make the assumption that each kernel we'll be using is a 3x3 kernel (which most kernels are):
const float offset = 1.0 / 300.0;

void main()
{
    vec2 offsets[9] = vec2[](
        vec2(-offset,  offset), // top-left
        vec2( 0.0f,    offset), // top-center
        vec2( offset,  offset), // top-right
        vec2(-offset,  0.0f),   // center-left
        vec2( 0.0f,    0.0f),   // center-center
        vec2( offset,  0.0f),   // center-right
        vec2(-offset, -offset), // bottom-left
        vec2( 0.0f,   -offset), // bottom-center
        vec2( offset, -offset)  // bottom-right
    );

    float kernel[9] = float[](
        -1, -1, -1,
        -1,  9, -1,
        -1, -1, -1
    );

    vec3 sampleTex[9];
    for(int i = 0; i < 9; i++)
    {
        sampleTex[i] = vec3(texture(screenTexture, TexCoords.st + offsets[i]));
    }
    vec3 col = vec3(0.0);
    for(int i = 0; i < 9; i++)
        col += sampleTex[i] * kernel[i];

    FragColor = vec4(col, 1.0);
}
In the fragment shader we first create an array of 9 vec2 offsets for each surrounding texture coordinate. The offset is a constant value that you could customize to your liking. Then we define the kernel, which in this case is a
This particular sharpen kernel looks like this:
This could be the base of some interesting effects where your player may be on a narcotic adventure.
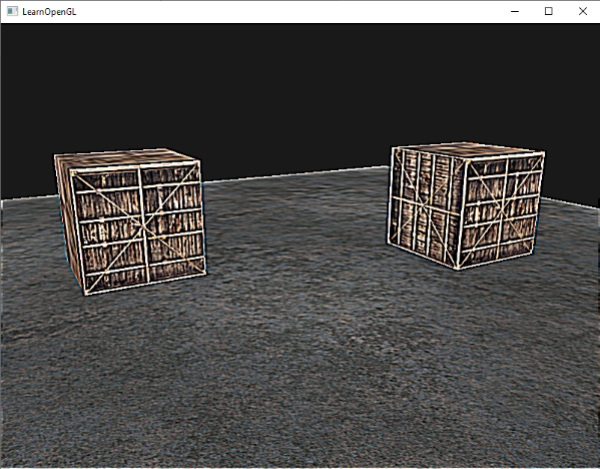
Blur
A kernel that creates a
Because all values add up to 16, directly returning the combined sampled colors would result in an extremely bright color so we have to divide each value of the kernel by 16. The resulting kernel array then becomes:
float kernel[9] = float[](
    1.0 / 16, 2.0 / 16, 1.0 / 16,
    2.0 / 16, 4.0 / 16, 2.0 / 16,
    1.0 / 16, 2.0 / 16, 1.0 / 16
);
By only changing the kernel array in the fragment shader we can completely change the post-processing effect. It now looks something like this:
Such a blur effect creates interesting possibilities. We could vary the blur amount over time to create the effect of someone being drunk, or increase the blur whenever the main character is not wearing glasses. Blurring can also be a useful tool for smoothing color values which we'll see use of in later chapters.
You can see that once we have such a little kernel implementation in place it is quite easy to create cool post-processing effects. Let's show you a last popular effect to finish this discussion.
Edge detection
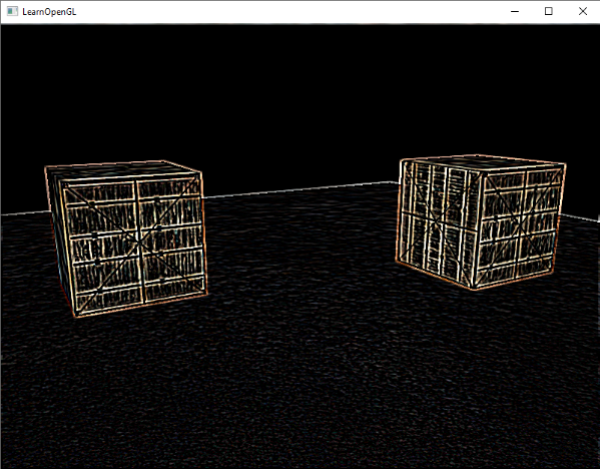
Below you can find an
This kernel highlights all edges and darkens the rest, which is pretty useful when we only care about edges in an image.
It probably does not come as a surprise that kernels like this are used as image-manipulating tools/filters in tools like Photoshop. Because of a graphic card's ability to process fragments with extreme parallel capabilities, we can manipulate images on a per-pixel basis in real-time with relative ease. Image-editing tools therefore tend to use graphics cards for image-processing.
Exercises
- Can you use framebuffers to create a rear-view mirror? For this you'll have to draw your scene twice: one with the camera rotated 180 degrees and the other as normal. Try to create a small quad at the top of your screen to apply the mirror texture on, something like this; solution.
- Play around with the kernel values and create your own interesting post-processing effects. Try searching the internet as well for other interesting kernels.