


Anti Aliasing
Advanced-OpenGL/Anti-Aliasing
Somewhere in your adventurous rendering journey you probably came across some jagged saw-like patterns along the edges of your models. The reason these
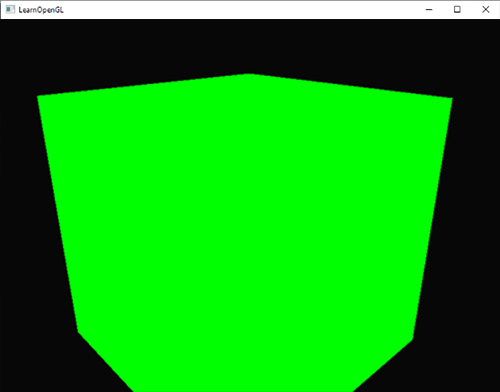
While not immediately visible, if you take a closer look at the edges of the cube you'll see a jagged pattern. If we zoom in you'd see the following:

This is clearly not something we want in a final version of an application. This effect, of clearly seeing the pixel formations an edge is composed of, is called
At first we had a technique called
This technique did give birth to a more modern technique called
Multisampling
To understand what multisampling is and how it works into solving the aliasing problem we first need to delve a bit further into the inner workings of OpenGL's rasterizer.
The rasterizer is the combination of all algorithms and processes that sit between your final processed vertices and the fragment shader. The rasterizer takes all vertices belonging to a single primitive and transforms this to a set of fragments. Vertex coordinates can theoretically have any coordinate, but fragments can't since they are bound by the resolution of your screen. There will almost never be a one-on-one mapping between vertex coordinates and fragments, so the rasterizer has to determine in some way what fragment/screen-coordinate each specific vertex will end up at.
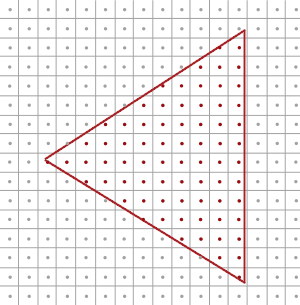
Here we see a grid of screen pixels where the center of each pixel contains a
You can probably already figure out the origin of aliasing right now. The complete rendered version of the triangle would look like this on your screen:
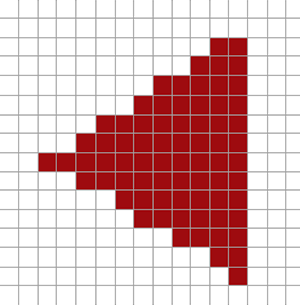
Due to the limited amount of screen pixels, some pixels will be rendered along an edge and some won't. The result is that we're rendering primitives with non-smooth edges giving rise to the jagged edges we've seen before.
What multisampling does, is not use a single sampling point for determining coverage of the triangle, but multiple sample points (guess where it got its name from). Instead of a single sample point at the center of each pixel we're going to place 4
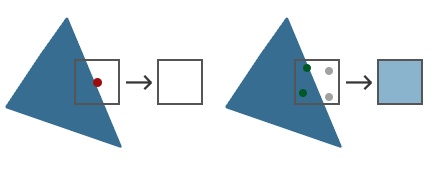
The left side of the image shows how we would normally determine the coverage of a triangle. This specific pixel won't run a fragment shader (and thus remains blank) since its sample point wasn't covered by the triangle. The right side of the image shows a multisampled version where each pixel contains 4 sample points. Here we can see that only 2 of the sample points cover the triangle.
This is where multisampling becomes interesting. We determined that 2 subsamples were covered by the triangle so the next step is to determine a color for this specific pixel. Our initial guess would be that we run the fragment shader for each covered subsample and later average the colors of each subsample per pixel. In this case we'd run the fragment shader twice on the interpolated vertex data at each subsample and store the resulting color in those sample points. This is (fortunately) not how it works, because this would mean we need to run a lot more fragment shaders than without multisampling, drastically reducing performance.
How MSAA really works is that the fragment shader is only run once per pixel (for each primitive) regardless of how many subsamples the triangle covers; the fragment shader runs with the vertex data interpolated to the center of the pixel. MSAA then uses a larger depth/stencil buffer to determine subsample coverage. The number of subsamples covered determines how much the pixel color contributes to the framebuffer. Because only 2 of the 4 samples were covered in the previous image, half of the triangle's color is mixed with the framebuffer color (in this case the clear color) resulting in a light blue-ish color.
The result is a higher resolution buffer (with higher resolution depth/stencil) where all the primitive edges now produce a smoother pattern. Let's see what multisampling looks like when we determine the coverage of the earlier triangle:
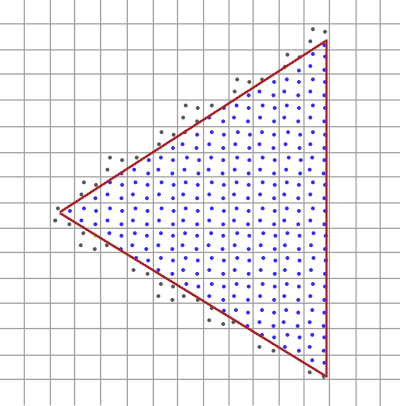
Here each pixel contains 4 subsamples (the irrelevant samples were hidden) where the blue subsamples are covered by the triangle and the gray sample points aren't. Within the inner region of the triangle all pixels will run the fragment shader once where its color output is stored directly in the framebuffer (assuming no blending). At the inner edges of the triangle however not all subsamples will be covered so the result of the fragment shader won't fully contribute to the framebuffer. Based on the number of covered samples, more or less of the triangle fragment's color ends up at that pixel.
For each pixel, the less subsamples are part of the triangle, the less it takes the color of the triangle. If we were to fill in the actual pixel colors we get the following image:

The hard edges of the triangle are now surrounded by colors slightly lighter than the actual edge color, which causes the edge to appear smooth when viewed from a distance.
Depth and stencil values are stored per subsample and, even though we only run the fragment shader once, color values are stored per subsample as well for the case of multiple triangles overlapping a single pixel. For depth testing the vertex's depth value is interpolated to each subsample before running the depth test, and for stencil testing we store the stencil values per subsample. This does mean that the size of the buffers are now increased by the amount of subsamples per pixel.
What we've discussed so far is a basic overview of how multisampled anti-aliasing works behind the scenes. The actual logic behind the rasterizer is a bit more complicated, but this brief description should be enough to understand the concept and logic behind multisampled anti-aliasing; enough to delve into the practical aspects.
MSAA in OpenGL
If we want to use MSAA in OpenGL we need to use a buffer that is able to store more than one sample value per pixel. We need a new type of buffer that can store a given amount of multisamples and this is called a
Most windowing systems are able to provide us a multisample buffer instead of a default buffer. GLFW also gives us this functionality and all we need to do is hint GLFW that we'd like to use a multisample buffer with N samples instead of a normal buffer by calling
glfwWindowHint (GLFW_SAMPLES, 4);
When we now call
Now that we asked GLFW for multisampled buffers we need to enable multisampling by calling
glEnable (GL_MULTISAMPLE);
Because the actual multisampling algorithms are implemented in the rasterizer in your OpenGL drivers there's not much else we need to do. If we now were to render the green cube from the start of this chapter we should see smoother edges:
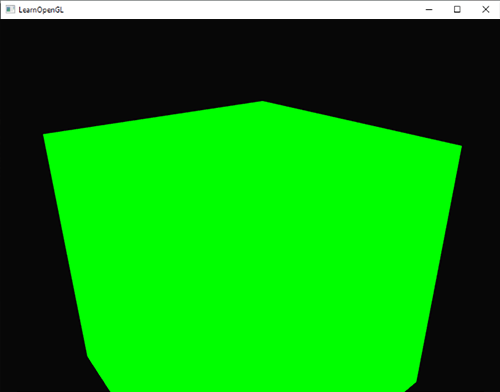
The cube does indeed look a lot smoother and the same will apply for any other object you're drawing in your scene. You can find the source code for this simple example here.
Off-screen MSAA
Because GLFW takes care of creating the multisampled buffers, enabling MSAA is quite easy. If we want to use our own framebuffers however, we have to generate the multisampled buffers ourselves; now we do need to take care of creating multisampled buffers.
There are two ways we can create multisampled buffers to act as attachments for framebuffers: texture attachments and renderbuffer attachments. Quite similar to normal attachments like we've discussed in the framebuffers chapter.
Multisampled texture attachments
To create a texture that supports storage of multiple sample points we use
glBindTexture (GL_TEXTURE_2D_MULTISAMPLE, tex);
glTexImage2D MultisampleglBindTexture (GL_TEXTURE_2D_MULTISAMPLE, 0);
The second argument sets the number of samples we'd like the texture to have. If the last argument is set to GL_TRUE, the image will use identical sample locations and the same number of subsamples for each texel.
To attach a multisampled texture to a framebuffer we use
glFramebufferTexture2D (GL_FRAMEBUFFER, GL_COLOR_ATTACHMENT0, GL_TEXTURE_2D_MULTISAMPLE, tex, 0);
The currently bound framebuffer now has a multisampled color buffer in the form of a texture image.
Multisampled renderbuffer objects
Like textures, creating a multisampled renderbuffer object isn't difficult. It is even quite easy since all we need to change is
glRenderbufferStorage MultisampleThe one thing that changed here is the extra second parameter where we set the amount of samples we'd like to use; 4 in this particular case.
Render to multisampled framebuffer
Rendering to a multisampled framebuffer is straightforward. Whenever we draw anything while the framebuffer object is bound, the rasterizer will take care of all the multisample operations. However, because a multisampled buffer is a bit special, we can't directly use the buffer for other operations like sampling it in a shader.
A multisampled image contains much more information than a normal image so what we need to do is downscale or
glBindFramebuffer (GL_READ_FRAMEBUFFER, multisampledFBO);
glBindFramebuffer (GL_DRAW_FRAMEBUFFER, 0);
glBlitFramebuffer (0, 0, width, height, 0, 0, width, height, GL_COLOR_BUFFER_BIT, GL_NEAREST);
If we then were to render the same application we should get the same output: a lime-green cube displayed with MSAA and again showing significantly less jagged edges:
You can find the source code here.
But what if we wanted to use the texture result of a multisampled framebuffer to do stuff like post-processing? We can't directly use the multisampled texture(s) in the fragment shader. What we can do however is blit the multisampled buffer(s) to a different FBO with a non-multisampled texture attachment. We then use this ordinary color attachment texture for post-processing, effectively post-processing an image rendered via multisampling. This does mean we have to generate a new FBO that acts solely as an intermediate framebuffer object to resolve the multisampled buffer into; a normal 2D texture we can use in the fragment shader. This process looks a bit like this in pseudocode:
unsigned int msFBO = CreateFBOWithMultiSampledAttachments();
// then create another FBO with a normal texture color attachment
[...]
glFramebufferTexture2D (GL_FRAMEBUFFER, GL_COLOR_ATTACHMENT0, GL_TEXTURE_2D, screenTexture, 0);
[...]
while(!glfwWindowShouldClose (window))
{
[...]
glBindFramebuffer (msFBO);
ClearFrameBuffer();
DrawScene();
// now resolve multisampled buffer(s) into intermediate FBO
glBindFramebuffer (GL_READ_FRAMEBUFFER, msFBO);
glBindFramebuffer (GL_DRAW_FRAMEBUFFER, intermediateFBO);
glBlitFramebuffer (0, 0, width, height, 0, 0, width, height, GL_COLOR_BUFFER_BIT, GL_NEAREST);
// now scene is stored as 2D texture image, so use that image for post-processing
glBindFramebuffer (GL_FRAMEBUFFER, 0);
ClearFramebuffer();
glBindTexture (GL_TEXTURE_2D, screenTexture);
DrawPostProcessingQuad();
[...]
}
If we then implement this into the post-processing code of the framebuffers chapter we're able to create all kinds of cool post-processing effects on a texture of a scene with (almost) no jagged edges. With a grayscale postprocessing filter applied it'll look something like this:
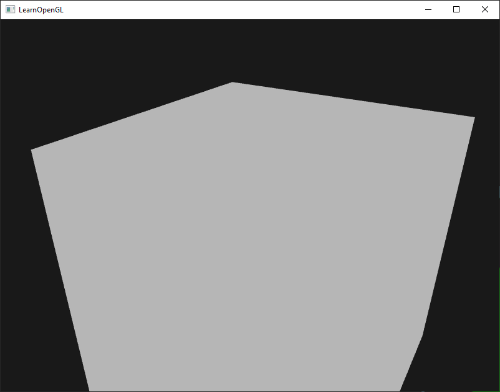
You can see that when we want to combine multisampling with off-screen rendering we need to take care of some extra steps. The steps are worth the extra effort though since multisampling significantly boosts the visual quality of your scene. Do note that enabling multisampling can noticeably reduce performance the more samples you use.
Custom Anti-Aliasing algorithm
It is possible to directly pass a multisampled texture image to a fragment shader instead of first resolving it. GLSL gives us the option to sample the texture image per subsample so we can create our own custom anti-aliasing algorithms.
To get a texture value per subsample you'd have to define the texture uniform sampler as a
uniform sampler2DMS screenTextureMS;
Using the
vec4 colorSample = texelFetch(screenTextureMS, TexCoords, 3); // 4th subsample
We won't go into the details of creating custom anti-aliasing techniques here, but this may be enough to get started on building one yourself.