Weighted Blended
Guest-Articles/2020/OIT/Weighted-Blended
Weighted, Blended is an approximate order-independent transparency technique which was published in the journal of computer graphics techniques in 2013 by Morgan McGuire and Louis Bavoil at NVIDIA to address the transparency problem on a broad class of then gaming platforms.
Their approach to avoid the cost of storing and sorting primitives or fragments is to alter the compositing operator so that it is order independent, thus allowing a pure streaming approach.
Most games have ad-hoc and scene-dependent ways of working around transparent surface rendering limitations. These include limited sorting, additive-only blending, and hard-coded render and composite ordering. Most of these methods also break at some point during gameplay and create visual artifacts. One not-viable alternative is depth peeling, which produces good images, but is too slow for scenes with many layers both in theory and practice.
There are many asymptotically fast solutions for transparency rendering, such as bounded A-buffer approximations using programmable blending (e.g., Marco Salvi's work), stochastic transparency (as explained by Eric Enderton and others), and ray tracing. One or more of these will probably dominate at some point, but all were impractical on the game platforms of five or six years ago, including PC DX11/GL4 GPUs, mobile devices with OpenGL ES 3.0 GPUs, and last-generation consoles like PlayStation 4.
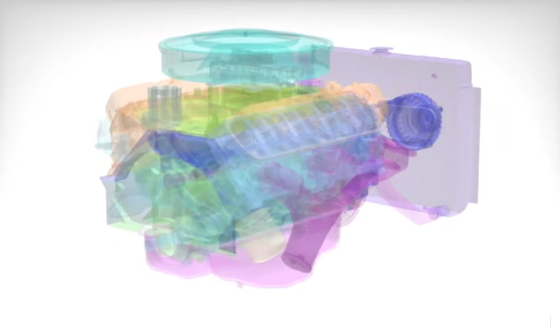
The below image is a transparent CAD view of a car engine rendered by this technique.
Theory
This technique renders non-refractive, monochrome transmission through surfaces that themselves have color, without requiring sorting or new hardware features. In fact, it can be implemented with a simple shader for any GPU that supports blending to render targets with more than 8 bits per channel.
It works best on GPUs with multiple render targets and floating-point texture, where it is faster than sorted transparency and avoids sorting artifacts and popping for particle systems. It also consumes less bandwidth than even a 4-deep RGBA8 K-buffer and allows mixing low-resolution particles with full-resolution surfaces such as glass.
For the mixed resolution case, the peak memory cost remains that of the higher resolution render target but bandwidth cost falls based on the proportional of low-resolution surfaces.
The basic idea of Weighted, Blended method is to compute the coverage of the background by transparent surfaces exactly, but to only approximate the light scattered towards the camera by the transparent surfaces themselves. The algorithm imposes a heuristic on inter-occlusion factor among transparent surfaces that increases with distance from the camera.
After all transparent surfaces have been rendered, it then performs a full-screen normalization and compositing pass to reduce errors where the heuristic was a poor approximation of the true inter-occlusion.
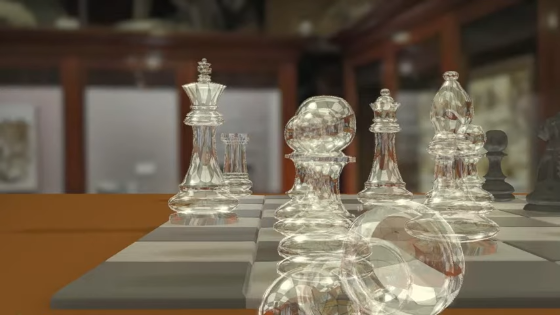
The below image is a glass chess set rendered with this technique. Note that the glass pieces are not refracting any light.
For a better understanding and a more detailed explanation of the weight function, please refer to page 5, 6 and 7 of the original paper as the Blended OIT has been implemented and improved by different methods along the years. Link to the paper is provided at the end of this article.
Limitation
The primary limitation of the technique is that the weighting heuristic must be tuned for the anticipated depth range and opacity of transparent surfaces.
The technique was implemented in OpenGL for the G3D Innovation Engine and DirectX for the Unreal Engine to produce the results live and in the paper. Dan Bagnell and Patrick Cozzi implemented it in WebGL for their open-source Cesium engine (see also their blog post discussing it).
From those implementations, a good set of weighting functions were found, which are reported in the journal paper. In the paper, they also discuss how to spot artifacts from a poorly-tuned weighting function and fix them.
Also, I haven't been able to find a proper way to implement this technique in a deferred renderer. Since pixels override each other in a deferred renderer, we lose information about the previous layers so we cannot correctly accumulate the color values for the lighting stage.
One feasible solution is to apply this technique as you would ordinarily do in a forward renderer. This is basically borrowing the transparency pass of a forward renderer and incorporate it in a deferred one.
Implementation
This technique is fairly straight forward to implement and the shader modifications are very simple. If you're familiar with how Framebuffers work in OpenGL, you're almost halfway there.
The only caveat is we need to write our code in OpenGL ^4.0 to be able to use blending to multiple render targets (e.g. utilizing
Overview
During the transparent surface rendering, shade surfaces as usual, but output to two render targets. The first render target (
Then, render the surfaces in any order to these render targets, adding the following to the bottom of the pixel shader and using the specified blending modes:
// your first render target which is used to accumulate pre-multiplied color values
layout (location = 0) out vec4 accum;

// your second render target which is used to store pixel revealage
layout (location = 1) out float reveal;

...

// output linear (not gamma encoded!), unmultiplied color from the rest of the shader
vec4 color = ... // regular shading code

// insert your favorite weighting function here. the color-based factor
// avoids color pollution from the edges of wispy clouds. the z-based
// factor gives precedence to nearer surfaces
float weight =
    max(min(1.0, max(max(color.r, color.g), color.b) * color.a), color.a) *
    clamp(0.03 / (1e-5 + pow(z / 200, 4.0)), 1e-2, 3e3);

// blend func: GL_ONE, GL_ONE
// switch to pre-multiplied alpha and weight
accum = vec4(color.rgb * color.a, color.a) * weight;

// blend func: GL_ZERO, GL_ONE_MINUS_SRC_ALPHA
reveal = color.a;
Finally, after all surfaces have been rendered, composite the result onto the screen using a full-screen pass:
// bind your accum render target to this texture unit
layout (binding = 0) uniform sampler2D rt0;

// bind your reveal render target to this texture unit
layout (binding = 1) uniform sampler2D rt1;

// shader output
out vec4 color;

// fetch pixel information
vec4 accum = texelFetch(rt0, int2(gl_FragCoord.xy), 0);
float reveal = texelFetch(rt1, int2(gl_FragCoord.xy), 0).r;

// blend func: GL_ONE_MINUS_SRC_ALPHA, GL_SRC_ALPHA
color = vec4(accum.rgb / max(accum.a, 1e-5), reveal);
Use this table as a reference for your render targets:
| Render Target | Format | Clear | Src Blend | Dst Blend | Write ("Src") |
| accum | RGBA16F | (0,0,0,0) | ONE | ONE | (r*a, g*a, b*a, a) * w |
| revealage | R8 | (1,0,0,0) | ZERO | ONE_MINUS_SRC_COLOR | a |
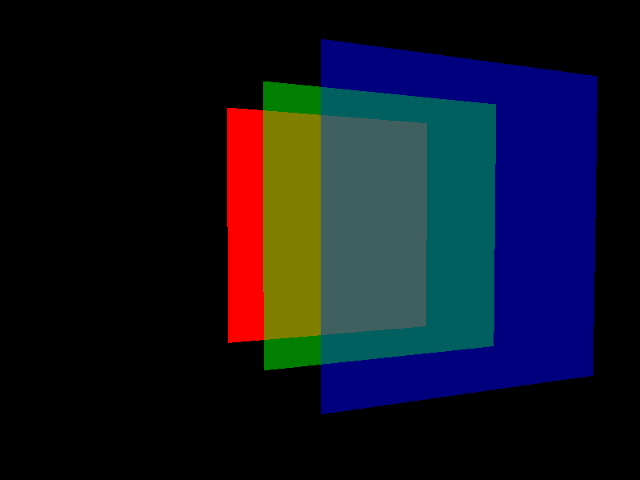
A total of three rendering passes are needed to accomplish the finished result which is down below:
Details
To get started, we would have to setup a quad for our solid and transparent surfaces. The red quad will be the solid one, and the green and blue will be the transparent one. Since we're using the same quad for our screen quad as well, here we define UV values for texture mapping purposes at the screen pass.
float quadVertices[] = {
// positions // uv
-1.0f, -1.0f, 0.0f, 0.0f, 0.0f,
1.0f, -1.0f, 0.0f, 1.0f, 0.0f,
1.0f, 1.0f, 0.0f, 1.0f, 1.0f,
1.0f, 1.0f, 0.0f, 1.0f, 1.0f,
-1.0f, 1.0f, 0.0f, 0.0f, 1.0f,
-1.0f, -1.0f, 0.0f, 0.0f, 0.0f
};
// quad VAO
unsigned int quadVAO, quadVBO;
glGenVertexArrays (1, &quadVAO);
glGenBuffers (1, &quadVBO);
glBindVertexArray (quadVAO);
glBindBuffer (GL_ARRAY_BUFFER, quadVBO);
glBufferData (GL_ARRAY_BUFFER, sizeof(quadVertices), quadVertices, GL_STATIC_DRAW);
glEnable VertexAttribArrayglVertexAttribPointer (0, 3, GL_FLOAT, GL_FALSE, 5 * sizeof(float), (void*)0);
glEnable VertexAttribArrayglVertexAttribPointer (1, 2, GL_FLOAT, GL_FALSE, 5 * sizeof(float), (void*)(3 * sizeof(float)));
glBindVertexArray (0);
Next, we will create two framebuffers for our solid and transparent passes. Our solid pass needs a color buffer and a depth buffer to store color and depth information. Our transparent pass needs two color buffers to store color accumulation and pixel revealage threshold. We will also attach the opaque framebuffer's depth texture to our transparent framebuffer, to utilize it for depth testing when rendering our transparent surfaces.
// set up framebuffers
unsigned int opaqueFBO, transparentFBO;
glGenFramebuffers (1, &opaqueFBO);
glGenFramebuffers (1, &transparentFBO);
// set up attachments for opaque framebuffer
unsigned int opaqueTexture;
glGenTextures (1, &opaqueTexture);
glBindTexture (GL_TEXTURE_2D, opaqueTexture);
glTexImage2D (GL_TEXTURE_2D, 0, GL_RGBA16F, SCR_WIDTH, SCR_HEIGHT, 0, GL_RGBA, GL_HALF_FLOAT, NULL);
glTexParameter i(GL_TEXTURE_2D, GL_TEXTURE_MIN_FILTER, GL_LINEAR);
glTexParameter i(GL_TEXTURE_2D, GL_TEXTURE_MAG_FILTER, GL_LINEAR);
glBindTexture (GL_TEXTURE_2D, 0);
unsigned int depthTexture;
glGenTextures (1, &depthTexture);
glBindTexture (GL_TEXTURE_2D, depthTexture);
glTexImage2D (GL_TEXTURE_2D, 0, GL_DEPTH_COMPONENT, SCR_WIDTH, SCR_HEIGHT,
0, GL_DEPTH_COMPONENT, GL_FLOAT, NULL);
glBindTexture (GL_TEXTURE_2D, 0);
...
// set up attachments for transparent framebuffer
unsigned int accumTexture;
glGenTextures (1, &accumTexture);
glBindTexture (GL_TEXTURE_2D, accumTexture);
glTexImage2D (GL_TEXTURE_2D, 0, GL_RGBA16F, SCR_WIDTH, SCR_HEIGHT, 0, GL_RGBA, GL_HALF_FLOAT, NULL);
glTexParameter i(GL_TEXTURE_2D, GL_TEXTURE_MIN_FILTER, GL_LINEAR);
glTexParameter i(GL_TEXTURE_2D, GL_TEXTURE_MAG_FILTER, GL_LINEAR);
glBindTexture (GL_TEXTURE_2D, 0);
unsigned int revealTexture;
glGenTextures (1, &revealTexture);
glBindTexture (GL_TEXTURE_2D, revealTexture);
glTexImage2D (GL_TEXTURE_2D, 0, GL_R8, SCR_WIDTH, SCR_HEIGHT, 0, GL_RED, GL_FLOAT, NULL);
glTexParameter i(GL_TEXTURE_2D, GL_TEXTURE_MIN_FILTER, GL_LINEAR);
glTexParameter i(GL_TEXTURE_2D, GL_TEXTURE_MAG_FILTER, GL_LINEAR);
glBindTexture (GL_TEXTURE_2D, 0);
...
// don't forget to explicitly tell OpenGL that your transparent framebuffer has two draw buffers
const GLenum transparentDrawBuffers[] = { GL_COLOR_ATTACHMENT0, GL_COLOR_ATTACHMENT1 };
glDrawBuffers(2, transparentDrawBuffers);
Before rendering, setup some model matrices for your quads. You can set the Z axis however you want since this is an order-independent technique and objects closer or further to the camera would not impose any problem.
glm::mat4 redModelMat = calculate_model_matrix(glm::vec3(0.0f, 0.0f, 0.0f));
glm::mat4 greenModelMat = calculate_model_matrix(glm::vec3(0.0f, 0.0f, 1.0f));
glm::mat4 blueModelMat = calculate_model_matrix(glm::vec3(0.0f, 0.0f, 2.0f));
At this point, we have to perform our solid pass, so configure the render states and bind the opaque framebuffer.
// configure render states
glEnable (GL_DEPTH_TEST);
glDepthFunc (GL_LESS);
glDepthMask (GL_TRUE);
glDisable(GL_BLEND);
glClear ColorglBindFramebuffer (GL_FRAMEBUFFER, opaqueFBO);
glClear (GL_COLOR_BUFFER_BIT | GL_DEPTH_BUFFER_BIT);
We have to reset our depth function and depth mask for the solid pass at every frame since pipeline changes these states further down the line.
Now, draw the solid objects using the solid shader. You can draw alpha cutout objects both at this stage and the next stage as well. The solid shader is just a simple shader that transforms the vertices and draws the mesh with the supplied color.
// use solid shader
solidShader.use();
// draw red quad
solidShader.setMat4("mvp", vp * redModelMat);
solidShader.setVec3("color", glm::vec3(1.0f, 0.0f, 0.0f));
glBindVertexArray (quadVAO);
glDrawArrays (GL_TRIANGLES, 0, 6);
So far so good. For our transparent pass, like in the solid pass, configure the render states to blend to these render targets as below, then bind the transparent framebuffer and clear its two color buffers to vec4(0.0f) and vec4(1.0).
// configure render states
// disable depth writes so transparent objects wouldn't interfere with solid pass depth values
glDepthMask (GL_FALSE);
glEnable (GL_BLEND);
glBlendFunc i(0, GL_ONE, GL_ONE); // accumulation blend target
glBlendFunc i(1, GL_ZERO, GL_ONE_MINUS_SRC_COLOR); // revealge blend target
glBlendEquation (GL_FUNC_ADD);
// bind transparent framebuffer to render transparent objects
glBindFramebuffer (GL_FRAMEBUFFER, transparentFBO);
// use a four component float array or a glm::vec4(0.0)
glClear Bufferfv(GL_COLOR, 0, &zeroFillerVec[0]);
// use a four component float array or a glm::vec4(1.0)
glClear Bufferfv(GL_COLOR, 1, &oneFillerVec[0]);
Then, draw the transparent surfaces with your preferred alpha values.
// use transparent shader
transparentShader.use();
// draw green quad
transparentShader.setMat4("mvp", vp * greenModelMat);
transparentShader.setVec4("color", glm::vec4(0.0f, 1.0f, 0.0f, 0.5f));
glBindVertexArray (quadVAO);
glDrawArrays (GL_TRIANGLES, 0, 6);
// draw blue quad
transparentShader.setMat4("mvp", vp * blueModelMat);
transparentShader.setVec4("color", glm::vec4(0.0f, 0.0f, 1.0f, 0.5f));
glBindVertexArray (quadVAO);
glDrawArrays (GL_TRIANGLES, 0, 6);
The transparent shader is where half the work is done. It's primarily a shader that collects pixel information for our composite pass:
// shader outputs
layout (location = 0) out vec4 accum;
layout (location = 1) out float reveal;

// material color
uniform vec4 color;

void main()
{
    // weight function
    float weight = clamp(pow(min(1.0, color.a * 10.0) + 0.01, 3.0) * 1e8 *
                         pow(1.0 - gl_FragCoord.z * 0.9, 3.0), 1e-2, 3e3);

    // store pixel color accumulation
    accum = vec4(color.rgb * color.a, color.a) * weight;

    // store pixel revealage threshold
    reveal = color.a;
}
Note that, we are directly using the color passed to the shader as our final fragment color. Normally, if you are in a lighting shader, you want to use the final result of the lighting to store in accumulation and revealage render targets.
Now that everything has been rendered, we have to
In OpenGL, we can achieve this by color blending feature:
// set render states
glDepthFunc (GL_ALWAYS);
glEnable (GL_BLEND);
glBlendFunc (GL_SRC_ALPHA, GL_ONE_MINUS_SRC_ALPHA);
// bind opaque framebuffer
glBindFramebuffer (GL_FRAMEBUFFER, opaqueFBO);
// use composite shader
compositeShader.use();
// draw screen quad
glActiveTexture (GL_TEXTURE0);
glBindTexture (GL_TEXTURE_2D, accumTexture);
glActiveTexture (GL_TEXTURE1);
glBindTexture (GL_TEXTURE_2D, revealTexture);
glBindVertexArray (quadVAO);
glDrawArrays (GL_TRIANGLES, 0, 6);
Composite shader is where the other half of the work is done. We're basically merging two layers, one being the solid objects image and the other being the transparent objects image. Accumulation buffer tells us about the color and revealage buffer determines the visibility of the the underlying pixel:
// shader outputs
layout (location = 0) out vec4 frag;

// color accumulation buffer
layout (binding = 0) uniform sampler2D accum;

// revealage threshold buffer
layout (binding = 1) uniform sampler2D reveal;

// epsilon number
const float EPSILON = 0.00001f;

// calculate floating point numbers equality accurately
bool isApproximatelyEqual(float a, float b)
{
    return abs(a - b) <= (abs(a) < abs(b) ? abs(b) : abs(a)) * EPSILON;
}

// get the max value between three values
float max3(vec3 v)
{
    return max(max(v.x, v.y), v.z);
}

void main()
{
    // fragment coordination
    ivec2 coords = ivec2(gl_FragCoord.xy);

    // fragment revealage
    float revealage = texelFetch(reveal, coords, 0).r;

    // save the blending and color texture fetch cost if there is not a transparent fragment
    if (isApproximatelyEqual(revealage, 1.0f))
        discard;

    // fragment color
    vec4 accumulation = texelFetch(accum, coords, 0);

    // suppress overflow
    if (isinf(max3(abs(accumulation.rgb))))
        accumulation.rgb = vec3(accumulation.a);

    // prevent floating point precision bug
    vec3 average_color = accumulation.rgb / max(accumulation.a, EPSILON);

    // blend pixels
    frag = vec4(average_color, 1.0f - revealage);
}
Note that, we are using some helper functions like
Also, we don't need an intermediate framebuffer to do compositing. We can use our opaque framebuffer as the base framebuffer and paint over it since it already has the opaque pass information. Plus, we're stating that all depth tests should pass since we want to paint over the opaque image.
Finally, draw your composited image (which is the opaque texture attachment since you rendered your transparent image over it in the last pass) onto the backbuffer and observe the result.
// set render states
glDisable(GL_DEPTH);
glDepthMask (GL_TRUE); // enable depth writes so glClear won't ignore clearing the depth buffer
glDisable(GL_BLEND);
// bind backbuffer
glBindFramebuffer (GL_FRAMEBUFFER, 0);
glClear ColorglClear (GL_COLOR_BUFFER_BIT | GL_DEPTH_BUFFER_BIT | GL_STENCIL_BUFFER_BIT);
// use screen shader
screenShader.use();
// draw final screen quad
glActiveTexture (GL_TEXTURE0);
glBindTexture (GL_TEXTURE_2D, opaqueTexture);
glBindVertexArray (quadVAO);
glDrawArrays (GL_TRIANGLES, 0, 6);
Screen shader is just a simple post-processing shader which draws a full-screen quad.
In a regular pipeline, you would also apply gamma-correction, tone-mapping, etc. in an intermediate post-processing framebuffer before you render to backbuffer, but ensure you are not applying them while rendering your solid and transparent surfaces and also not before composition since this transparency technique needs raw color values for calculating transparent pixels.
Now, the interesting part is to play with the Z axis of your objects to see order-independence in action. Try to place your transparent objects behind the solid object or mess up the orders entirely.
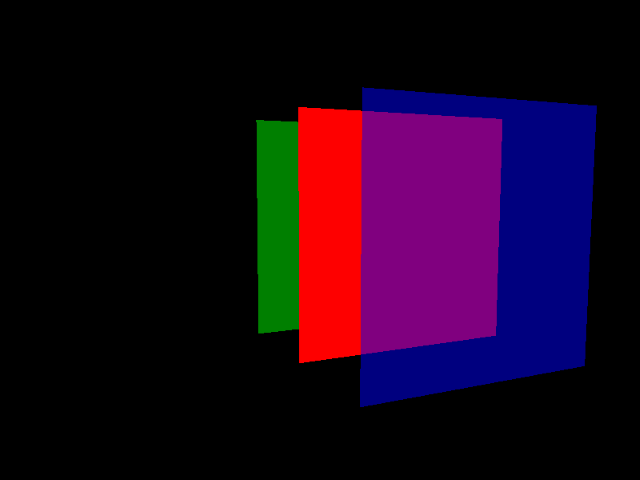
In the image above, the green quad is rendered after the red quad, but behind it, and if you move the camera around to see the green quad from behind, you won't see any artifacts.
As stated earlier, one limitation that this technique imposes is that for scenes with higher depth/alpha complexity we need to tune the weighting function to achieve the correct result. Luckily, a number of tested weighting functions are provided in the paper which you can refer and investigate them for your environment.
Be sure to also check the colored transmission transparency which is the improved version of this technique in the links below.
You can find the source code for this demo here.
Further reading
- Weighted, Blended paper: The original paper published in the journal of computer graphics. A brief history of the transparency and the emergence of the technique itself is provided. This is a must for the dedicated readers.
- Weighted, Blended introduction: Casual Effects is Morgan McGuire's personal blog. This post is the introduction of their technique which goes into further details and is definitely worth to read. Plus, there are videos of their implementation live in action that you would not want to miss.
- Weighted, Blended for implementors: And also another blog post by him on implementing the technique for implementors.
- Weighted, Blended and colored transmission: And another blog post on colored transmission for transparent surfaces.
- A live implementation of the technique: This is a live WebGL visualization from Cesium engine which accepts weighting functions for you to test in your browser!
Contact: e-mail


