


Instancing
Advanced-OpenGL/Instancing
Say you have a scene where you're drawing a lot of models where most of these models contain the same set of vertex data, but with different world transformations. Think of a scene filled with grass leaves: each grass leave is a small model that consists of only a few triangles. You'll probably want to draw quite a few of them and your scene may end up with thousands or maybe tens of thousands of grass leaves that you need to render each frame. Because each leaf is only a few triangles, the leaf is rendered almost instantly. However, the thousands of render calls you'll have to make will drastically reduce performance.
If we were to actually render such a large amount of objects it will look a bit like this in code:
for(unsigned int i = 0; i < amount_of_models_to_draw; i++)
{
DoSomePreparations(); // bind VAO, bind textures, set uniforms etc.
glDrawArrays (GL_TRIANGLES, 0, amount_of_vertices);
}
When drawing many
It would be much more convenient if we could send data over to the GPU once, and then tell OpenGL to draw multiple objects using this data with a single drawing call. Enter
Instancing is a technique where we draw many (equal mesh data) objects at once with a single render call, saving us all the CPU -> GPU communications each time we need to render an object. To render using instancing all we need to do is change the render calls
By itself this function is a bit useless. Rendering the same object a thousand times is of no use to us since each of the rendered objects is rendered exactly the same and thus also at the same location; we would only see one object! For this reason GLSL added another built-in variable in the vertex shader called gl_InstanceID.
When drawing with one of the instanced rendering calls, gl_InstanceID is incremented for each instance being rendered starting from 0. If we were to render the 43th instance for example, gl_InstanceID would have the value 42 in the vertex shader. Having a unique value per instance means we could now for example index into a large array of position values to position each instance at a different location in the world.
To get a feel for instanced drawing we're going to demonstrate a simple example that renders a hundred 2D quads in normalized device coordinates with just one render call. We accomplish this by uniquely positioning each instanced quad by indexing a uniform array of 100 offset vectors. The result is a neatly organized grid of quads that fill the entire window:
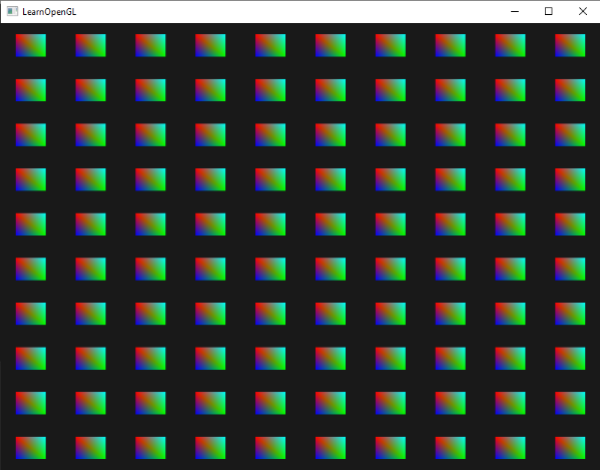
Each quad consists of 2 triangles with a total of 6 vertices. Each vertex contains a 2D NDC position vector and a color vector. Below is the vertex data used for this example - the triangles are small enough to properly fit the screen when there's a 100 of them:
float quadVertices[] = {
    // positions     // colors
    -0.05f,  0.05f,  1.0f, 0.0f, 0.0f,
     0.05f, -0.05f,  0.0f, 1.0f, 0.0f,
    -0.05f, -0.05f,  0.0f, 0.0f, 1.0f,

    -0.05f,  0.05f,  1.0f, 0.0f, 0.0f,
     0.05f, -0.05f,  0.0f, 1.0f, 0.0f,
     0.05f,  0.05f,  0.0f, 1.0f, 1.0f
};
The quads are colored in the fragment shader that receives a color vector from the vertex shader and sets it as its output:
#version 330 core
out vec4 FragColor;

in vec3 fColor;

void main()
{
    FragColor = vec4(fColor, 1.0);
}
Nothing new so far, but at the vertex shader it's starting to get interesting:
#version 330 core
layout (location = 0) in vec2 aPos;
layout (location = 1) in vec3 aColor;

out vec3 fColor;

uniform vec2 offsets[100];

void main()
{
    vec2 offset = offsets[gl_InstanceID];
    gl_Position = vec4(aPos + offset, 0.0, 1.0);
    fColor = aColor;
}
Here we defined a uniform array called offsets that contain a total of 100 offset vectors. Within the vertex shader we retrieve an offset vector for each instance by indexing the offsets array using gl_InstanceID. If we now were to draw 100 quads with instanced drawing we'd get 100 quads located at different positions.
We do need to actually set the offset positions that we calculate in a nested for-loop before we enter the render loop:
glm::vec2 translations[100];
int index = 0;
float offset = 0.1f;
for(int y = -10; y < 10; y += 2)
{
    for(int x = -10; x < 10; x += 2)
    {
        glm::vec2 translation;
        translation.x = (float)x / 10.0f + offset;
        translation.y = (float)y / 10.0f + offset;
        translations[index++] = translation;
    }
}
Here we create a set of 100 translation vectors that contains an offset vector for all positions in a 10x10 grid. In addition to generating the translations array, we'd also need to transfer the data to the vertex shader's uniform array:
shader.use();
for(unsigned int i = 0; i < 100; i++)
{
    shader.setVec2(("offsets[" + std::to_string(i) + "]")), translations[i]);
}
Within this snippet of code we transform the for-loop counter i to a
Now that all the preparations are finished we can start rendering the quads. To draw via instanced rendering we call
glBindVertexArray (quadVAO);
glDrawArrays Instanced
The parameters of 100 quads in a 10x10 grid we set it equal to 100. Running the code should now give you the familiar image of 100 colorful quads.
Instanced arrays
While the previous implementation works fine for this specific use case, whenever we are rendering a lot more than 100 instances (which is quite common) we will eventually hit a limit on the amount of uniform data we can send to the shaders. One alternative option is known as
With vertex attributes, at the start of each run of the vertex shader, the GPU will retrieve the next set of vertex attributes that belong to the current vertex. When defining a vertex attribute as an instanced array however, the vertex shader only updates the content of the vertex attribute per instance. This allows us to use the standard vertex attributes for data per vertex and use the instanced array for storing data that is unique per instance.
To give you an example of an instanced array we're going to take the previous example and convert the offset uniform array to an instanced array. We'll have to update the vertex shader by adding another vertex attribute:
#version 330 core
layout (location = 0) in vec2 aPos;
layout (location = 1) in vec3 aColor;
layout (location = 2) in vec2 aOffset;

out vec3 fColor;

void main()
{
    gl_Position = vec4(aPos + aOffset, 0.0, 1.0);
    fColor = aColor;
}
We no longer use gl_InstanceID and can directly use the offset attribute without first indexing into a large uniform array.
Because an instanced array is a vertex attribute, just like the position and color variables, we need to store its content in a vertex buffer object and configure its attribute pointer. We're first going to store the translations array (from the previous section) in a new buffer object:
unsigned int instanceVBO;
glGenBuffers (1, &instanceVBO);
glBindBuffer (GL_ARRAY_BUFFER, instanceVBO);
glBufferData (GL_ARRAY_BUFFER, sizeof(glm::vec2) * 100, &translations[0], GL_STATIC_DRAW);
glBindBuffer (GL_ARRAY_BUFFER, 0);
Then we also need to set its vertex attribute pointer and enable the vertex attribute:
glEnable VertexAttribArrayglBindBuffer (GL_ARRAY_BUFFER, instanceVBO);
glVertexAttribPointer (2, 2, GL_FLOAT, GL_FALSE, 2 * sizeof(float), (void*)0);
glBindBuffer (GL_ARRAY_BUFFER, 0);
glVertexAttribDivisor (2, 1);
What makes this code interesting is the last line where we call 0 which tells OpenGL to update the content of the vertex attribute each iteration of the vertex shader. By setting this attribute to 1 we're telling OpenGL that we want to update the content of the vertex attribute when we start to render a new instance. By setting it to 2 we'd update the content every 2 instances and so on. By setting the attribute divisor to 1 we're effectively telling OpenGL that the vertex attribute at attribute location 2 is an instanced array.
If we now were to render the quads again with
This is exactly the same as the previous example, but now with instanced arrays, which allows us to pass a lot more data (as much as memory allows us) to the vertex shader for instanced drawing.
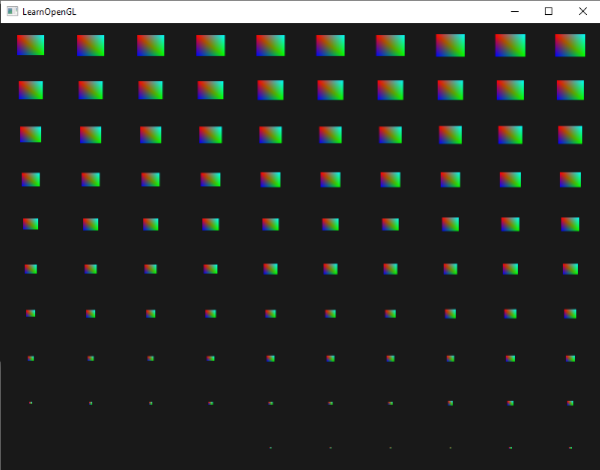
For fun we could slowly downscale each quad from top-right to bottom-left using gl_InstanceID again, because why not?
void main()
{
    vec2 pos = aPos * (gl_InstanceID / 100.0);
    gl_Position = vec4(pos + aOffset, 0.0, 1.0);
    fColor = aColor;
}
The result is that the first instances of the quads are drawn extremely small and the further we're in the process of drawing the instances, the closer gl_InstanceID gets to 100 and thus the more the quads regain their original size. It's perfectly legal to use instanced arrays together with gl_InstanceID like this.
If you're still a bit unsure about how instanced rendering works or want to see how everything fits together you can find the full source code of the application here.
While fun and all, these examples aren't really good examples of instancing. Yes, they do give you an easy overview of how instancing works, but instancing gets most of its power when drawing an enormous amount of similar objects. For that reason we're going to venture into space.
An asteroid field
Imagine a scene where we have one large planet that's at the center of a large asteroid ring. Such an asteroid ring could contain thousands or tens of thousands of rock formations and quickly becomes un-renderable on any decent graphics card. This scenario proves itself particularly useful for instanced rendering, since all the asteroids can be represented with a single model. Each single asteroid then gets its variation from a transformation matrix unique to each asteroid.
To demonstrate the impact of instanced rendering we're first going to render a scene of asteroids hovering around a planet without instanced rendering. The scene will contain a large planet model that can be downloaded from here and a large set of asteroid rocks that we properly position around the planet. The asteroid rock model can be downloaded here.
Within the code samples we load the models using the model loader we've previously defined in the model loading chapters.
To achieve the effect we're looking for we'll be generating a model transformation matrix for each asteroid. The transformation matrix first translates the rock somewhere in the asteroid ring - then we'll add a small random displacement value to the offset to make the ring look more natural. From there we also apply a random scale and a random rotation. The result is a transformation matrix that translates each asteroid somewhere around the planet while also giving it a more natural and unique look compared to the other asteroids.
unsigned int amount = 1000;
glm::mat4 *modelMatrices;
modelMatrices = new glm::mat4[amount];
srand(glfwGetTime ()); // initialize random seed
float radius = 50.0;
float offset = 2.5f;
for(unsigned int i = 0; i < amount; i++)
{
glm::mat4 model = glm::mat4(1.0f);
// 1. translation: displace along circle with 'radius' in range [-offset, offset]
float angle = (float)i / (float)amount * 360.0f;
float displacement = (rand() % (int)(2 * offset * 100)) / 100.0f - offset;
float x = sin(angle) * radius + displacement;
displacement = (rand() % (int)(2 * offset * 100)) / 100.0f - offset;
float y = displacement * 0.4f; // keep height of field smaller compared to width of x and z
displacement = (rand() % (int)(2 * offset * 100)) / 100.0f - offset;
float z = cos(angle) * radius + displacement;
model = glm::translate (model, glm::vec3(x, y, z));
// 2. scale: scale between 0.05 and 0.25f
float scale = (rand() % 20) / 100.0f + 0.05;
model = glm::scale (model, glm::vec3(scale));
// 3. rotation: add random rotation around a (semi)randomly picked rotation axis vector
float rotAngle = (rand() % 360);
model = glm::rotate (model, rotAngle, glm::vec3(0.4f, 0.6f, 0.8f));
// 4. now add to list of matrices
modelMatrices[i] = model;
}
This piece of code may look a little daunting, but we basically transform the x and z position of the asteroid along a circle with a radius defined by radius and randomly displace each asteroid a little around the circle by -offset and offset. We give the y displacement less of an impact to create a more flat asteroid ring. Then we apply scale and rotation transformations and store the resulting transformation matrix in modelMatrices that is of size amount. Here we generate 1000 model matrices, one per asteroid.
After loading the planet and rock models and compiling a set of shaders, the rendering code then looks a bit like this:
// draw planet
shader.use();
glm::mat4 model = glm::mat4(1.0f);
model = glm::translate (model, glm::vec3(0.0f, -3.0f, 0.0f));
model = glm::scale (model, glm::vec3(4.0f, 4.0f, 4.0f));
shader.setMat4("model", model);
planet.Draw(shader);
// draw meteorites
for(unsigned int i = 0; i < amount; i++)
{
shader.setMat4("model", modelMatrices[i]);
rock.Draw(shader);
}
First we draw the planet model, that we translate and scale a bit to accommodate the scene, and then we draw a number of rock models equal to the amount of transformations we generated previously. Before we draw each rock however, we first set the corresponding model transformation matrix within the shader.
The result is then a space-like scene where we can see a natural-looking asteroid ring around a planet:
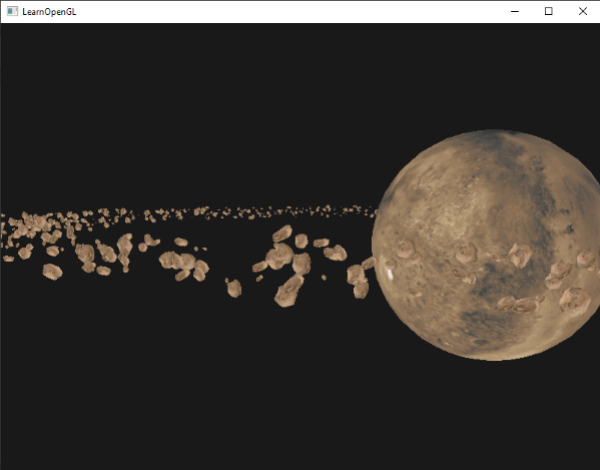
This scene contains a total of 1001 rendering calls per frame of which 1000 are of the rock model. You can find the source code for this scene here.
As soon as we start to increase this number we will quickly notice that the scene stops running smoothly and the number of frames we're able to render per second reduces drastically. As soon as we set amount to something close to 2000 the scene already becomes so slow on our GPU that it becomes difficult to move around.
Let's now try to render the same scene, but this time with instanced rendering. We first need to adjust the vertex shader a little:
#version 330 core
layout (location = 0) in vec3 aPos;
layout (location = 2) in vec2 aTexCoords;
layout (location = 3) in mat4 instanceMatrix;

out vec2 TexCoords;

uniform mat4 projection;
uniform mat4 view;

void main()
{
    gl_Position = projection * view * instanceMatrix * vec4(aPos, 1.0);
    TexCoords = aTexCoords;
}
We're no longer using a model uniform variable, but instead declare a 3, the columns of the matrix will have vertex attribute locations of 3, 4, 5, and 6.
We then have to set each of the attribute pointers of those 4 vertex attributes and configure them as instanced arrays:
// vertex buffer object
unsigned int buffer;
glGenBuffers (1, &buffer);
glBindBuffer (GL_ARRAY_BUFFER, buffer);
glBufferData (GL_ARRAY_BUFFER, amount * sizeof(glm::mat4), &modelMatrices[0], GL_STATIC_DRAW);
for(unsigned int i = 0; i < rock.meshes.size(); i++)
{
unsigned int VAO = rock.meshes[i].VAO;
glBindVertexArray (VAO);
// vertex attributes
std::size_t vec4Size = sizeof(glm::vec4);
glEnable VertexAttribArrayglVertexAttribPointer (3, 4, GL_FLOAT, GL_FALSE, 4 * vec4Size, (void*)0);
glEnable VertexAttribArrayglVertexAttribPointer (4, 4, GL_FLOAT, GL_FALSE, 4 * vec4Size, (void*)(1 * vec4Size));
glEnable VertexAttribArrayglVertexAttribPointer (5, 4, GL_FLOAT, GL_FALSE, 4 * vec4Size, (void*)(2 * vec4Size));
glEnable VertexAttribArrayglVertexAttribPointer (6, 4, GL_FLOAT, GL_FALSE, 4 * vec4Size, (void*)(3 * vec4Size));
glVertexAttribDivisor (3, 1);
glVertexAttribDivisor (4, 1);
glVertexAttribDivisor (5, 1);
glVertexAttribDivisor (6, 1);
glBindVertexArray (0);
}
Note that we cheated a little by declaring the VAO variable of the
Next we take the VAO of the mesh(es) again and this time draw using
// draw meteorites
instanceShader.use();
for(unsigned int i = 0; i < rock.meshes.size(); i++)
{
glBindVertexArray (rock.meshes[i].VAO);
glDrawElements Instanced
Here we draw the same amount of asteroids as the previous example, but this time with instanced rendering. The results should be exactly the same, but once we increase the amount you'll really start to see the power of instanced rendering. Without instanced rendering we were able to smoothly render around 1000 to 1500 asteroids. With instanced rendering we can now set this value to 100000. This, with the rock model having 576 vertices, would equal around 57 million vertices drawn each frame without significant performance drops; and only 2 draw calls!
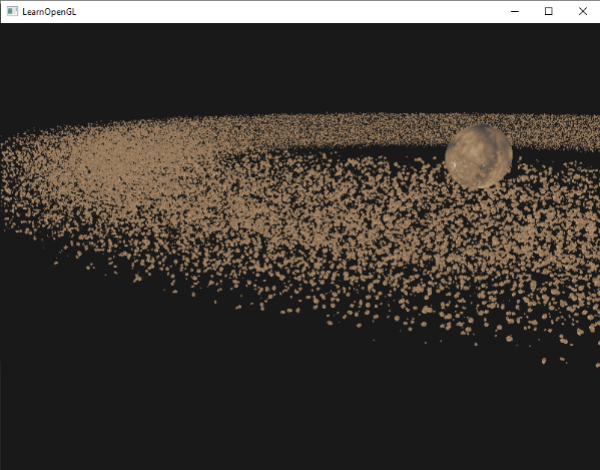
This image was rendered with 100000 asteroids with a radius of 150.0f and an offset equal to 25.0f. You can find the source code of the instanced rendering demo here.
100000 may be a bit too high, so try tweaking the values till you reach an acceptable framerate.
As you can see, with the right type of environments, instanced rendering can make an enormous difference to the rendering capabilities of your application. For this reason, instanced rendering is commonly used for grass, flora, particles, and scenes like this - basically any scene with many repeating shapes can benefit from instanced rendering.