Height map
height-map
Tessellation Chapter I: Rendering Terrain using Height Maps
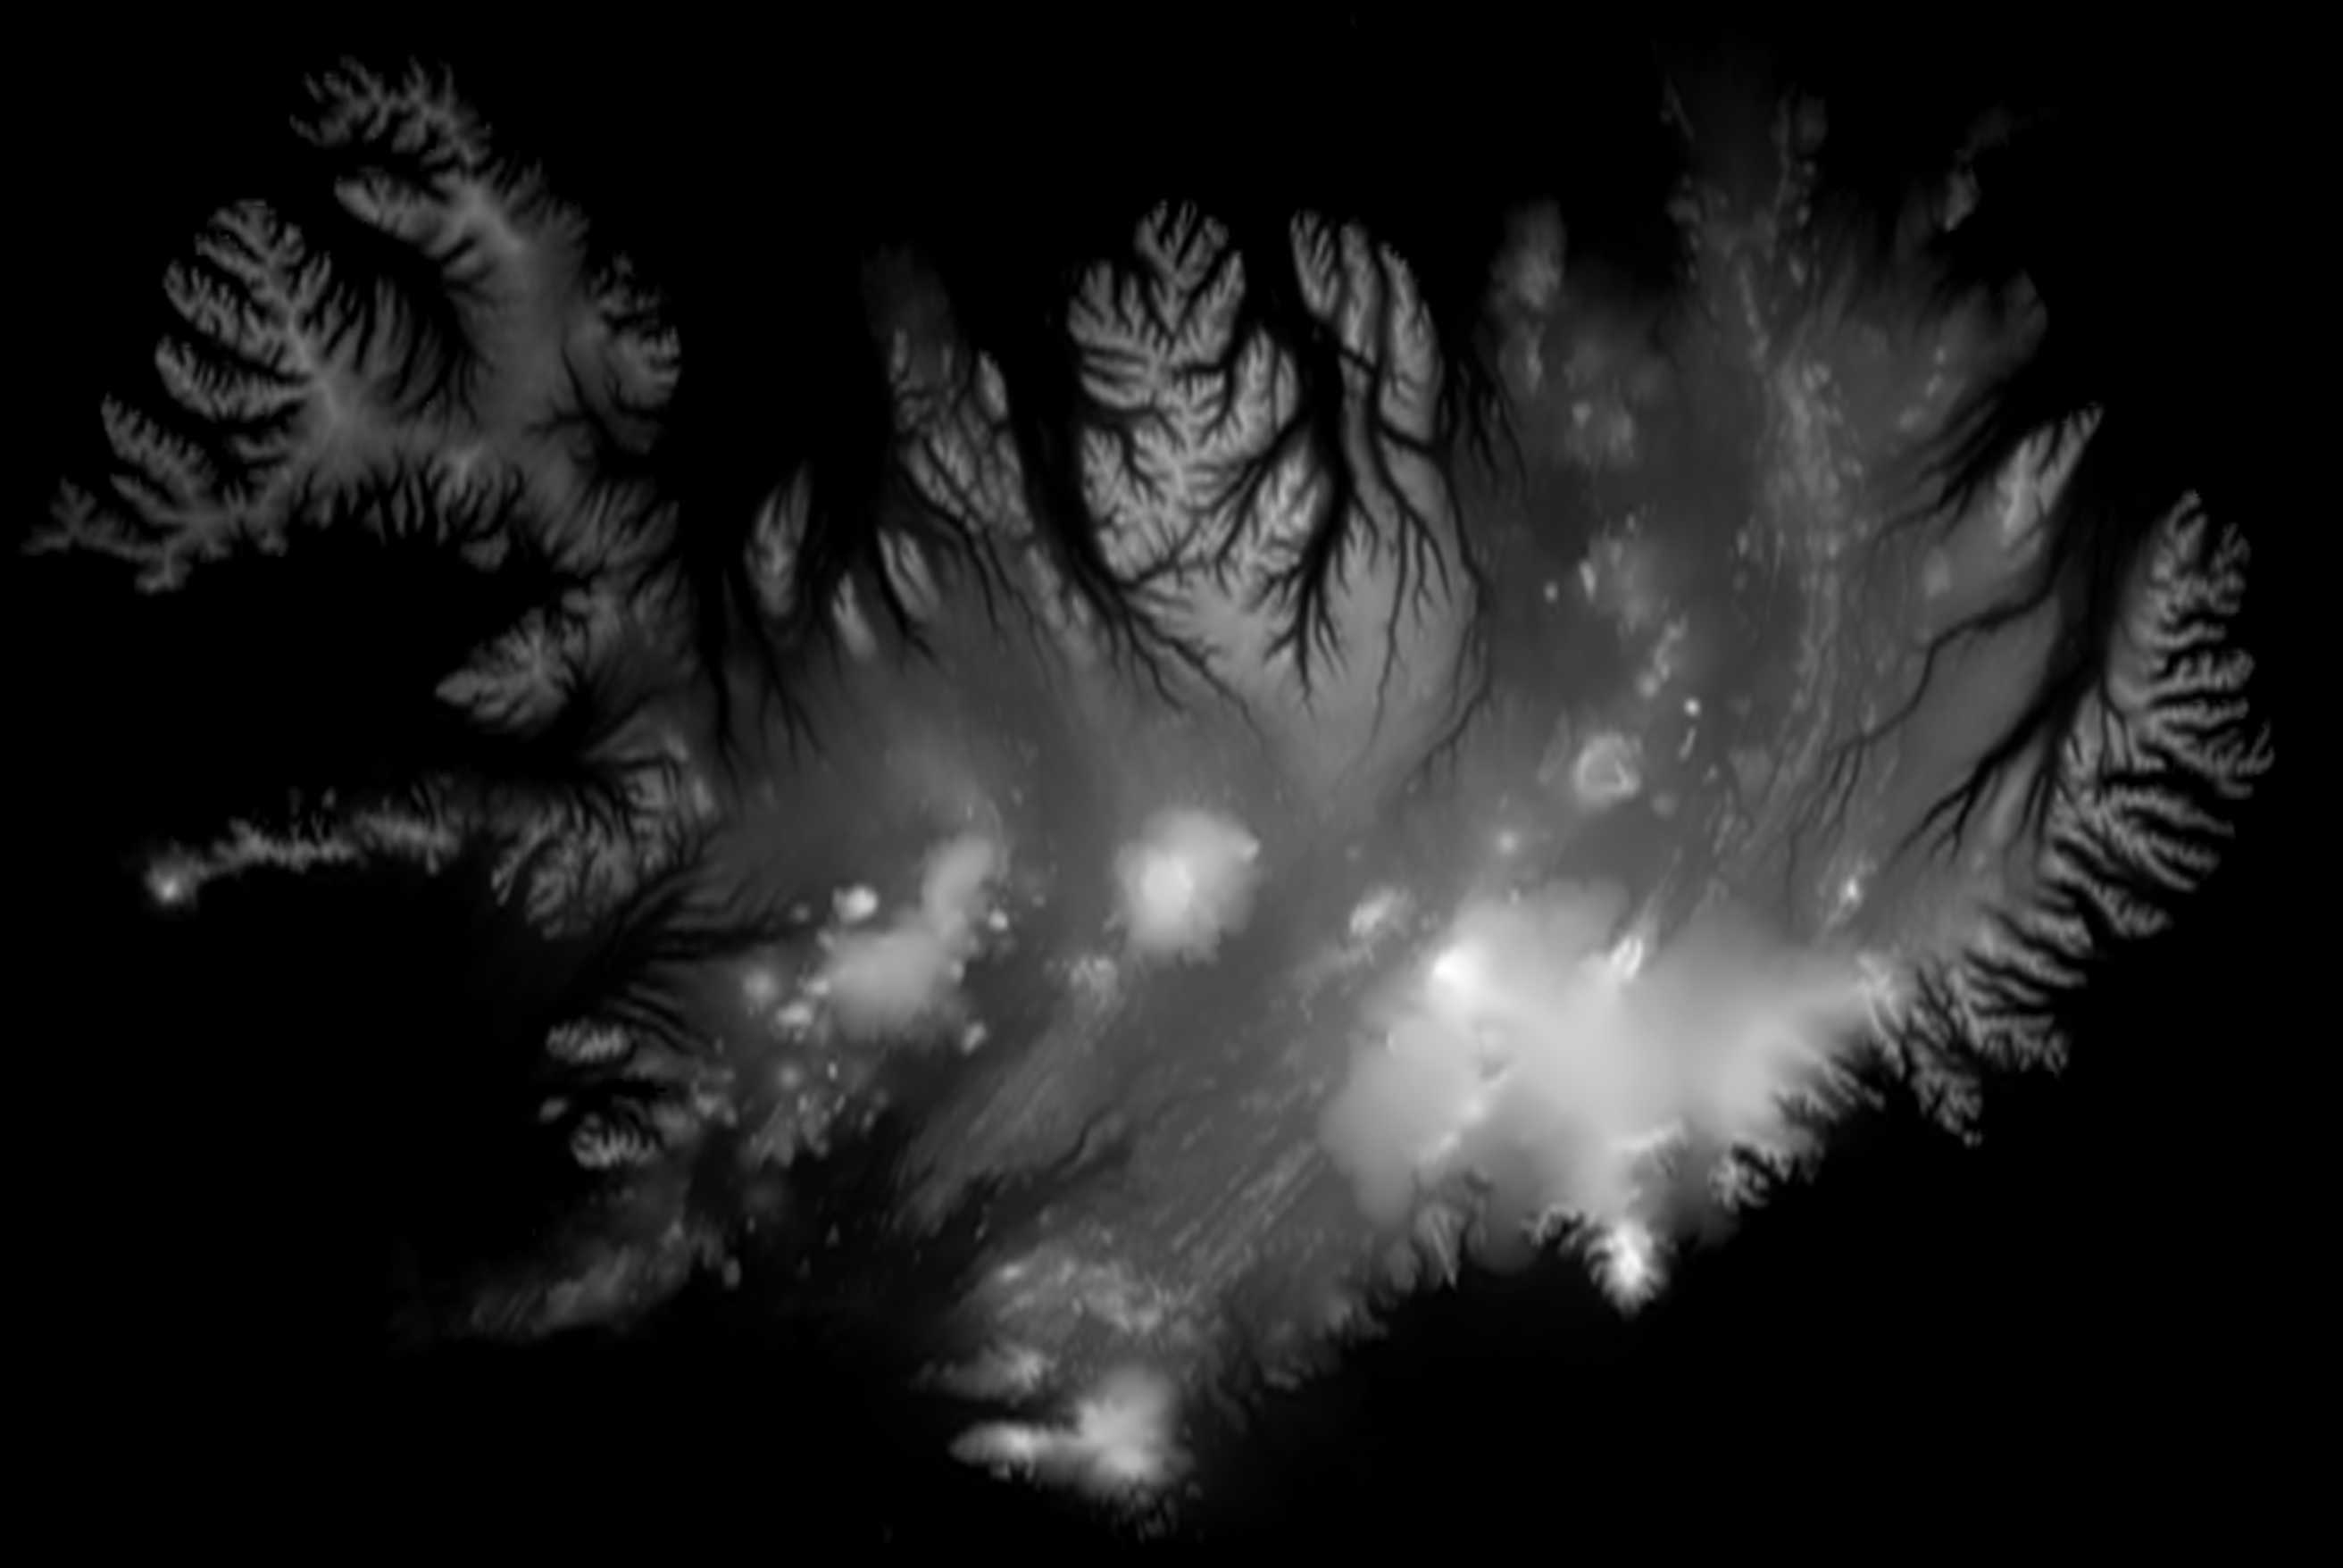
When terrain (without any caves or overhangs) is being rendered, a mesh can be perturbed based on a height map. The height map is a grayscale image with the texel value corresponding to the distance a vertex should be moved along its normal. In order to have highly detailed terrain it is necessary to have a high resolution mesh.
In this chapter we will render the corresponding terrain using a static method:
- Precomputing on the CPU a high resolution mesh
The next chapter will give us comparable results, greater control & flexibility, and better performance.
CPU Implementation
Below is a height map of Iceland used throughout this chapter. The height map was generated using Tangram Heightmapper.
We will read in the height map data into an array that stores the pixel data.
// load height map texture
int width, height, nChannels;
unsigned char *data = stbi_load("resources/heightmaps/iceland_heightmap.png",
                                &width, &height, &nChannels,
                                0);
We'll now generate a mesh that matches the resolution of our image. The above width * height * nChannels elements. Our mesh will then
be an array consisting of width x height vertices. For the sample height map
provided, this will result in a mesh of 1756 x 2624 vertices for a total of 4,607,744 vertices.
We'll use a width x height.
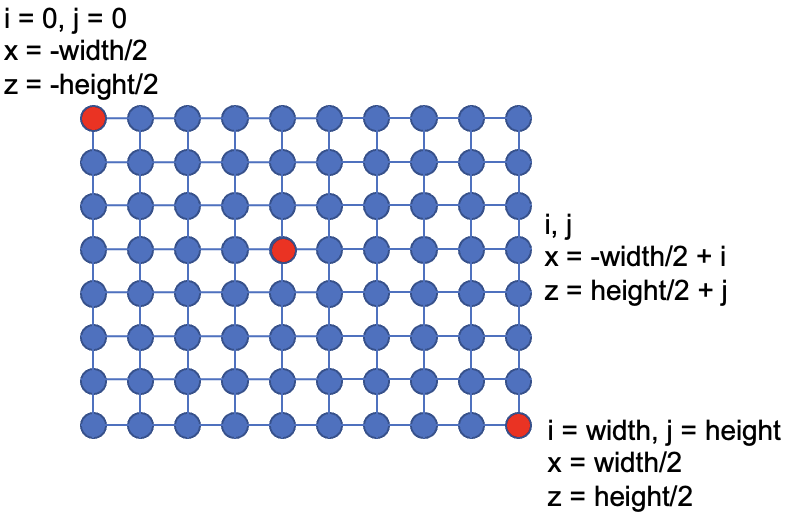
Each vertex will be one unit apart in model space. The vertex will then be displayed along the surface normal
(the Y-axis) based on the corresponding location from the height map. The following image helps visualize how the mesh
will be built up by a set of vertices.
We'll now populate each mesh vertex as follows.
// vertex generation
std::vector<float> vertices;
float yScale = 64.0f / 256.0f, yShift = 16.0f;  // apply a scale+shift to the height data
for(unsigned int i = 0; i < height; i++)
{
    for(unsigned int j = 0; j < width; j++)
    {
        // retrieve texel for (i,j) tex coord
        unsigned char* texel = data + (j + width * i) * nChannels;
        // raw height at coordinate
        unsigned char y = texel[0];

        // vertex
        vertices.push_back( -height/2.0f + i );        // v.x
        vertices.push_back( (int)y * yScale - yShift); // v.y
        vertices.push_back( -width/2.0f + j/ );        // v.z
    }
}
In the above code, the widht*height*3 elements. The two for loops go through each texel in the height map and
v.x = We'll have these range from-width/2towidth/2. This would correspond to the x dimension our ground would span in our scene.v.y = This is the height of each vertex to give our mesh elevation. They value we get out of our height map is within the range [0, 256]. We use theyScale to serve two purposes: (1) normalize the height map data to be within the range [0.0f, 1.0f] (2) scale it to the desired height we wish to work with. This now puts the values within the range [0.0f, 64.0f]. We finally apply a shift to translate the elevations to our final desired range, in this case [-16.0f, 48.0f]. You can choose the scale and shift you wish to apply based on your application.v.z = We'll have these range from-height/2toheight/2. This would correspond to the z dimension our ground would span in our scene.
After building up the vertex array, we can release the height map from memory.
stbi_image_free(data);
We'll ultimately render the mesh as a sequence of triangle strips, so we'll use an i across columns j.
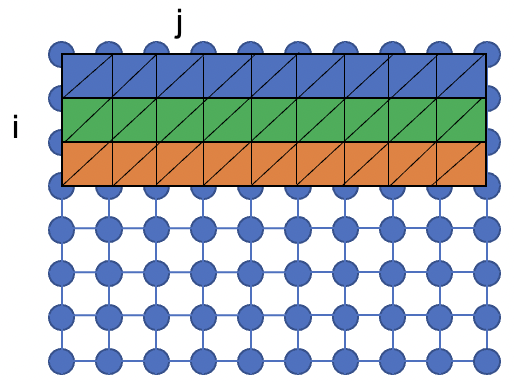
Each triangle strip has its vertices ordered by alternating from the top row to the bottom row.
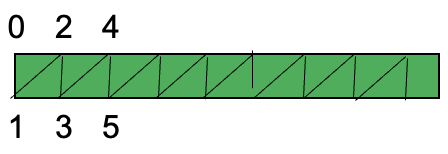
We can efficiently create a strip by alternating between row i and row i+1 as we sweep across all columns j.

The indices for each triangle strip is generated by the following tripley nested for loop.
// index generation
std::vector<unsigned int> indices;
for(unsigned int i = 0; i < height-1; i++)       // for each row a.k.a. each strip
{
    for(unsigned int j = 0; j < width; j++)      // for each column
    {
        for(unsigned int k = 0; k < 2; k++)      // for each side of the strip
        {
            indices.push_back(j + width * (i + k));
        }
    }
}
There are two values we need to know when rendering, so we'll compute these at this time. The first value is the number of strips to be rendered and the second value is the number of vertices per strip. These values directly correlate to the three loops above.
const unsigned int NUM_STRIPS = height-1;
const unsigned int NUM_VERTS_PER_STRIP = width*2;
Each strip will be comprised of NUM_VERTS_PER_STRIP - 2 triangles and our full mesh will contain
NUM_STRIPS * (NUM_VERTS_PER_STRIP - 2) triangles. The Iceland height map contains 1,755 strips with
5,246 triangles each for a total of 9,206,730 triangles!
With all of our mesh data now computed, we can set up our
// register VAO
GLuint terrainVAO, terrainVBO, terrainEBO;
glGenVertexArrays (1, &terrainVAO);
glBindVertexArray (terrainVAO);
glGenBuffers (1, &terrainVBO);
glBindBuffer (GL_ARRAY_BUFFER, terrainVBO);
glBufferData (GL_ARRAY_BUFFER,
vertices.size() * sizeof(float), // size of vertices buffer
&vertices[0], // pointer to first element
GL_STATIC_DRAW);
// position attribute
glVertexAttribPointer (0, 3, GL_FLOAT, GL_FALSE, 0, (void*)0);
glEnable VertexAttribArrayglGenBuffers (1, &terrainEBO);
glBindBuffer (GL_ELEMENT_ARRAY_BUFFER, terrainEBO);
glBufferData (GL_ELEMENT_ARRAY_BUFFER,
indices.size() * sizeof(unsigned int), // size of indices buffer
&indices[0], // pointer to first element
GL_STATIC_DRAW);
And finally it's time to render the mesh strip by strip.
// draw mesh
glBindVertexArray (terrainVAO);
// render the mesh triangle strip by triangle strip - each row at a time
for(unsigned int strip = 0; strip < NUM_STRIPS; ++strip)
{
glDrawElements (GL_TRIANGLE_STRIP, // primitive type
NUM_VERTS_PER_STRIP, // number of indices to render
GL_UNSIGNED_INT, // index data type
(void*)(sizeof(unsigned int)
* NUM_VERTS_PER_STRIP
* strip)); // offset to starting index
}
When rendering, we'll pass the y coordinate of our vertex from the vertex shader to the fragment shader. In the fragment shader, we'll then normalize this value (using the reverse shift & scale from above) to convert it into a grayscale value. The resulting terrain is displayed below from two different view points.
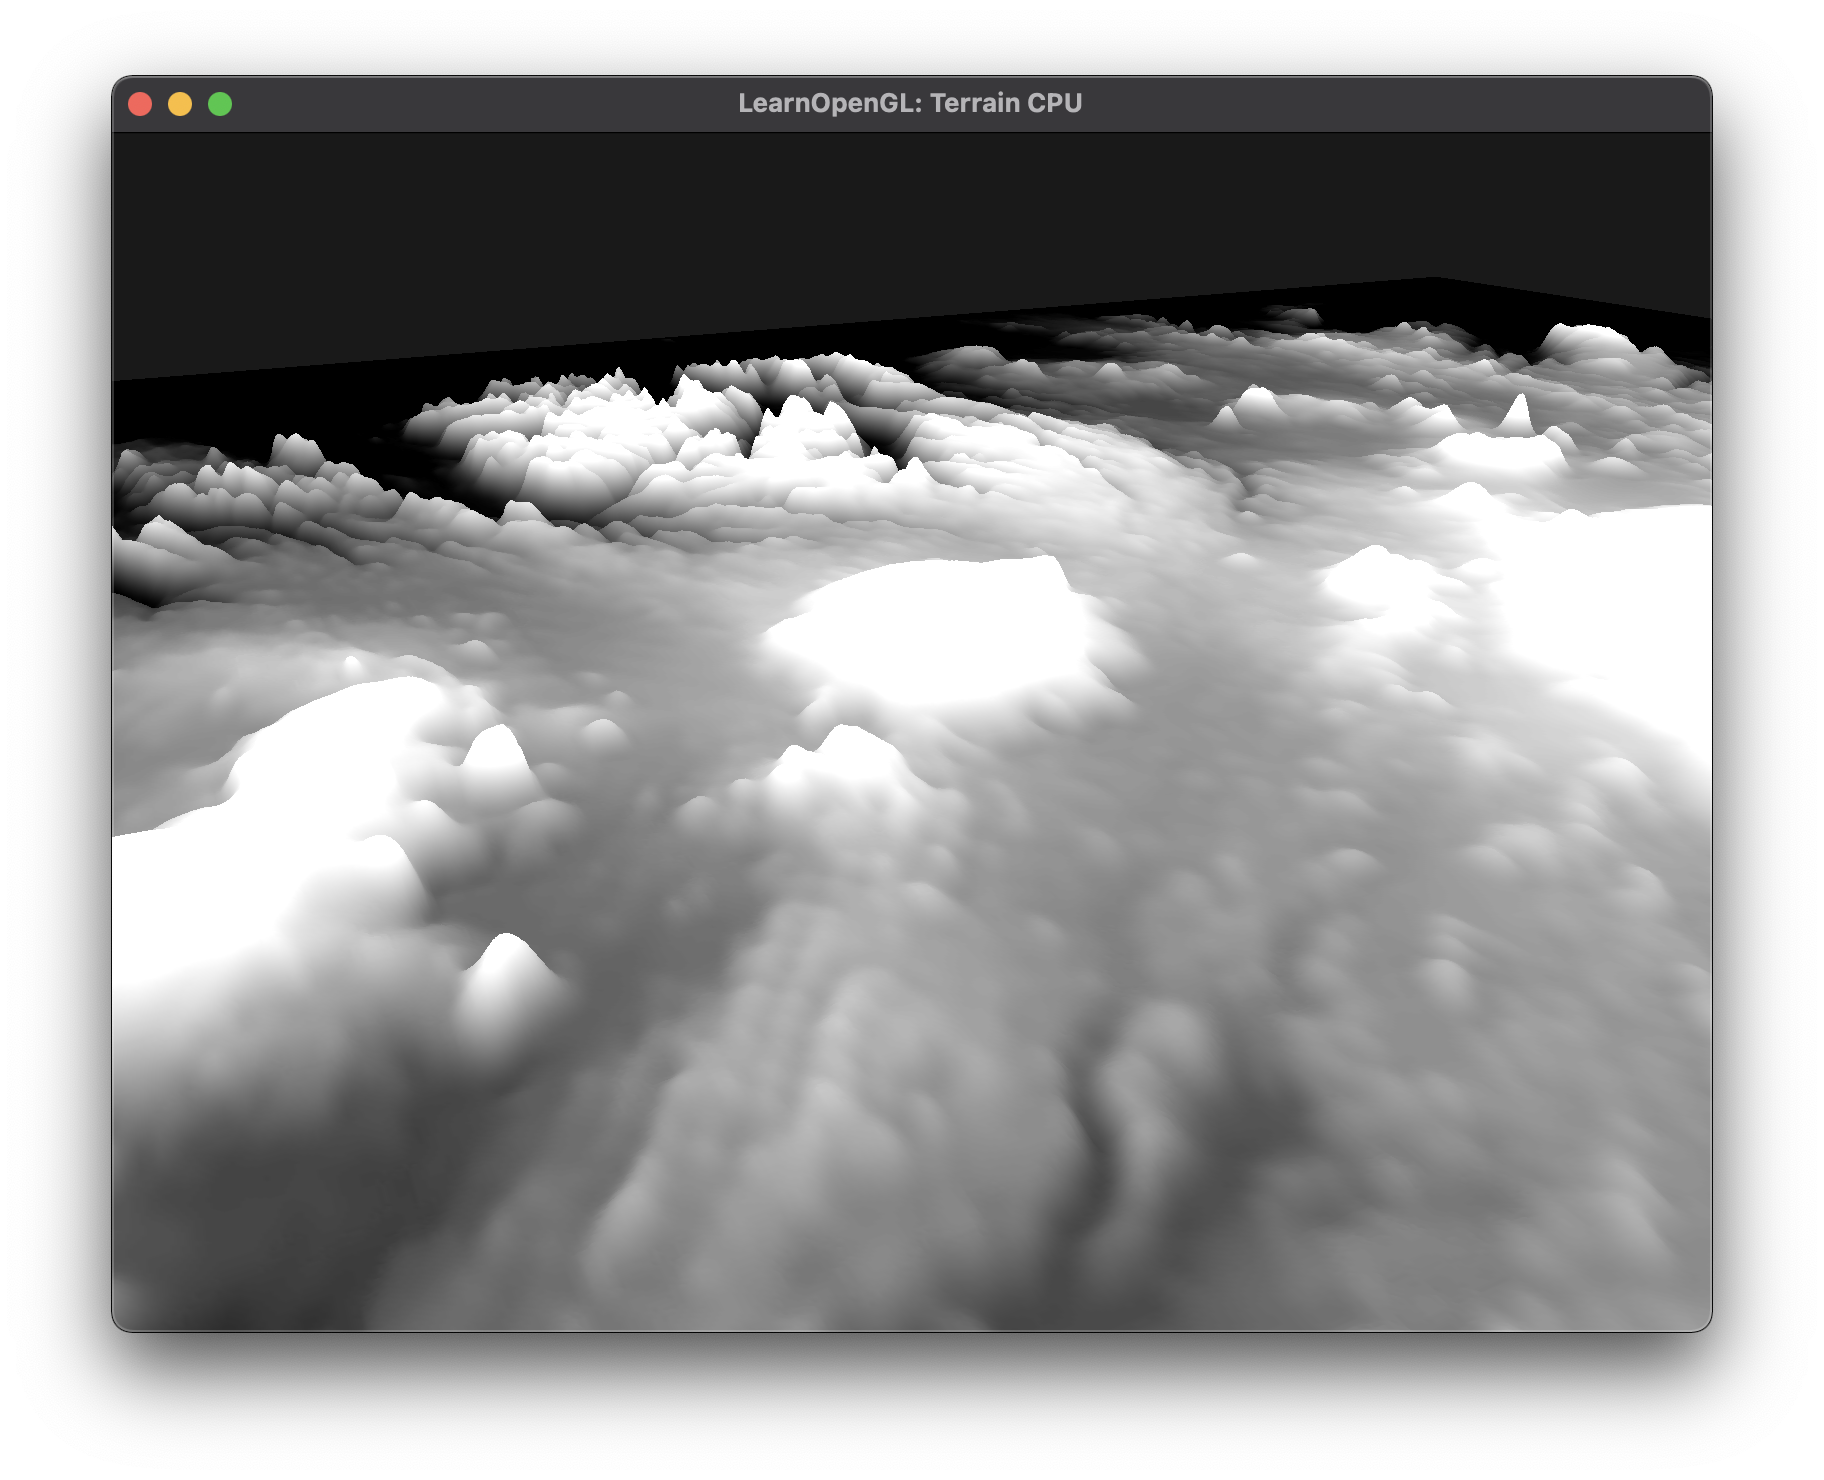
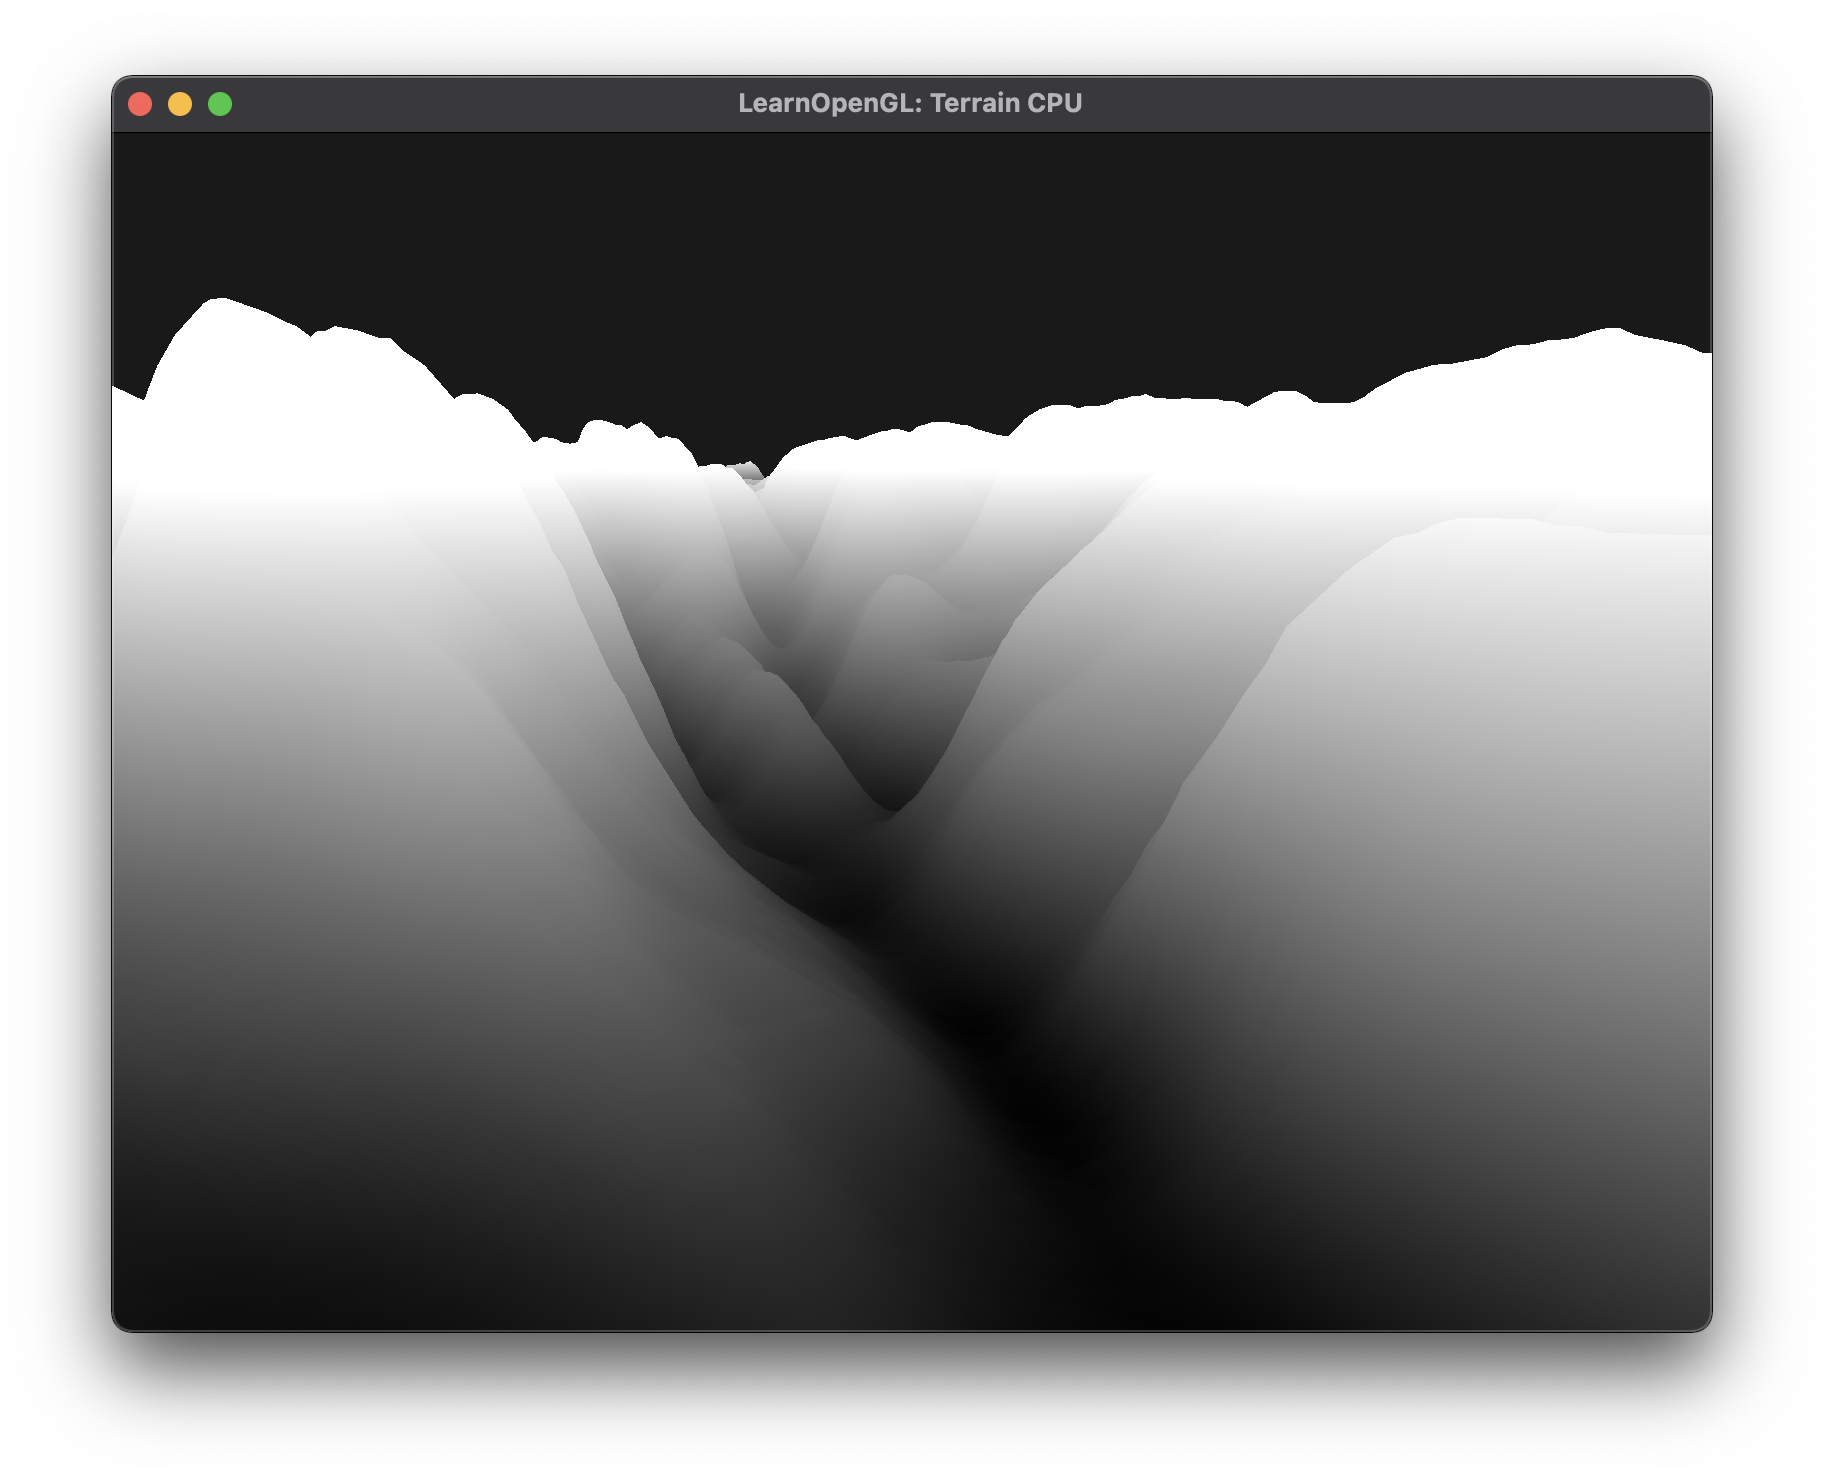
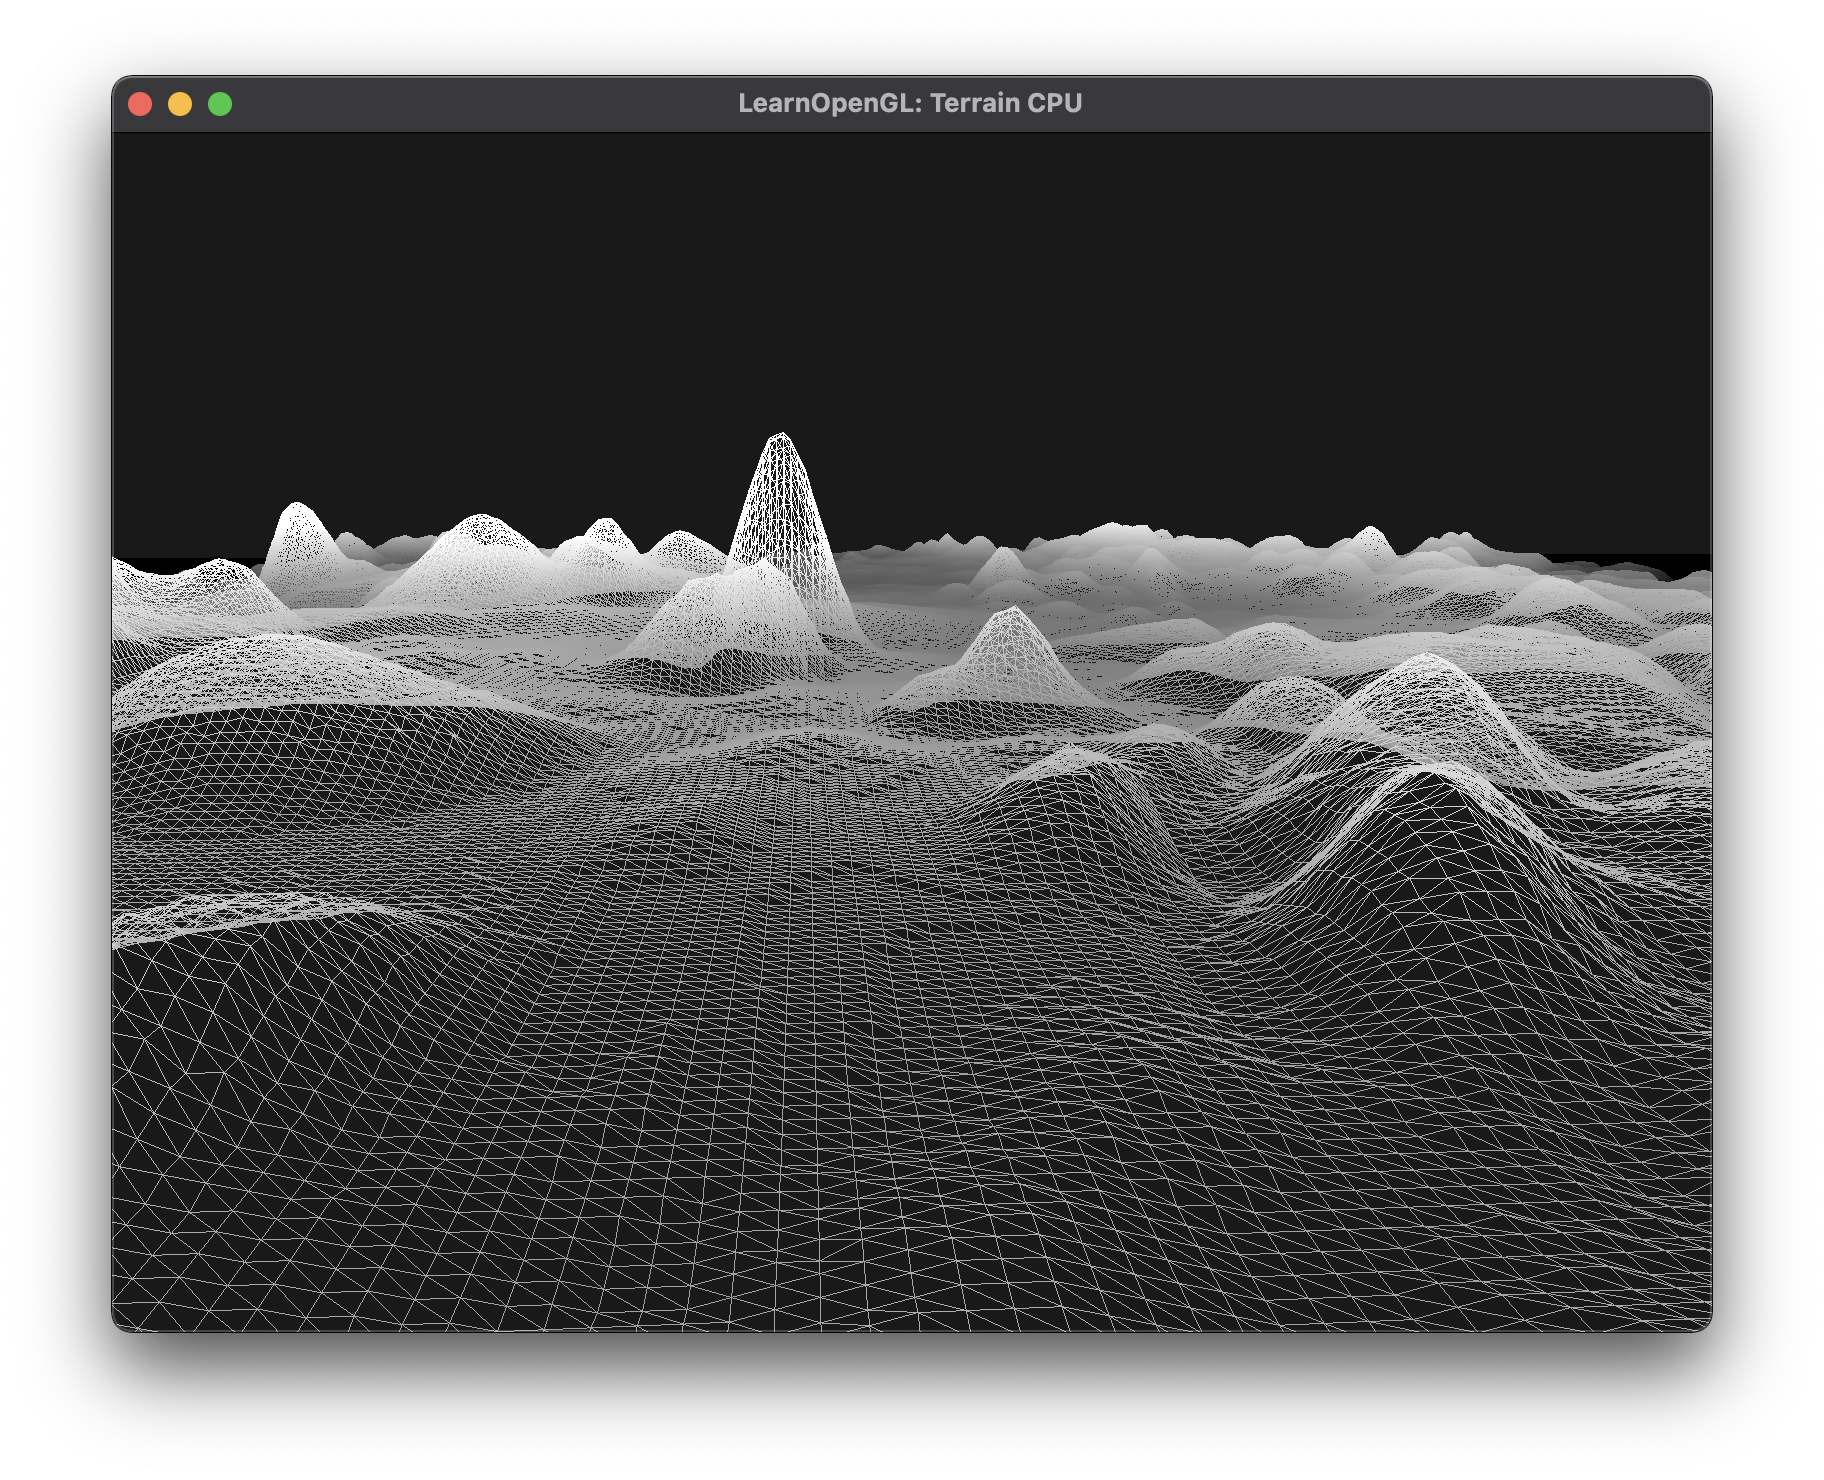
Below is a wireframe displaying the resolution of the mesh.
You can find the full source code for the CPU terrain height map demo here.
The above implementation works but has its deficiencies:
- The mesh generation is time intensive ( O(
n2) - Refer back to vertex generation and index generation). - The mesh storage is memory intensive to store the vertices and indices
(width * height * 3 * sizeof(float) + width * (height+1) * sizeof(unsigned int)- almost 72MB in our example). - The mesh has a fixed uniform resolution (
width * heightvertices and(height-1) * (width*2)triangles - 4,607,744 vertices and 9,206,730 triangles in our example). - The Vertex Shader needs to process a minimum of
width * heightvertices. - To draw the entire mesh, we need to have
height - 1draw calls.
In the next chapter, we'll offload the work to the GPU making use of tessellation shaders to improve the performance & memory footprint while also making the rendering adaptive to the necessary level of detail.
References
Contact: email


