


Model
Model-Loading/Model
Now it is time to get our hands dirty with Assimp and start creating the actual loading and translation code. The goal of this chapter is to create another class that represents a model in its entirety, that is, a model that contains multiple meshes, possibly with multiple textures. A house, that contains a wooden balcony, a tower, and perhaps a swimming pool, could still be loaded as a single model. We'll load the model via Assimp and translate it to multiple
Without further ado, I present you the class structure of the
class Model
{
    public:
        Model(char *path)
        {
            loadModel(path);
        }
        void Draw(Shader &shader);
    private:
        // model data
        vector<Mesh> meshes;
        string directory;

        void loadModel(string path);
        void processNode(aiNode *node, const aiScene *scene);
        Mesh processMesh(aiMesh *mesh, const aiScene *scene);
        vector<Texture> loadMaterialTextures(aiMaterial *mat, aiTextureType type,
                                             string typeName);
};
The
The
void Draw(Shader &shader)
{
    for(unsigned int i = 0; i < meshes.size(); i++)
        meshes[i].Draw(shader);
}
Importing a 3D model into OpenGL
To import a model and translate it to our own structure, we first need to include the appropriate headers of Assimp:
#include <assimp/Importer.hpp>
#include <assimp/scene.h>
#include <assimp/postprocess.h>
The first function we're calling is
The great thing about Assimp is that it neatly abstracts from all the technical details of loading all the different file formats and does all this with a single one-liner:
Assimp::Importer importer;
const aiScene *scene = importer.ReadFile(path, aiProcess_Triangulate | aiProcess_FlipUVs);
We first declare an
- aiProcess_GenNormals: creates normal vectors for each vertex if the model doesn't contain normal vectors.
- aiProcess_SplitLargeMeshes: splits large meshes into smaller sub-meshes which is useful if your rendering has a maximum number of vertices allowed and can only process smaller meshes.
- aiProcess_OptimizeMeshes: does the reverse by trying to join several meshes into one larger mesh, reducing drawing calls for optimization.
Mesh objects.
The complete
void loadModel(string path)
{
    Assimp::Importer import;
    const aiScene *scene = import.ReadFile(path, aiProcess_Triangulate | aiProcess_FlipUVs);

    if(!scene || scene->mFlags & AI_SCENE_FLAGS_INCOMPLETE || !scene->mRootNode)
    {
        cout << "ERROR::ASSIMP::" << import.GetErrorString() << endl;
        return;
    }
    directory = path.substr(0, path.find_last_of('/'));

    processNode(scene->mRootNode, scene);
}
After we load the model, we check if the scene and the root node of the scene are not null and check one of its flags to see if the returned data is incomplete. If any of these error conditions are met, we report the error retrieved from the importer's
If nothing went wrong, we want to process all of the scene's nodes. We pass the first node (root node) to the recursive
As you may remember from Assimp's structure, each node contains a set of mesh indices where each index points to a specific mesh located in the scene object. We thus want to retrieve these mesh indices, retrieve each mesh, process each mesh, and then do this all again for each of the node's children nodes. The content of the
void processNode(aiNode *node, const aiScene *scene)
{
    // process all the node's meshes (if any)
    for(unsigned int i = 0; i < node->mNumMeshes; i++)
    {
        aiMesh *mesh = scene->mMeshes[node->mMeshes[i]];
        meshes.push_back(processMesh(mesh, scene));
    }
    // then do the same for each of its children
    for(unsigned int i = 0; i < node->mNumChildren; i++)
    {
        processNode(node->mChildren[i], scene);
    }
}
We first check each of the node's mesh indices and retrieve the corresponding mesh by indexing the scene's mMeshes array. The returned mesh is then passed to the
Once all the meshes have been processed, we iterate through all of the node's children and call the same
An example use case for such a system is when you want to translate a car mesh and make sure that all its children (like an engine mesh, a steering wheel mesh, and its tire meshes) translate as well; such a system is easily created using parent-child relations.
Right now however we're not using such a system, but it is generally recommended to stick with this approach for whenever you want extra control over your mesh data. These node-like relations are after all defined by the artists who created the models.
The next step is to process Assimp's data into the
Assimp to Mesh
Translating an aiMesh object to a mesh object of our own is not too difficult. All we need to do, is access each of the mesh's relevant properties and store them in our own object. The general structure of the
Mesh processMesh(aiMesh *mesh, const aiScene *scene)
{
    vector<Vertex> vertices;
    vector<unsigned int> indices;
    vector<Texture> textures;

    for(unsigned int i = 0; i < mesh->mNumVertices; i++)
    {
        Vertex vertex;
        // process vertex positions, normals and texture coordinates
        [...]
        vertices.push_back(vertex);
    }
    // process indices
    [...]
    // process material
    if(mesh->mMaterialIndex >= 0)
    {
        [...]
    }

    return Mesh(vertices, indices, textures);
}
Processing a mesh is a 3-part process: retrieve all the vertex data, retrieve the mesh's indices, and finally retrieve the relevant material data. The processed data is stored in one of the 3 vectors and from those a
Retrieving the vertex data is pretty simple: we define a mesh->mNumVertices). Within the iteration we want to fill this struct with all the relevant data. For vertex positions this is done as follows:
glm::vec3 vector;
vector.x = mesh->mVertices[i].x;
vector.y = mesh->mVertices[i].y;
vector.z = mesh->mVertices[i].z;
vertex.Position = vector;
Note that we define a temporary vec3 for transferring Assimp's data to. This is necessary as Assimp maintains its own data types for vector, matrices, strings etc. and they don't convert that well to glm's data types.
The procedure for normals should come as no surprise now:
vector.x = mesh->mNormals[i].x;
vector.y = mesh->mNormals[i].y;
vector.z = mesh->mNormals[i].z;
vertex.Normal = vector;
Texture coordinates are roughly the same, but Assimp allows a model to have up to 8 different texture coordinates per vertex. We're not going to use 8, we only care about the first set of texture coordinates. We'll also want to check if the mesh actually contains texture coordinates (which may not be always the case):
if(mesh->mTextureCoords[0]) // does the mesh contain texture coordinates?
{
    glm::vec2 vec;
    vec.x = mesh->mTextureCoords[0][i].x;
    vec.y = mesh->mTextureCoords[0][i].y;
    vertex.TexCoords = vec;
}
else
    vertex.TexCoords = glm::vec2(0.0f, 0.0f);
The vertex struct is now completely filled with the required vertex attributes and we can push it to the back of the vertices vector at the end of the iteration. This process is repeated for each of the mesh's vertices.
Indices
Assimp's interface defines each mesh as having an array of faces, where each face represents a single primitive, which in our case (due to the aiProcess_Triangulate option) are always triangles. A face contains the indices of the vertices we need to draw in what order for its primitive. So if we iterate over all the faces and store all the face's indices in the indices vector we're all set:
for(unsigned int i = 0; i < mesh->mNumFaces; i++)
{
    aiFace face = mesh->mFaces[i];
    for(unsigned int j = 0; j < face.mNumIndices; j++)
        indices.push_back(face.mIndices[j]);
}
After the outer loop has finished, we now have a complete set of vertices and index data for drawing the mesh via
Material
Similar to nodes, a mesh only contains an index to a material object. To retrieve the material of a mesh, we need to index the scene's mMaterials array. The mesh's material index is set in its mMaterialIndex property, which we can also query to check if the mesh contains a material or not:
if(mesh->mMaterialIndex >= 0)
{
    aiMaterial *material = scene->mMaterials[mesh->mMaterialIndex];
    vector<Texture> diffuseMaps = loadMaterialTextures(material,
                                        aiTextureType_DIFFUSE, "texture_diffuse");
    textures.insert(textures.end(), diffuseMaps.begin(), diffuseMaps.end());
    vector<Texture> specularMaps = loadMaterialTextures(material,
                                        aiTextureType_SPECULAR, "texture_specular");
    textures.insert(textures.end(), specularMaps.begin(), specularMaps.end());
}
We first retrieve the aiMaterial object from the scene's mMaterials array. Then we want to load the mesh's diffuse and/or specular textures. A material object internally stores an array of texture locations for each texture type. The different texture types are all prefixed with aiTextureType_. We use a helper function called
The
vector<Texture> loadMaterialTextures(aiMaterial *mat, aiTextureType type, string typeName)
{
    vector<Texture> textures;
    for(unsigned int i = 0; i < mat->GetTextureCount(type); i++)
    {
        aiString str;
        mat->GetTexture(type, i, &str);
        Texture texture;
        texture.id = TextureFromFile(str.C_Str(), directory);
        texture.type = typeName;
        texture.path = str;
        textures.push_back(texture);
    }
    return textures;
}
We first check the amount of textures stored in the material via its aiString. We then use another helper function called stb_image.h) for us and returns the texture's ID. You can check the complete code listing at the end for its content if you're not sure how such a function is written.
Some models found over the internet use absolute paths for their texture locations, which won't work on each machine. In that case you probably want to manually edit the file to use local paths for the textures (if possible).
And that is all there is to importing a model with Assimp.
An optimization
We're not completely done yet, since there is still a large (but not completely necessary) optimization we want to make. Most scenes re-use several of their textures onto several meshes; think of a house again that has a granite texture for its walls. This texture could also be applied to the floor, its ceilings, the staircase, perhaps a table, and maybe even a small well close by. Loading textures is not a cheap operation and in our current implementation a new texture is loaded and generated for each mesh, even though the exact same texture could have been loaded several times before. This quickly becomes the bottleneck of your model loading implementation.
So we're going to add one small tweak to the model code by storing all of the loaded textures globally. Wherever we want to load a texture, we first check if it hasn't been loaded already. If so, we take that texture and skip the entire loading routine, saving us a lot of processing power. To be able to compare textures we need to store their path as well:
struct Texture {
    unsigned int id;
    string type;
    string path;  // we store the path of the texture to compare with other textures
};
Then we store all the loaded textures in another vector declared at the top of the model's class file as a private variable:
vector<Texture> textures_loaded;
In the
vector<Texture> loadMaterialTextures(aiMaterial *mat, aiTextureType type, string typeName)
{
    vector<Texture> textures;
    for(unsigned int i = 0; i < mat->GetTextureCount(type); i++)
    {
        aiString str;
        mat->GetTexture(type, i, &str);
        bool skip = false;
        for(unsigned int j = 0; j < textures_loaded.size(); j++)
        {
            if(std::strcmp(textures_loaded[j].path.data(), str.C_Str()) == 0)
            {
                textures.push_back(textures_loaded[j]);
                skip = true;
                break;
            }
        }
        if(!skip)
        {   // if texture hasn't been loaded already, load it
            Texture texture;
            texture.id = TextureFromFile(str.C_Str(), directory);
            texture.type = typeName;
            texture.path = str.C_Str();
            textures.push_back(texture);
            textures_loaded.push_back(texture); // add to loaded textures
        }
    }
    return textures;
}
You can find the complete source code of the
No more containers!
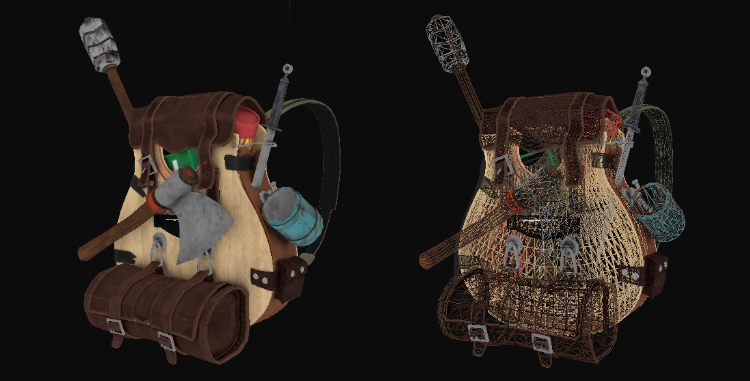
So let's give our implementation a spin by actually importing a model created by genuine artists, not something done by the creative genius that I am. Because I don't want to give myself too much credit, I'll occasionally allow some other artists to join the ranks and this time we're going to load this amazing Survival Guitar Backpack by Berk Gedik. I've modified the material and paths a bit so it works directly with the way we've set up the model loading. The model is exported as a .obj file together with a .mtl file that links to the model's diffuse, specular, and normal maps (we'll get to those later). You can download the adjusted model for this chapter here. Note that there's a few extra texture types we won't be using yet, and that all the textures and the model file(s) should be located in the same directory for the textures to load.
Now, declare a
You can find the complete source code here. Note that we tell stb_image.h to flip textures vertically, if you haven't done so already, before we load the model. Otherwise the textures will look all messed up.
We can also get more creative and introduce point lights to the render equation as we learned from the Lighting chapters and together with specular maps get amazing results:
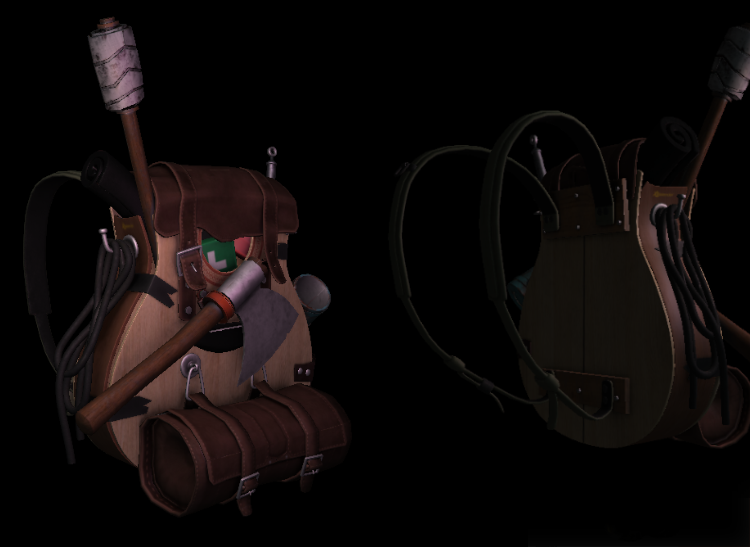
Even I have to admit that this is maybe a bit more fancy than the containers we've used so far. Using Assimp you can load tons of models found over the internet. There are quite a few resource websites that offer free 3D models for you to download in several file formats. Do note that some models still won't load properly, have texture paths that won't work, or are simply exported in a format even Assimp can't read.
Further reading
- How-To Texture Wavefront (.obj) Models for OpenGL: great video guide by Matthew Early on how to set up 3D models in Blender so they directly work with the current model loader (as the texture setup we've chosen doesn't always work out of the box).