


Assimp
Model-Loading/Assimp
In all the scenes so far we've been extensively playing with our little container friend, but over time, even our best friends can get a little boring. In bigger graphics applications, there are usually lots of complicated and interesting models that are much prettier to look at than a static container. However, unlike the container object, we can't really manually define all the vertices, normals, and texture coordinates of complicated shapes like houses, vehicles, or human-like characters. What we want instead, is to import these models into the application; models that were carefully designed by 3D artists in tools like Blender, 3DS Max or Maya.
These so called
It is our job to parse these exported model files and extract all the relevant information so we can store them in a format that OpenGL understands. A common issue is that there are dozens of different file formats where each exports the model data in its own unique way. Model formats like the Wavefront .obj only contains model data with minor material information like model colors and diffuse/specular maps, while model formats like the XML-based Collada file format are extremely extensive and contain models, lights, many types of materials, animation data, cameras, complete scene information, and much more. The wavefront object format is generally considered to be an easy-to-parse model format. It is recommended to visit the Wavefront's wiki page at least once to see how such a file format's data is structured. This should give you a basic perception of how model file formats are generally structured.
All by all, there are many different file formats where a common general structure between them usually does not exist. So if we want to import a model from these file formats, we'd have to write an importer ourselves for each of the file formats we want to import. Luckily for us, there just happens to be a library for this.
A model loading library
A very popular model importing library out there is called Assimp that stands for Open Asset Import Library. Assimp is able to import dozens of different model file formats (and export to some as well) by loading all the model's data into Assimp's generalized data structures. As soon as Assimp has loaded the model, we can retrieve all the data we need from Assimp's data structures. Because the data structure of Assimp stays the same, regardless of the type of file format we imported, it abstracts us from all the different file formats out there.
When importing a model via Assimp it loads the entire model into a scene object that contains all the data of the imported model/scene. Assimp then has a collection of nodes where each node contains indices to data stored in the scene object where each node can have any number of children. A (simplistic) model of Assimp's structure is shown below:
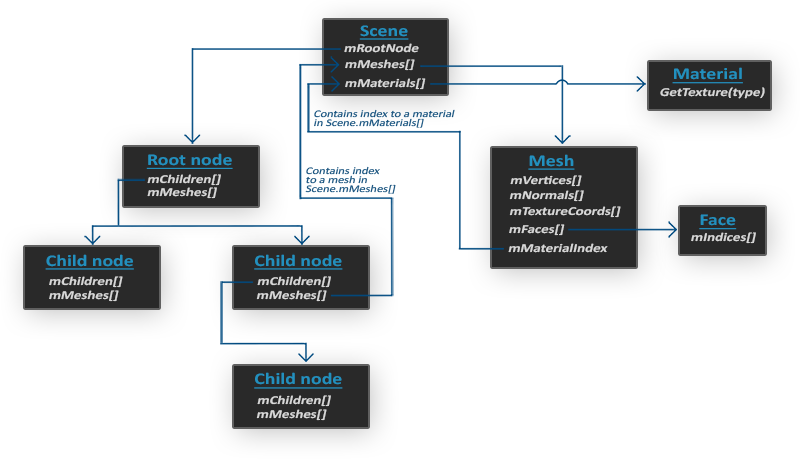
- All the data of the scene/model is contained in the Scene object like all the materials and the meshes. It also contains a reference to the root node of the scene.
- The Root node of the scene may contain children nodes (like all other nodes) and could have a set of indices that point to mesh data in the scene object's mMeshes array. The scene's mMeshes array contains the actual Mesh objects, the values in the mMeshes array of a node are only indices for the scene's meshes array.
- A Mesh object itself contains all the relevant data required for rendering, think of vertex positions, normal vectors, texture coordinates, faces, and the material of the object.
- A mesh contains several faces. A Face represents a render primitive of the object (triangles, squares, points). A face contains the indices of the vertices that form a primitive. Because the vertices and the indices are separated, this makes it easy for us to render via an index buffer (see Hello Triangle).
- Finally a mesh also links to a Material object that hosts several functions to retrieve the material properties of an object. Think of colors and/or texture maps (like diffuse and specular maps).
What we want to do is: first load an object into a Scene object, recursively retrieve the corresponding Mesh objects from each of the nodes (we recursively search each node's children), and process each Mesh object to retrieve the vertex data, indices, and its material properties. The result is then a collection of mesh data that we want to contain in a single Model object.
When modeling objects in modeling toolkits, artists generally do not create an entire model out of a single shape. Usually, each model has several sub-models/shapes that it consists of. Each of those single shapes is called a
In the next chapters we'll create our own
Building Assimp
You can download Assimp from their GitHub page and choose the corresponding version. For this writing, the Assimp version used was version 3.1.1. It is advised to compile the libraries by yourself, since their pre-compiled libraries don't always work on all systems. Review the Creating a window chapter if you forgot how to compile a library by yourself via CMake.
A few issues can come up while building Assimp, so I'll note them down here with their solutions in case any of you get the same errors:
- CMake continually gives errors while retrieving the configuration list about DirectX libraries missing, messages like:
The solution here is to install the DirectX SDK in case you haven't installed this before. You can download the SDK from here.Could not locate DirectX CMake Error at cmake-modules/FindPkgMacros.cmake:110 (message): Required library DirectX not found! Install the library (including dev packages) and try again. If the library is already installed, set the missing variables manually in cmake. - While installing the DirectX SDK, a possible error code of
s1023could pop up. In that case you first want to de-install the C++ Redistributable package(s) before installing the SDK.
Once the configuration is completed, you can generate a solution file, open it, and compile the libraries (either as a release version or a debug version, whatever floats your boat). Be sure to compile it for 64-bit as all LearnOpenGL code is 64 bit.
The default configuration builds Assimp as a dynamic library so we need to include the resulting DLL named assimp.dll (or with some post-fix) alongside the application's binaries. You can simply copy the DLL to the same folder where your application's executable is located.
After compiling the generated solution, the resulting library and DLL file are located in the code/Debug or code/Release folder. Then simply move the lib and DLL to their appropriate locations, link them from your solution, and be sure to copy Assimp's headers to your include directory (the header files are found in the include folder in the files downloaded from Assimp).
By now you should have compiled Assimp and linked it to your application. If you still received any unreported error, feel free to ask for help in the comments.