


Creating a window
Getting-started/Creating-a-window
The first thing we need to do before we start creating stunning graphics is to create an OpenGL context and an application window to draw in. However, those operations are specific per operating system and OpenGL purposefully tries to abstract itself from these operations. This means we have to create a window, define a context, and handle user input all by ourselves.
Luckily, there are quite a few libraries out there that provide the functionality we seek, some specifically aimed at OpenGL. Those libraries save us all the operation-system specific work and give us a window and an OpenGL context to render in. Some of the more popular libraries are GLUT, SDL, SFML and GLFW. On LearnOpenGL we will be using GLFW. Feel free to use any of the other libraries, the setup for most is similar to GLFW's setup.
GLFW
GLFW is a library, written in C, specifically targeted at OpenGL. GLFW gives us the bare necessities required for rendering goodies to the screen. It allows us to create an OpenGL context, define window parameters, and handle user input, which is plenty enough for our purposes.
The focus of this and the next chapter is to get GLFW up and running, making sure it properly creates an OpenGL context and that it displays a simple window for us to mess around in. This chapter takes a step-by-step approach in retrieving, building and linking the GLFW library. We'll use Microsoft Visual Studio 2019 IDE as of this writing (note that the process is the same on the more recent visual studio versions). If you're not using Visual Studio (or an older version) don't worry, the process will be similar on most other IDEs.
Building GLFW
GLFW can be obtained from their webpage's download page. GLFW already has pre-compiled binaries and header files for Visual Studio 2012 up to 2019, but for completeness' sake we will compile GLFW ourselves from the source code. This is to give you a feel for the process of compiling open-source libraries yourself as not every library will have pre-compiled binaries available. So let's download the Source package.
Once you've downloaded the source package, extract it and open its content. We are only interested in a few items:
- The resulting library from compilation.
- The include folder.
Compiling the library from the source code guarantees that the resulting library is perfectly tailored for your CPU/OS, a luxury pre-compiled binaries don't always provide (sometimes, pre-compiled binaries are not available for your system). The problem with providing source code to the open world however is that not everyone uses the same IDE or build system for developing their application, which means the project/solution files provided may not be compatible with other people's setup. So people then have to setup their own project/solution with the given .c/.cpp and .h/.hpp files, which is cumbersome. Exactly for those reasons there is a tool called CMake.
CMake
CMake is a tool that can generate project/solution files of the user's choice (e.g. Visual Studio, Code::Blocks, Eclipse) from a collection of source code files using pre-defined CMake scripts. This allows us to generate a Visual Studio 2019 project file from GLFW's source package which we can use to compile the library. First we need to download and install CMake which can be downloaded on their download page.
Once CMake is installed you can choose to run CMake from the command line or through their GUI. Since we're not trying to overcomplicate things we're going to use the GUI. CMake requires a source code folder and a destination folder for the binaries. For the source code folder we're going to choose the root folder of the downloaded GLFW source package and for the build folder we're creating a new directory build and then select that directory.
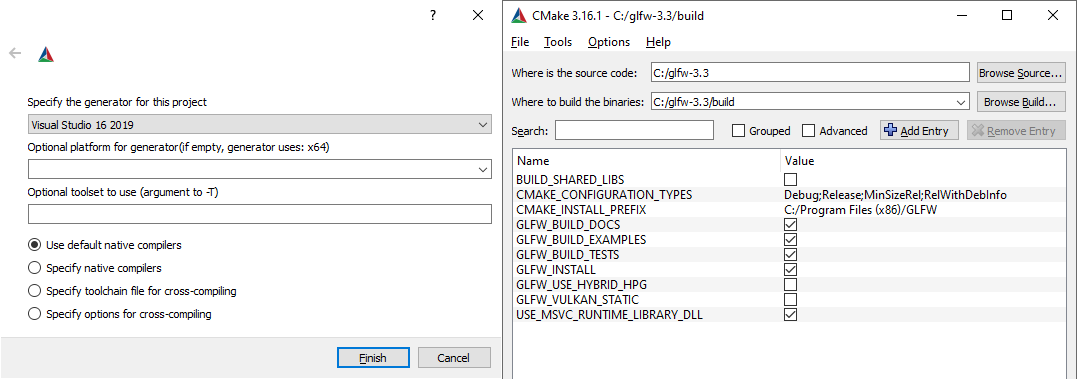
Once the source and destination folders have been set, click the Configure button so CMake can read the required settings and the source code. We then have to choose the generator for the project and since we're using Visual Studio 2019 we will choose the Visual Studio 16 option (Visual Studio 2019 is also known as Visual Studio 16). CMake will then display the possible build options to configure the resulting library. We can leave them to their default values and click Configure again to store the settings. Once the settings have been set, we click Generate and the resulting project files will be generated in your build folder.
Compilation
In the build folder a file named GLFW.sln can now be found and we open it with Visual Studio 2019. Since CMake generated a project file that already contains the proper configuration settings we only have to build the solution. CMake should've automatically configured the solution so it compiles to a 64-bit library; now hit build solution. This will give us a compiled library file that can be found in build/src/Debug named glfw3.lib.
Once we generated the library we need to make sure the IDE knows where to find the library and the include files for our OpenGL program. There are two common approaches in doing this:
- We find the
/liband/includefolders of the IDE/compiler and add the content of GLFW'sincludefolder to the IDE's/includefolder and similarly addglfw3.libto the IDE's/libfolder. This works, but it's is not the recommended approach. It's hard to keep track of your library and include files and a new installation of your IDE/compiler results in you having to do this process all over again. -
Another approach (and recommended) is to create a new set of directories at a location of your choice that contains all the header files/libraries from third party libraries to which you can refer to from your IDE/compiler. You could, for instance, create a single folder that contains a
LibsandIncludefolder where we store all our library and header files respectively for OpenGL projects. Now all the third party libraries are organized within a single location (that can be shared across multiple computers). The requirement is, however, that each time we create a new project we have to tell the IDE where to find those directories.
Our first project
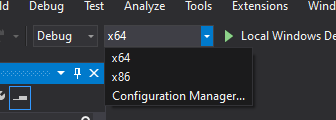
First, let's open up Visual Studio and create a new project. Choose C++ if multiple options are given and take the Empty Project (don't forget to give your project a suitable name). Since we're going to be doing everything in 64-bit and the project defaults to 32-bit, we'll need to change the dropdown at the top next to Debug from x86 to x64:
Once that's done, we now have a workspace to create our very first OpenGL application!
Linking
In order for the project to use GLFW we need to glfw3.lib in the linker settings, but our project does not yet know where to find glfw3.lib since we store our third party libraries in a different directory. We thus need to add this directory to the project first.
We can tell the IDE to take this directory into account when it needs to look for library and include files. Right-click the project name in the solution explorer and then go to VC++ Directories as seen in the image below:
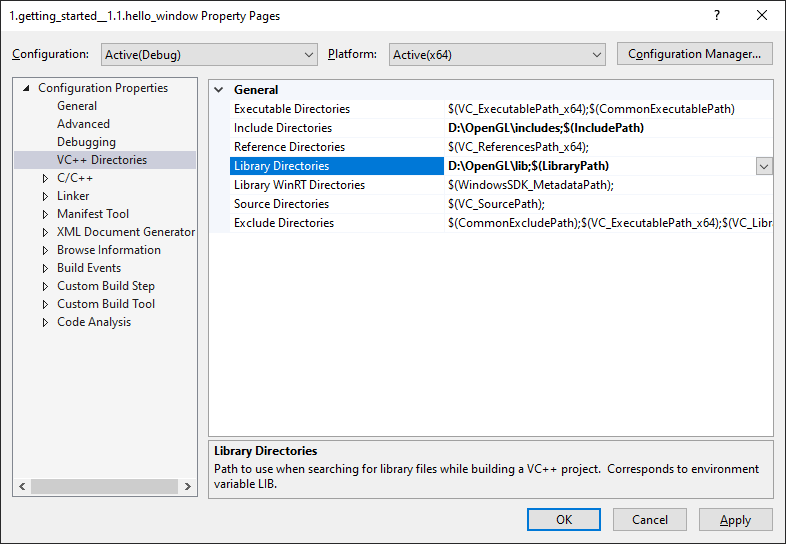
From there on out you can add your own directories to let the project know where to search. This can be done by manually inserting it into the text or clicking the appropriate location string and selecting the <Edit..> option. Do this for both the Library Directories and Include Directories:

Here you can add as many extra directories as you'd like and from that point on the IDE will also search those directorie when searching for library and header files. As soon as your Include folder from GLFW is included, you will be able to find all the header files for GLFW by including <GLFW/..>. The same applies for the library directories.
Since VS can now find all the required files we can finally link GLFW to the project by going to the Linker tab and Input:
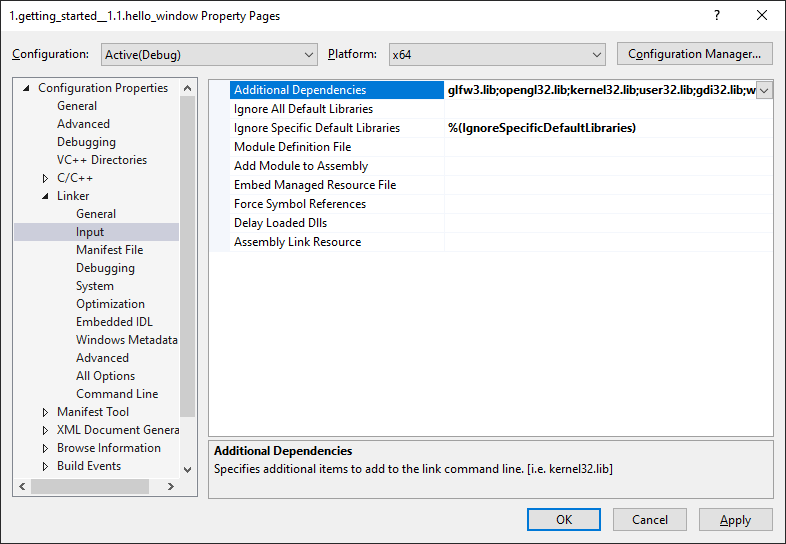
To then link to a library you'd have to specify the name of the library to the linker. Since the library name is glfw3.lib, we add that to the Additional Dependencies field (either manually or using the <Edit..> option) and from that point on GLFW will be linked when we compile. In addition to GLFW we should also add a link entry to the OpenGL library, but this may differ per operating system:
OpenGL library on Windows
If you're on Windows the OpenGL library opengl32.lib comes with the Microsoft SDK, which is installed by default when you install Visual Studio. Since this chapter uses the VS compiler and is on windows we add opengl32.lib to the linker settings. Note that the 64-bit equivalent of the OpenGL library is called opengl32.lib, just like the 32-bit equivalent, which is a bit of an unfortunate name.
OpenGL library on Linux
On Linux systems you need to link to the libGL.so library by adding -lGL to your linker settings. If you can't find the library you probably need to install any of the Mesa, NVidia or AMD dev packages.
Then, once you've added both the GLFW and OpenGL library to the linker settings you can include the header files for GLFW as follows:
#include <GLFW/glfw3.h>
-lglfw3 -lGL -lX11 -lpthread -lXrandr -lXi -ldl. Not correctly linking the corresponding libraries will generate many undefined reference errors.
This concludes the setup and configuration of GLFW.
GLAD
We're still not quite there yet, since there is one other thing we still need to do. Because OpenGL is only really a standard/specification it is up to the driver manufacturer to implement the specification to a driver that the specific graphics card supports. Since there are many different versions of OpenGL drivers, the location of most of its functions is not known at compile-time and needs to be queried at run-time. It is then the task of the developer to retrieve the location of the functions he/she needs and store them in function pointers for later use. Retrieving those locations is OS-specific. In Windows it looks something like this:
// define the function's prototype
typedef void (*GL_GENBUFFERS) (GLsizei, GLuint*);
// find the function and assign it to a function pointer
GL_GENBUFFERS glGenBuffers = (GL_GENBUFFERS)wglGetProcAddress("glGenBuffers ");
// function can now be called as normal
unsigned int buffer;
glGenBuffers (1, &buffer);
As you can see the code looks complex and it's a cumbersome process to do this for each function you may need that is not yet declared. Thankfully, there are libraries for this purpose as well where GLAD is a popular and up-to-date library.
Setting up GLAD
GLAD is an open source library that manages all that cumbersome work we talked about. GLAD has a slightly different configuration setup than most common open source libraries. GLAD uses a web service where we can tell GLAD for which version of OpenGL we'd like to define and load all relevant OpenGL functions according to that version.
Go to the GLAD web service, make sure the language is set to C++, and in the API section select an OpenGL version of at least 3.3 (which is what we'll be using; higher versions are fine as well). Also make sure the profile is set to Core and that the Generate a loader option is ticked. Ignore the extensions (for now) and click Generate to produce the resulting library files.
GLAD by now should have provided you a zip file containing two include folders, and a single glad.c file. Copy both include folders (glad and KHR) into your include(s) directoy (or add an extra item pointing to these folders), and add the glad.c file to your project.
After the previous steps, you should be able to add the following include directive above your file:
#include <glad/glad.h>
Hitting the compile button shouldn't give you any errors, at which point we're set to go for the next chapter where we'll discuss how we can actually use GLFW and GLAD to configure an OpenGL context and spawn a window. Be sure to check that all your include and library directories are correct and that the library names in the linker settings match the corresponding libraries.
Additional resources
- GLFW: Window Guide: official GLFW guide on setting up and configuring a GLFW window.
- Building applications: provides great info about the compilation/linking process of your application and a large list of possible errors (plus solutions) that may come up.
- GLFW with Code::Blocks: building GLFW in Code::Blocks IDE.
- Running CMake: short overview of how to run CMake on both Windows and Linux.
- Writing a build system under Linux: an autotools tutorial by Wouter Verholst on how to write a build system in Linux.
- Polytonic/Glitter: a simple boilerplate project that comes pre-configured with all relevant libraries; great for if you want a sample project without the hassle of having to compile all the libraries yourself.