


SSAO
Advanced-Lighting/SSAO
We've briefly touched the topic in the basic lighting chapter: ambient lighting. Ambient lighting is a fixed light constant we add to the overall lighting of a scene to simulate the
Below is an example image of a scene with and without ambient occlusion. Notice how especially between the creases, the (ambient) light is more occluded:
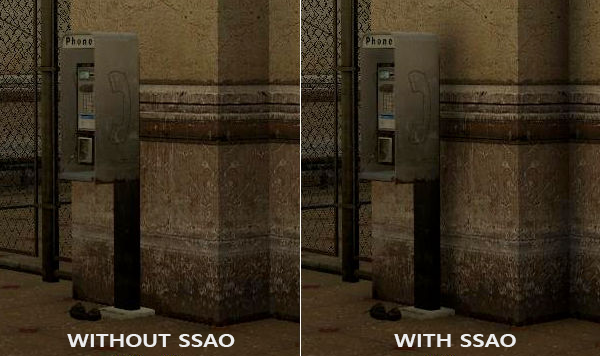
While not an incredibly obvious effect, the image with ambient occlusion enabled does feel a lot more realistic due to these small occlusion-like details, giving the entire scene a greater feel of depth.
Ambient occlusion techniques are expensive as they have to take surrounding geometry into account. One could shoot a large number of rays for each point in space to determine its amount of occlusion, but that quickly becomes computationally infeasible for real-time solutions. In 2007, Crytek published a technique called
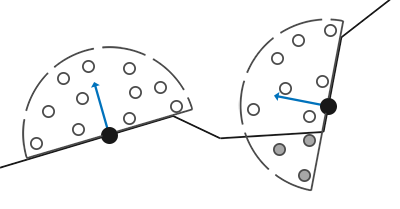
The basics behind screen-space ambient occlusion are simple: for each fragment on a screen-filled quad we calculate an
Each of the gray depth samples that are inside geometry contribute to the total occlusion factor; the more samples we find inside geometry, the less ambient lighting the fragment should eventually receive.
It is clear the quality and precision of the effect directly relates to the number of surrounding samples we take. If the sample count is too low, the precision drastically reduces and we get an artifact called
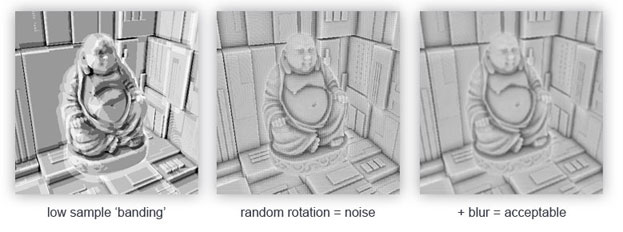
As you can see, even though we get noticeable banding on the SSAO results due to a low sample count, by introducing some randomness the banding effects are completely gone.
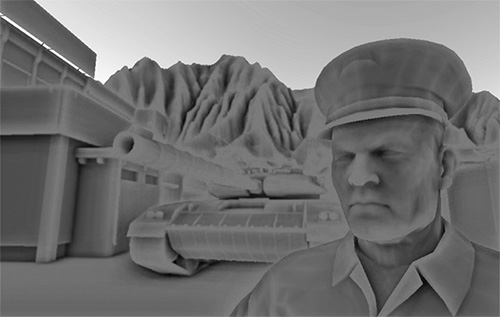
The SSAO method developed by Crytek had a certain visual style. Because the sample kernel used was a sphere, it caused flat walls to look gray as half of the kernel samples end up being in the surrounding geometry. Below is an image of Crysis's screen-space ambient occlusion that clearly portrays this gray feel:
For that reason we won't be using a sphere sample kernel, but rather a hemisphere sample kernel oriented along a surface's normal vector.
By sampling around this
Sample buffers
SSAO requires geometrical info as we need some way to determine the occlusion factor of a fragment. For each fragment, we're going to need the following data:
- A per-fragment position vector.
- A per-fragment normal vector.
- A per-fragment albedo color.
- A sample kernel.
- A per-fragment random rotation vector used to rotate the sample kernel.
Using a per-fragment view-space position we can orient a sample hemisphere kernel around the fragment's view-space surface normal and use this kernel to sample the position buffer texture at varying offsets. For each per-fragment kernel sample we compare its depth with its depth in the position buffer to determine the amount of occlusion. The resulting occlusion factor is then used to limit the final ambient lighting component. By also including a per-fragment rotation vector we can significantly reduce the number of samples we'll need to take as we'll soon see.
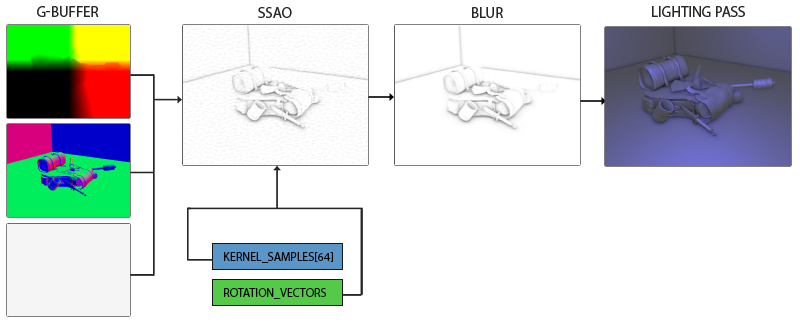
As SSAO is a screen-space technique we calculate its effect on each fragment on a screen-filled 2D quad. This does mean we have no geometrical information of the scene. What we could do, is render the geometrical per-fragment data into screen-space textures that we then later send to the SSAO shader so we have access to the per-fragment geometrical data. If you've followed along with the previous chapter you'll realize this looks quite like a deferred renderer's G-buffer setup. For that reason SSAO is perfectly suited in combination with deferred rendering as we already have the position and normal vectors in the G-buffer.
As we should have per-fragment position and normal data available from the scene objects, the fragment shader of the geometry stage is fairly simple:
#version 330 core
layout (location = 0) out vec4 gPosition;
layout (location = 1) out vec3 gNormal;
layout (location = 2) out vec4 gAlbedoSpec;

in vec2 TexCoords;
in vec3 FragPos;
in vec3 Normal;

void main()
{
    // store the fragment position vector in the first gbuffer texture
    gPosition = FragPos;
    // also store the per-fragment normals into the gbuffer
    gNormal = normalize(Normal);
    // and the diffuse per-fragment color, ignore specular
    gAlbedoSpec.rgb = vec3(0.95);
}
Since SSAO is a screen-space technique where occlusion is calculated from the visible view, it makes sense to implement the algorithm in view-space. Therefore, FragPos and Normal as supplied by the geometry stage's vertex shader are transformed to view space (multiplied by the view matrix as well).
The gPosition color buffer texture is configured as follows:
glGenTextures (1, &gPosition);
glBindTexture (GL_TEXTURE_2D, gPosition);
glTexImage2D (GL_TEXTURE_2D, 0, GL_RGBA16F, SCR_WIDTH, SCR_HEIGHT, 0, GL_RGBA, GL_FLOAT, NULL);
glTexParameter i(GL_TEXTURE_2D, GL_TEXTURE_MIN_FILTER, GL_NEAREST);
glTexParameter i(GL_TEXTURE_2D, GL_TEXTURE_MAG_FILTER, GL_NEAREST);
glTexParameter i(GL_TEXTURE_2D, GL_TEXTURE_WRAP_S, GL_CLAMP_TO_EDGE);
glTexParameter i(GL_TEXTURE_2D, GL_TEXTURE_WRAP_T, GL_CLAMP_TO_EDGE);
This gives us a position texture that we can use to obtain depth values for each of the kernel samples. Note that we store the positions in a floating point data format; this way position values aren't clamped to [0.0,1.0] and we need the higher precision. Also note the texture wrapping method of GL_CLAMP_TO_EDGE. This ensures we don't accidentally oversample position/depth values in screen-space outside the texture's default coordinate region.
Next, we need the actual hemisphere sample kernel and some method to randomly rotate it.
Normal-oriented hemisphere
We need to generate a number of samples oriented along the normal of a surface. As we briefly discussed at the start of this chapter, we want to generate samples that form a hemisphere. As it is difficult nor plausible to generate a sample kernel for each surface normal direction, we're going to generate a sample kernel in tangent space, with the normal vector pointing in the positive z direction.
Assuming we have a unit hemisphere, we can obtain a sample kernel with a maximum of 64 sample values as follows:
std::uniform_real_distribution<float> randomFloats(0.0, 1.0); // random floats between [0.0, 1.0]
std::default_random_engine generator;
std::vector<glm::vec3> ssaoKernel;
for (unsigned int i = 0; i < 64; ++i)
{
    glm::vec3 sample(
        randomFloats(generator) * 2.0 - 1.0,
        randomFloats(generator) * 2.0 - 1.0,
        randomFloats(generator)
    );
    sample  = glm::normalize(sample);
    sample *= randomFloats(generator);
    ssaoKernel.push_back(sample);
}
We vary the x and y direction in tangent space between -1.0 and 1.0, and vary the z direction of the samples between 0.0 and 1.0 (if we varied the z direction between -1.0 and 1.0 as well we'd have a sphere sample kernel). As the sample kernel will be oriented along the surface normal, the resulting sample vectors will all end up in the hemisphere.
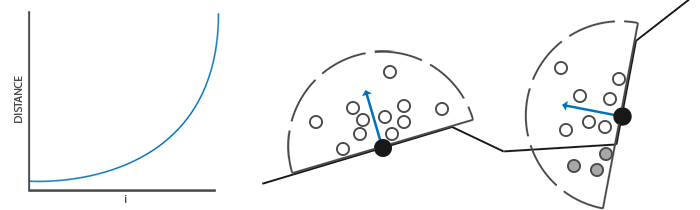
Currently, all samples are randomly distributed in the sample kernel, but we'd rather place a larger weight on occlusions close to the actual fragment. We want to distribute more kernel samples closer to the origin. We can do this with an accelerating interpolation function:
   float scale = (float)i / 64.0;
   scale   = lerp(0.1f, 1.0f, scale * scale);
   sample *= scale;
   ssaoKernel.push_back(sample);
}
Where
float lerp(float a, float b, float f)
{
    return a + f * (b - a);
}
This gives us a kernel distribution that places most samples closer to its origin.
Each of the kernel samples will be used to offset the view-space fragment position to sample surrounding geometry. We do need quite a lot of samples in view-space in order to get realistic results, which may be too heavy on performance. However, if we can introduce some semi-random rotation/noise on a per-fragment basis, we can significantly reduce the number of samples required.
Random kernel rotations
By introducing some randomness onto the sample kernels we largely reduce the number of samples necessary to get good results. We could create a random rotation vector for each fragment of a scene, but that quickly eats up memory. It makes more sense to create a small texture of random rotation vectors that we tile over the screen.
We create a 4x4 array of random rotation vectors oriented around the tangent-space surface normal:
std::vector<glm::vec3> ssaoNoise;
for (unsigned int i = 0; i < 16; i++)
{
    glm::vec3 noise(
        randomFloats(generator) * 2.0 - 1.0,
        randomFloats(generator) * 2.0 - 1.0,
        0.0f);
    ssaoNoise.push_back(noise);
}
As the sample kernel is oriented along the positive z direction in tangent space, we leave the z component at 0.0 so we rotate around the z axis.
We then create a 4x4 texture that holds the random rotation vectors; make sure to set its wrapping method to GL_REPEAT so it properly tiles over the screen.
unsigned int noiseTexture;
glGenTextures (1, &noiseTexture);
glBindTexture (GL_TEXTURE_2D, noiseTexture);
glTexImage2D (GL_TEXTURE_2D, 0, GL_RGBA16F, 4, 4, 0, GL_RGB, GL_FLOAT, &ssaoNoise[0]);
glTexParameter i(GL_TEXTURE_2D, GL_TEXTURE_MIN_FILTER, GL_NEAREST);
glTexParameter i(GL_TEXTURE_2D, GL_TEXTURE_MAG_FILTER, GL_NEAREST);
glTexParameter i(GL_TEXTURE_2D, GL_TEXTURE_WRAP_S, GL_REPEAT);
glTexParameter i(GL_TEXTURE_2D, GL_TEXTURE_WRAP_T, GL_REPEAT);
We now have all the relevant input data we need to implement SSAO.
The SSAO shader
The SSAO shader runs on a 2D screen-filled quad that calculates the occlusion value for each of its fragments. As we need to store the result of the SSAO stage (for use in the final lighting shader), we create yet another framebuffer object:
unsigned int ssaoFBO;
glGenFramebuffers (1, &ssaoFBO);
glBindFramebuffer (GL_FRAMEBUFFER, ssaoFBO);
unsigned int ssaoColorBuffer;
glGenTextures (1, &ssaoColorBuffer);
glBindTexture (GL_TEXTURE_2D, ssaoColorBuffer);
glTexImage2D (GL_TEXTURE_2D, 0, GL_RED, SCR_WIDTH, SCR_HEIGHT, 0, GL_RED, GL_FLOAT, NULL);
glTexParameter i(GL_TEXTURE_2D, GL_TEXTURE_MIN_FILTER, GL_NEAREST);
glTexParameter i(GL_TEXTURE_2D, GL_TEXTURE_MAG_FILTER, GL_NEAREST);
glFramebufferTexture2D (GL_FRAMEBUFFER, GL_COLOR_ATTACHMENT0, GL_TEXTURE_2D, ssaoColorBuffer, 0);
As the ambient occlusion result is a single grayscale value we'll only need a texture's red component, so we set the color buffer's internal format to GL_RED.
The complete process for rendering SSAO then looks a bit like this:
// geometry pass: render stuff into G-buffer
glBindFramebuffer (GL_FRAMEBUFFER, gBuffer);
[...]
glBindFramebuffer (GL_FRAMEBUFFER, 0);
// use G-buffer to render SSAO texture
glBindFramebuffer (GL_FRAMEBUFFER, ssaoFBO);
glClear (GL_COLOR_BUFFER_BIT);
glActiveTexture (GL_TEXTURE0);
glBindTexture (GL_TEXTURE_2D, gPosition);
glActiveTexture (GL_TEXTURE1);
glBindTexture (GL_TEXTURE_2D, gNormal);
glActiveTexture (GL_TEXTURE2);
glBindTexture (GL_TEXTURE_2D, noiseTexture);
shaderSSAO.use();
SendKernelSamplesToShader();
shaderSSAO.setMat4("projection", projection);
RenderQuad();
glBindFramebuffer (GL_FRAMEBUFFER, 0);
// lighting pass: render scene lighting
glClear (GL_COLOR_BUFFER_BIT | GL_DEPTH_BUFFER_BIT);
shaderLightingPass.use();
[...]
glActiveTexture (GL_TEXTURE3);
glBindTexture (GL_TEXTURE_2D, ssaoColorBuffer);
[...]
RenderQuad();
The shaderSSAO shader takes as input the relevant G-buffer textures, the noise texture, and the normal-oriented hemisphere kernel samples:
#version 330 core
out float FragColor;

in vec2 TexCoords;

uniform sampler2D gPosition;
uniform sampler2D gNormal;
uniform sampler2D texNoise;

uniform vec3 samples[64];
uniform mat4 projection;

// tile noise texture over screen, based on screen dimensions divided by noise size
const vec2 noiseScale = vec2(800.0/4.0, 600.0/4.0); // screen = 800x600

void main()
{
    [...]
}
Interesting to note here is the noiseScale variable. We want to tile the noise texture all over the screen, but as the TexCoords vary between 0.0 and 1.0, the texNoise texture won't tile at all. So we'll calculate the required amount to scale TexCoords by dividing the screen's dimensions by the noise texture size.
vec3 fragPos   = texture(gPosition, TexCoords).xyz;
vec3 normal    = texture(gNormal, TexCoords).rgb;
vec3 randomVec = texture(texNoise, TexCoords * noiseScale).xyz;
As we set the tiling parameters of texNoise to GL_REPEAT, the random values will be repeated all over the screen. Together with the fragPos and normal vector, we then have enough data to create a TBN matrix that transforms any vector from tangent-space to view-space:
vec3 tangent   = normalize(randomVec - normal * dot(randomVec, normal));
vec3 bitangent = cross(normal, tangent);
mat3 TBN       = mat3(tangent, bitangent, normal);
Using a process called the
Next we iterate over each of the kernel samples, transform the samples from tangent to view-space, add them to the current fragment position, and compare the fragment position's depth with the sample depth stored in the view-space position buffer. Let's discuss this in a step-by-step fashion:
float occlusion = 0.0;
for(int i = 0; i < kernelSize; ++i)
{
    // get sample position
    vec3 samplePos = TBN * samples[i]; // from tangent to view-space
    samplePos = fragPos + samplePos * radius;

    [...]
}
Here kernelSize and radius are variables that we can use to tweak the effect; in this case a value of 64 and 0.5 respectively. For each iteration we first transform the respective sample to view-space. We then add the view-space kernel offset sample to the view-space fragment position. Then we multiply the offset sample by radius to increase (or decrease) the effective sample radius of SSAO.
Next we want to transform sample to screen-space so we can sample the position/depth value of sample as if we were rendering its position directly to the screen. As the vector is currently in view-space, we'll transform it to clip-space first using the projection matrix uniform:
vec4 offset = vec4(samplePos, 1.0);
offset      = projection * offset;    // from view to clip-space
offset.xyz /= offset.w;               // perspective divide
offset.xyz  = offset.xyz * 0.5 + 0.5; // transform to range 0.0 - 1.0
After the variable is transformed to clip-space, we perform the perspective divide step by dividing its xyz components with its w component. The resulting normalized device coordinates are then transformed to the [0.0, 1.0] range so we can use them to sample the position texture:
float sampleDepth = texture(gPosition, offset.xy).z;
We use the offset vector's x and y component to sample the position texture to retrieve the depth (or z value) of the sample position as seen from the viewer's perspective (the first non-occluded visible fragment). We then check if the sample's current depth value is larger than the stored depth value and if so, we add to the final contribution factor:
occlusion += (sampleDepth >= samplePos.z + bias ? 1.0 : 0.0);
Note that we add a small bias here to the original fragment's depth value (set to 0.025 in this example). A bias isn't always necessary, but it helps visually tweak the SSAO effect and solves acne effects that may occur based on the scene's complexity.
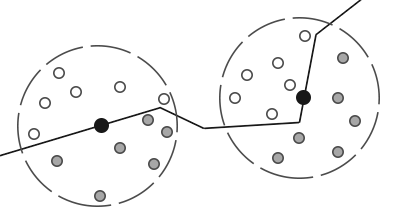
We're not completely finished yet as there is still a small issue we have to take into account. Whenever a fragment is tested for ambient occlusion that is aligned close to the edge of a surface, it will also consider depth values of surfaces far behind the test surface; these values will (incorrectly) contribute to the occlusion factor. We can solve this by introducing a range check as the following image (courtesy of John Chapman) illustrates:
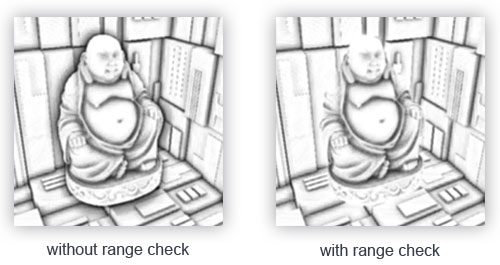
We introduce a range check that makes sure a fragment contributes to the occlusion factor if its depth values is within the sample's radius. We change the last line to:
float rangeCheck = smoothstep(0.0, 1.0, radius / abs(fragPos.z - sampleDepth));
occlusion       += (sampleDepth >= samplePos.z + bias ? 1.0 : 0.0) * rangeCheck;
Here we used GLSL's 0.0 if less than or equal to its first parameter and 1.0 if equal or higher to its second parameter. If the depth difference ends up between radius, its value gets smoothly interpolated between 0.0 and 1.0 by the following curve:

If we were to use a hard cut-off range check that would abruptly remove occlusion contributions if the depth values are outside radius, we'd see obvious (unattractive) borders at where the range check is applied.
As a final step we normalize the occlusion contribution by the size of the kernel and output the results. Note that we subtract the occlusion factor from 1.0 so we can directly use the occlusion factor to scale the ambient lighting component.
}
occlusion = 1.0 - (occlusion / kernelSize);
FragColor = occlusion;
If we'd imagine a scene where our favorite backpack model is taking a little nap, the ambient occlusion shader produces the following texture:
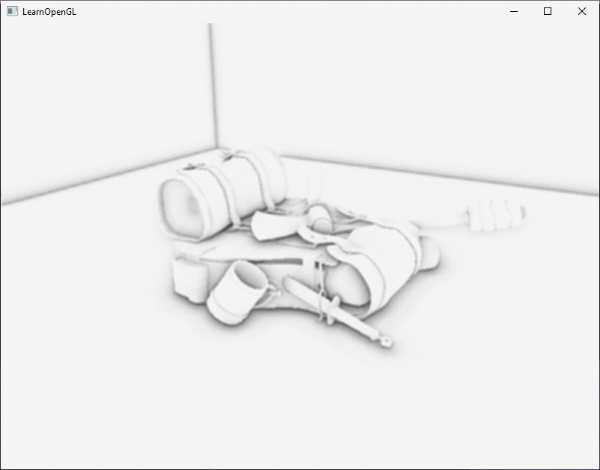
As we can see, ambient occlusion gives a great sense of depth. With just the ambient occlusion texture we can already clearly see the model is indeed laying on the floor, instead of hovering slightly above it.
It still doesn't look perfect, as the repeating pattern of the noise texture is clearly visible. To create a smooth ambient occlusion result we need to blur the ambient occlusion texture.
Ambient occlusion blur
Between the SSAO pass and the lighting pass, we first want to blur the SSAO texture. So let's create yet another framebuffer object for storing the blur result:
unsigned int ssaoBlurFBO, ssaoColorBufferBlur;
glGenFramebuffers (1, &ssaoBlurFBO);
glBindFramebuffer (GL_FRAMEBUFFER, ssaoBlurFBO);
glGenTextures (1, &ssaoColorBufferBlur);
glBindTexture (GL_TEXTURE_2D, ssaoColorBufferBlur);
glTexImage2D (GL_TEXTURE_2D, 0, GL_RED, SCR_WIDTH, SCR_HEIGHT, 0, GL_RED, GL_FLOAT, NULL);
glTexParameter i(GL_TEXTURE_2D, GL_TEXTURE_MIN_FILTER, GL_NEAREST);
glTexParameter i(GL_TEXTURE_2D, GL_TEXTURE_MAG_FILTER, GL_NEAREST);
glFramebufferTexture2D (GL_FRAMEBUFFER, GL_COLOR_ATTACHMENT0, GL_TEXTURE_2D, ssaoColorBufferBlur, 0);
Because the tiled random vector texture gives us a consistent randomness, we can use this property to our advantage to create a simple blur shader:
#version 330 core
out float FragColor;

in vec2 TexCoords;

uniform sampler2D ssaoInput;

void main() {
    vec2 texelSize = 1.0 / vec2(textureSize(ssaoInput, 0));
    float result = 0.0;
    for (int x = -2; x < 2; ++x)
    {
        for (int y = -2; y < 2; ++y)
        {
            vec2 offset = vec2(float(x), float(y)) * texelSize;
            result += texture(ssaoInput, TexCoords + offset).r;
        }
    }
    FragColor = result / (4.0 * 4.0);
}
Here we traverse the surrounding SSAO texels between -2.0 and 2.0, sampling the SSAO texture an amount identical to the noise texture's dimensions. We offset each texture coordinate by the exact size of a single texel using vec2 of the given texture's dimensions. We average the obtained results to get a simple, but effective blur:
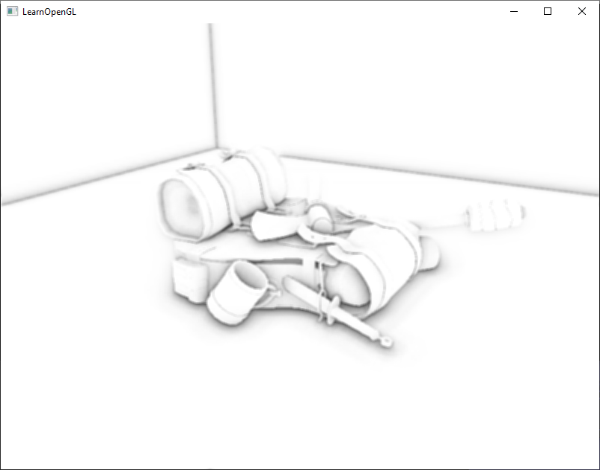
And there we go, a texture with per-fragment ambient occlusion data; ready for use in the lighting pass.
Applying ambient occlusion
Applying the occlusion factors to the lighting equation is incredibly easy: all we have to do is multiply the per-fragment ambient occlusion factor to the lighting's ambient component and we're done. If we take the Blinn-Phong deferred lighting shader of the previous chapter and adjust it a bit, we get the following fragment shader:
#version 330 core
out vec4 FragColor;

in vec2 TexCoords;

uniform sampler2D gPosition;
uniform sampler2D gNormal;
uniform sampler2D gAlbedo;
uniform sampler2D ssao;

struct Light {
    vec3 Position;
    vec3 Color;

    float Linear;
    float Quadratic;
    float Radius;
};
uniform Light light;

void main()
{
    // retrieve data from gbuffer
    vec3 FragPos = texture(gPosition, TexCoords).rgb;
    vec3 Normal = texture(gNormal, TexCoords).rgb;
    vec3 Diffuse = texture(gAlbedo, TexCoords).rgb;
    float AmbientOcclusion = texture(ssao, TexCoords).r;

    // blinn-phong (in view-space)
    vec3 ambient = vec3(0.3 * Diffuse * AmbientOcclusion); // here we add occlusion factor
    vec3 lighting  = ambient;
    vec3 viewDir  = normalize(-FragPos); // viewpos is (0.0.0) in view-space
    // diffuse
    vec3 lightDir = normalize(light.Position - FragPos);
    vec3 diffuse = max(dot(Normal, lightDir), 0.0) * Diffuse * light.Color;
    // specular
    vec3 halfwayDir = normalize(lightDir + viewDir);
    float spec = pow(max(dot(Normal, halfwayDir), 0.0), 8.0);
    vec3 specular = light.Color * spec;
    // attenuation
    float dist = length(light.Position - FragPos);
    float attenuation = 1.0 / (1.0 + light.Linear * dist + light.Quadratic * dist * dist);
    diffuse  *= attenuation;
    specular *= attenuation;
    lighting += diffuse + specular;

    FragColor = vec4(lighting, 1.0);
}
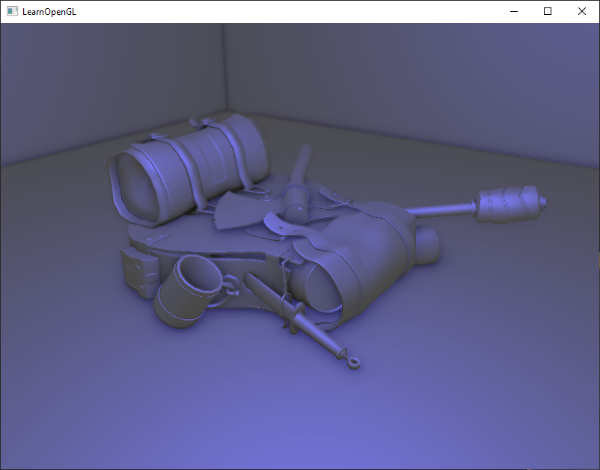
The only thing (aside from the change to view-space) we really changed is the multiplication of the scene's ambient component by AmbientOcclusion. With a single blue-ish point light in the scene we'd get the following result:
You can find the full source code of the demo scene here.
Screen-space ambient occlusion is a highly customizable effect that relies heavily on tweaking its parameters based on the type of scene. There is no perfect combination of parameters for every type of scene. Some scenes only work with a small radius, while other scenes require a larger radius and a larger sample count for them to look realistic. The current demo uses 64 samples, which is a bit much; play around with a smaller kernel size and try to get good results.
Some parameters you can tweak (by using uniforms for example): kernel size, radius, bias, and/or the size of the noise kernel. You can also raise the final occlusion value to a user-defined power to increase its strength:
occlusion = 1.0 - (occlusion / kernelSize);
FragColor = pow(occlusion, power);
Play around with different scenes and different parameters to appreciate the customizability of SSAO.
Even though SSAO is a subtle effect that isn't too clearly noticeable, it adds a great deal of realism to properly lit scenes and is definitely a technique you'd want to have in your toolkit.
Additional resources
- SSAO Tutorial: excellent SSAO tutorial by John Chapman; a large portion of this chapter's code and techniques are based of his article.
- Know your SSAO artifacts: great article about improving SSAO specific artifacts.
- SSAO With Depth Reconstruction: extension tutorial on top of SSAO from OGLDev about reconstructing position vectors from depth alone, saving us from storing the expensive position vectors in the G-buffer.