


Gamma Correction
Advanced-Lighting/Gamma-Correction
As soon as we compute the final pixel colors of the scene we will have to display them on a monitor. In the old days of digital imaging most monitors were cathode-ray tube (CRT) monitors. These monitors had the physical property that twice the input voltage did not result in twice the amount of brightness. Doubling the input voltage resulted in a brightness equal to an exponential relationship of roughly 2.2 known as the

The top line looks like the correct brightness scale to the human eye, doubling the brightness (from 0.1 to 0.2 for example) does indeed look like it's twice as bright with nice consistent differences. However, when we're talking about the physical brightness of light e.g. amount of photons leaving a light source, the bottom scale actually displays the correct brightness. At the bottom scale, doubling the brightness returns the correct physical brightness, but since our eyes perceive brightness differently (more susceptible to changes in dark colors) it looks weird.
Because the human eyes prefer to see brightness colors according to the top scale, monitors (still today) use a power relationship for displaying output colors so that the original physical brightness colors are mapped to the non-linear brightness colors in the top scale.
This non-linear mapping of monitors does output more pleasing brightness results for our eyes, but when it comes to rendering graphics there is one issue: all the color and brightness options we configure in our applications are based on what we perceive from the monitor and thus all the options are actually non-linear brightness/color options. Take a look at the graph below:
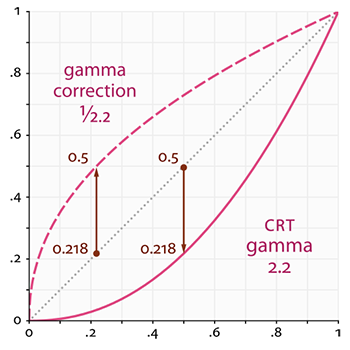
The dotted line represents color/light values in linear space and the solid line represents the color space that monitors display. If we double a color in linear space, its result is indeed double the value. For instance, take a light's color vector (0.5, 0.0, 0.0) which represents a semi-dark red light. If we would double this light in linear space it would become (1.0, 0.0, 0.0) as you can see in the graph. However, the original color gets displayed on the monitor as (0.218, 0.0, 0.0) as you can see from the graph. Here's where the issues start to rise: once we double the dark-red light in linear space, it actually becomes more than 4.5 times as bright on the monitor!
Up until this chapter we have assumed we were working in linear space, but we've actually been working in the monitor's output space so all colors and lighting variables we configured weren't physically correct, but merely looked (sort of) right on our monitor. For this reason, we (and artists) generally set lighting values way brighter than they should be (since the monitor darkens them) which as a result makes most linear-space calculations incorrect. Note that the monitor (CRT) and linear graph both start and end at the same position; it is the intermediate values that are darkened by the display.
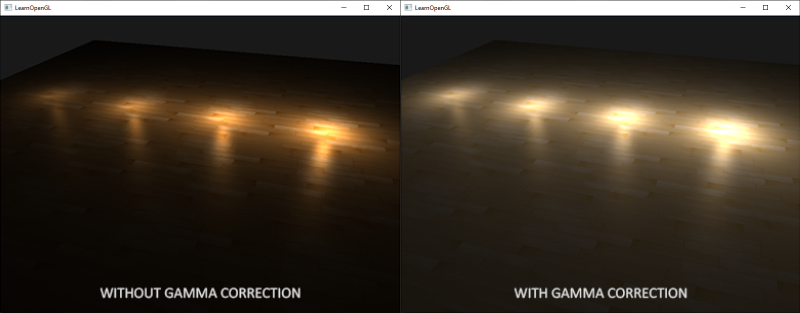
Because colors are configured based on the display's output, all intermediate (lighting) calculations in linear-space are physically incorrect. This becomes more obvious as more advanced lighting algorithms are in place, as you can see in the image below:
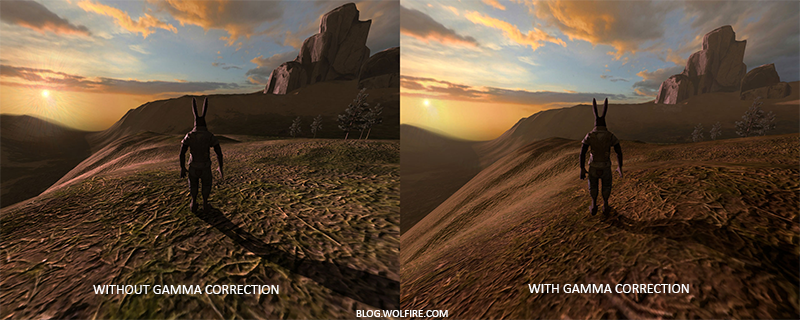
You can see that with gamma correction, the (updated) color values work more nicely together and darker areas show more details. Overall, a better image quality with a few small modifications.
Without properly correcting this monitor gamma, the lighting looks wrong and artists will have a hard time getting realistic and good-looking results. The solution is to apply
Gamma correction
The idea of gamma correction is to apply the inverse of the monitor's gamma to the final output color before displaying to the monitor. Looking back at the gamma curve graph earlier this chapter we see another dashed line that is the inverse of the monitor's gamma curve. We multiply each of the linear output colors by this inverse gamma curve (making them brighter) and as soon as the colors are displayed on the monitor, the monitor's gamma curve is applied and the resulting colors become linear. We effectively brighten the intermediate colors so that as soon as the monitor darkens them, it balances all out.
Let's give another example. Say we again have the dark-red color \((0.5, 0.0, 0.0)\). Before displaying this color to the monitor we first apply the gamma correction curve to the color value. Linear colors displayed by a monitor are roughly scaled to a power of \(2.2\) so the inverse requires scaling the colors by a power of \(1/2.2\). The gamma-corrected dark-red color thus becomes \((0.5, 0.0, 0.0)^{1/2.2} = (0.5, 0.0, 0.0)^{0.45} = (0.73, 0.0, 0.0)\). The corrected colors are then fed to the monitor and as a result the color is displayed as \((0.73, 0.0, 0.0)^{2.2} = (0.5, 0.0, 0.0)\). You can see that by using gamma-correction, the monitor now finally displays the colors as we linearly set them in the application.
There are two ways to apply gamma correction to your scene:
- By using OpenGL's built-in sRGB framebuffer support.
- By doing the gamma correction ourselves in the fragment shader(s).
The first option is probably the easiest, but also gives you less control. By enabling GL_FRAMEBUFFER_SRGB you tell OpenGL that each subsequent drawing command should first gamma correct colors (from the sRGB color space) before storing them in color buffer(s). The sRGB is a color space that roughly corresponds to a gamma of 2.2 and a standard for most devices. After enabling GL_FRAMEBUFFER_SRGB, OpenGL automatically performs gamma correction after each fragment shader run to all subsequent framebuffers, including the default framebuffer.
Enabling GL_FRAMEBUFFER_SRGB is as simple as calling
glEnable (GL_FRAMEBUFFER_SRGB);
From now on your rendered images will be gamma corrected and as this is done by the hardware it is completely free. Something you should keep in mind with this approach (and the other approach) is that gamma correction (also) transforms the colors from linear space to non-linear space so it is very important you only do gamma correction at the last and final step. If you gamma-correct your colors before the final output, all subsequent operations on those colors will operate on incorrect values. For instance, if you use multiple framebuffers you probably want intermediate results passed in between framebuffers to remain in linear-space and only have the last framebuffer apply gamma correction before being sent to the monitor.
The second approach requires a bit more work, but also gives us complete control over the gamma operations. We apply gamma correction at the end of each relevant fragment shader run so the final colors end up gamma corrected before being sent out to the monitor:
void main()
{
    // do super fancy lighting in linear space
    [...]
    // apply gamma correction
    float gamma = 2.2;
    FragColor.rgb = pow(fragColor.rgb, vec3(1.0/gamma));
}
The last line of code effectively raises each individual color component of fragColor to 1.0/gamma, correcting the output color of this fragment shader run.
An issue with this approach is that in order to be consistent you have to apply gamma correction to each fragment shader that contributes to the final output. If you have a dozen fragment shaders for multiple objects, you have to add the gamma correction code to each of these shaders. An easier solution would be to introduce a post-processing stage in your render loop and apply gamma correction on the post-processed quad as a final step which you'd only have to do once.
That one line represents the technical implementation of gamma correction. Not all too impressive, but there are a few extra things you have to consider when doing gamma correction.
sRGB textures
Because monitors display colors with gamma applied, whenever you draw, edit, or paint a picture on your computer you are picking colors based on what you see on the monitor. This effectively means all the pictures you create or edit are not in linear space, but in sRGB space e.g. doubling a dark-red color on your screen based on perceived brightness, does not equal double the red component.
As a result, when texture artists create art by eye, all the textures' values are in sRGB space so if we use those textures as they are in our rendering application we have to take this into account. Before we knew about gamma correction this wasn't really an issue, because the textures looked good in sRGB space which is the same space we worked in; the textures were displayed exactly as they are which was fine. However, now that we're displaying everything in linear space, the texture colors will be off as the following image shows:
The texture image is way too bright and this happens because it is actually gamma corrected twice! Think about it, when we create an image based on what we see on the monitor, we effectively gamma correct the color values of an image so that it looks right on the monitor. Because we then again gamma correct in the renderer, the image ends up way too bright.
To fix this issue we have to make sure texture artists work in linear space. However, since it's easier to work in sRGB space and most tools don't even properly support linear texturing, this is probably not the preferred solution.
The other solution is to re-correct or transform these sRGB textures to linear space before doing any calculations on their color values. We can do this as follows:
float gamma = 2.2;
vec3 diffuseColor = pow(texture(diffuse, texCoords).rgb, vec3(gamma));
To do this for each texture in sRGB space is quite troublesome though. Luckily OpenGL gives us yet another solution to our problems by giving us the GL_SRGB and GL_SRGB_ALPHA internal texture formats.
If we create a texture in OpenGL with any of these two sRGB texture formats, OpenGL will automatically correct the colors to linear-space as soon as we use them, allowing us to properly work in linear space. We can specify a texture as an sRGB texture as follows:
glTexImage2D (GL_TEXTURE_2D, 0, GL_SRGB, width, height, 0, GL_RGB, GL_UNSIGNED_BYTE, data);
If you also want to include alpha components in your texture you'll have to specify the texture's internal format as GL_SRGB_ALPHA.
You should be careful when specifying your textures in sRGB space as not all textures will actually be in sRGB space. Textures used for coloring objects (like diffuse textures) are almost always in sRGB space. Textures used for retrieving lighting parameters (like specular maps and normal maps) are almost always in linear space, so if you were to configure these as sRGB textures the lighting will look odd. Be careful in which textures you specify as sRGB.
With our diffuse textures specified as sRGB textures you get the visual output you'd expect again, but this time everything is gamma corrected only once.
Attenuation
Something else that's different with gamma correction is lighting attenuation. In the real physical world, lighting attenuates closely inversely proportional to the squared distance from a light source. In normal English it simply means that the light strength is reduced over the distance to the light source squared, like below:
float attenuation = 1.0 / (distance * distance);
However, when using this equation the attenuation effect is usually way too strong, giving lights a small radius that doesn't look physically right. For that reason other attenuation functions were used (like we discussed in the basic lighting chapter) that give much more control, or the linear equivalent is used:
float attenuation = 1.0 / distance;
The linear equivalent gives more plausible results compared to its quadratic variant without gamma correction, but when we enable gamma correction the linear attenuation looks too weak and the physically correct quadratic attenuation suddenly gives the better results. The image below shows the differences:
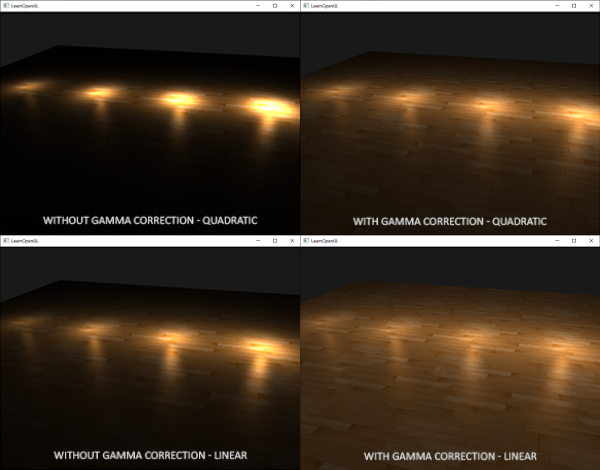
The cause of this difference is that light attenuation functions change brightness, and as we weren't visualizing our scene in linear space we chose the attenuation functions that looked best on our monitor, but weren't physically correct. Think of the squared attenuation function: if we were to use this function without gamma correction, the attenuation function effectively becomes: \((1.0 / distance^2)^{2.2}\) when displayed on a monitor. This creates a much larger attenuation from what we originally anticipated. This also explains why the linear equivalent makes much more sense without gamma correction as this effectively becomes \((1.0 / distance)^{2.2} = 1.0 / distance^{2.2}\) which resembles its physical equivalent a lot more.
You can find the source code of this simple demo scene here. By pressing the spacebar we switch between a gamma corrected and un-corrected scene with both scenes using their texture and attenuation equivalents. It's not the most impressive demo, but it does show how to actually apply all techniques.
To summarize, gamma correction allows us to do all our shader/lighting calculations in linear space. Because linear space makes sense in the physical world, most physical equations now actually give good results (like real light attenuation). The more advanced your lighting becomes, the easier it is to get good looking (and realistic) results with gamma correction. That is also why it's advised to only really tweak your lighting parameters as soon as you have gamma correction in place.
Additional resources
- What every coder should know about gamma: a well written in-depth article by John Novak about gamma correction.
- www.cambridgeincolour.com: more about gamma and gamma correction.
- blog.wolfire.com: blog post by David Rosen about the benefit of gamma correction in graphics rendering.
- renderwonk.com: some extra practical considerations.