Materials
Lighting/Materials
In the real world, each object has a different reaction to light. Steel objects are often shinier than a clay vase for example and a wooden container doesn't react the same to light as a steel container. Some objects reflect the light without much scattering resulting in small specular highlights and others scatter a lot giving the highlight a larger radius. If we want to simulate several types of objects in OpenGL we have to define
In the previous chapter we defined an object and light color to define the visual output of the object, combined with an ambient and specular intensity component. When describing a surface we can define a material color for each of the 3 lighting components: ambient, diffuse and specular lighting. By specifying a color for each of the components we have fine-grained control over the color output of the surface. Now add a shininess component to those 3 colors and we have all the material properties we need:
#version 330 core
struct Material {
    vec3 ambient;
    vec3 diffuse;
    vec3 specular;
    float shininess;
};

uniform Material material;
In the fragment shader we create a struct to store the material properties of the surface. We can also store them as individual uniform values, but storing them as a struct keeps it more organized. We first define the layout of the struct and then simply declare a uniform variable with the newly created struct as its type.
As you can see, we define a color vector for each of the Phong lighting's components. The ambient material vector defines what color the surface reflects under ambient lighting; this is usually the same as the surface's color. The diffuse material vector defines the color of the surface under diffuse lighting. The diffuse color is (just like ambient lighting) set to the desired surface's color. The specular material vector sets the color of the specular highlight on the surface (or possibly even reflect a surface-specific color). Lastly, the shininess impacts the scattering/radius of the specular highlight.
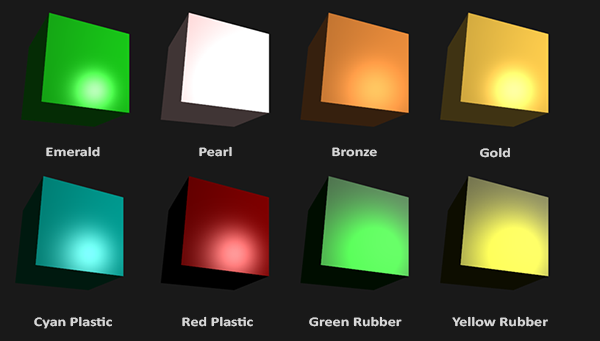
With these 4 components that define an object's material we can simulate many real-world materials. A table as found at devernay.free.fr shows a list of material properties that simulate real materials found in the outside world. The following image shows the effect several of these real world material values have on our cube:

As you can see, by correctly specifying the material properties of a surface it seems to change the perception we have of the object. The effects are clearly noticeable, but for the more realistic results we'll need to replace the cube with something more complicated. In the Model Loading chapters we'll discuss more complicated shapes.
Figuring out the right material settings for an object is a difficult feat that mostly requires experimentation and a lot of experience. It's not that uncommon to completely destroy the visual quality of an object by a misplaced material.
Let's try implementing such a material system in the shaders.
Setting materials
We created a uniform material struct in the fragment shader so next we want to change the lighting calculations to comply with the new material properties. Since all the material variables are stored in a struct we can access them from the material uniform:
void main()
{
    // ambient
    vec3 ambient = lightColor * material.ambient;

    // diffuse
    vec3 norm = normalize(Normal);
    vec3 lightDir = normalize(lightPos - FragPos);
    float diff = max(dot(norm, lightDir), 0.0);
    vec3 diffuse = lightColor * (diff * material.diffuse);

    // specular
    vec3 viewDir = normalize(viewPos - FragPos);
    vec3 reflectDir = reflect(-lightDir, norm);
    float spec = pow(max(dot(viewDir, reflectDir), 0.0), material.shininess);
    vec3 specular = lightColor * (spec * material.specular);

    vec3 result = ambient + diffuse + specular;
    FragColor = vec4(result, 1.0);
}
As you can see we now access all of the material struct's properties wherever we need them and this time calculate the resulting output color with the help of the material's colors. Each of the object's material attributes are multiplied with their respective lighting components.
We can set the material of the object in the application by setting the appropriate uniforms. A struct in GLSL however is not special in any regard when setting uniforms; a struct only really acts as a namespace of uniform variables. If we want to fill the struct we will have to set the individual uniforms, but prefixed with the struct's name:
lightingShader.setVec3("material.ambient", 1.0f, 0.5f, 0.31f);
lightingShader.setVec3("material.diffuse", 1.0f, 0.5f, 0.31f);
lightingShader.setVec3("material.specular", 0.5f, 0.5f, 0.5f);
lightingShader.setFloat("material.shininess", 32.0f);
We set the ambient and diffuse component to the color we'd like the object to have and set the specular component of the object to a medium-bright color; we don't want the specular component to be too strong. We also keep the shininess at 32.
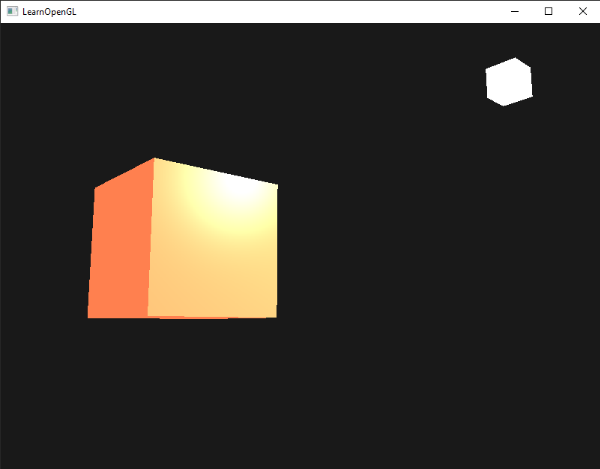
We can now easily influence the object's material from the application. Running the program gives you something like this:

It doesn't really look right though?
Light properties
The object is way too bright. The reason for the object being too bright is that the ambient, diffuse and specular colors are reflected with full force from any light source. Light sources also have different intensities for their ambient, diffuse and specular components respectively. In the previous chapter we solved this by varying the ambient and specular intensities with a strength value. We want to do something similar, but this time by specifying intensity vectors for each of the lighting components. If we'd visualize lightColor as vec3(1.0) the code would look like this:
vec3 ambient  = vec3(1.0) * material.ambient;
vec3 diffuse  = vec3(1.0) * (diff * material.diffuse);
vec3 specular = vec3(1.0) * (spec * material.specular);
So each material property of the object is returned with full intensity for each of the light's components. These vec3(1.0) values can be influenced individually as well for each light source and this is usually what we want. Right now the ambient component of the object is fully influencing the color of the cube. The ambient component shouldn't really have such a big impact on the final color so we can restrict the ambient color by setting the light's ambient intensity to a lower value:
vec3 ambient = vec3(0.1) * material.ambient;
We can influence the diffuse and specular intensity of the light source in the same way. This is closely similar to what we did in the previous chapter; you could say we already created some light properties to influence each lighting component individually. We'll want to create something similar to the material struct for the light properties:
struct Light {
    vec3 position;

    vec3 ambient;
    vec3 diffuse;
    vec3 specular;
};

uniform Light light;
A light source has a different intensity for its ambient, diffuse and specular components. The ambient light is usually set to a low intensity because we don't want the ambient color to be too dominant. The diffuse component of a light source is usually set to the exact color we'd like a light to have; often a bright white color. The specular component is usually kept at vec3(1.0) shining at full intensity. Note that we also added the light's position vector to the struct.
Just like with the material uniform we need to update the fragment shader:
vec3 ambient  = light.ambient * material.ambient;
vec3 diffuse  = light.diffuse * (diff * material.diffuse);
vec3 specular = light.specular * (spec * material.specular);
We then want to set the light intensities in the application:
lightingShader.setVec3("light.ambient",  0.2f, 0.2f, 0.2f);
lightingShader.setVec3("light.diffuse",  0.5f, 0.5f, 0.5f); // darken diffuse light a bit
lightingShader.setVec3("light.specular", 1.0f, 1.0f, 1.0f);
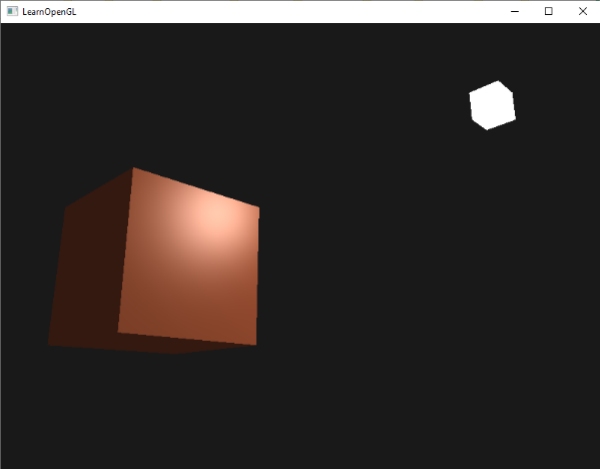
Now that we modulated how the light influences the object's material we get a visual output that looks much like the output from the previous chapter. This time however we got full control over the lighting and the material of the object:

Changing the visual aspects of objects is relatively easy right now. Let's spice things up a bit!
Different light colors
So far we used light colors to only vary the intensity of their individual components by choosing colors that range from white to gray to black, not affecting the actual colors of the object (only its intensity). Since we now have easy access to the light's properties we can change their colors over time to get some really interesting effects. Since everything is already set up in the fragment shader, changing the light's colors is easy and immediately creates some funky effects:
As you can see, a different light color greatly influences the object's color output. Since the light color directly influences what colors the object can reflect (as you may remember from the Colors chapter) it has a significant impact on the visual output.
We can easily change the light's colors over time by changing the light's ambient and diffuse colors via
glm::vec3 lightColor;
lightColor.x = sin(glfwGetTime () * 2.0f);
lightColor.y = sin(glfwGetTime () * 0.7f);
lightColor.z = sin(glfwGetTime () * 1.3f);
glm::vec3 diffuseColor = lightColor * glm::vec3(0.5f);
glm::vec3 ambientColor = diffuseColor * glm::vec3(0.2f);
lightingShader.setVec3("light.ambient", ambientColor);
lightingShader.setVec3("light.diffuse", diffuseColor);
Try and experiment with several lighting and material values and see how they affect the visual output. You can find the source code of the application here.
Exercises
- Can you make it so that changing the light color changes the color of the light's cube object?
- Can you simulate some of the real-world objects by defining their respective materials like we've seen at the start of this chapter? Note that the table's ambient values are not the same as the diffuse values; they didn't take light intensities into account. To correctly set their values you'd have to set all the light intensities to
vec3(1.0)to get the same output: solution of cyan plastic container.


