


Render text
In-Practice/2D-Game/Render-text
In this chapter we'll be adding the final enhancements to the game by adding a life system, a win condition, and feedback in the form of rendered text. This chapter heavily builds upon the earlier introduced Text Rendering chapter so it is highly advised to first work your way through that chapter if you haven't already.
In Breakout all text rendering code is encapsulated within a class called
The content of the text renderer's functions is almost exactly the same as the code from the text rendering chapter. However, the code for rendering glyphs onto the screen is slightly different:
void TextRenderer::RenderText(std::string text, float x, float y, float scale, glm::vec3 color)
{
    [...]
    for (c = text.begin(); c != text.end(); c++)
    {
        float xpos = x + ch.Bearing.x * scale;
        float ypos = y + (this->Characters['H'].Bearing.y - ch.Bearing.y) * scale;

        float w = ch.Size.x * scale;
        float h = ch.Size.y * scale;
        // update VBO for each character
        float vertices[6][4] = {
            { xpos,     ypos + h,   0.0f, 1.0f },
            { xpos + w, ypos,       1.0f, 0.0f },
            { xpos,     ypos,       0.0f, 0.0f },

            { xpos,     ypos + h,   0.0f, 1.0f },
            { xpos + w, ypos + h,   1.0f, 1.0f },
            { xpos + w, ypos,       1.0f, 0.0f }
        };
        [...]
    }
}
The reason for it being slightly different is that we use a different orthographic projection matrix from the one we've used in the text rendering chapter. In the text rendering chapter all y values ranged from bottom to top, while in the Breakout game all y values range from top to bottom with a y coordinate of 0.0 corresponding to the top edge of the screen. This means we have to slightly modify how we calculate the vertical offset.
Since we now render downwards from
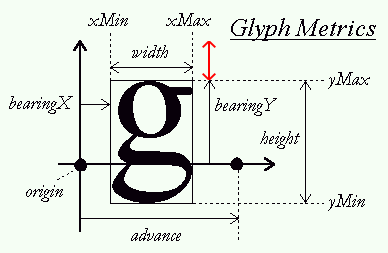
To calculate this vertical offset we need to get the top of the glyph space (the length of the black vertical arrow from the origin). Unfortunately, FreeType has no such metric for us. What we do know is that that some glyphs always touch this top edge; characters like 'H', 'T' or 'X'. So what if we calculate the length of this red vector by subtracting bearingY from any of these top-reaching glyphs by bearingY of the glyph in question. This way, we push the glyph down based on how far its top point differs from the top edge.
float ypos = y + (this->Characters['H'].Bearing.y - ch.Bearing.y) * scale;
In addition to updating the ypos calculation, we also switched the order of the vertices a bit to make sure all the vertices are still front facing when multiplied with the current orthographic projection matrix (as discussed in the face culling chapter).
Adding the
TextRenderer  *Text;

void Game::Init()
{
    [...]
    Text = new TextRenderer(this->Width, this->Height);
    Text->Load("fonts/ocraext.TTF", 24);
}
The text renderer is initialized with a font called OCR A Extended that you can download from here. If the font is not to your liking, feel free to use a different font.
Now that we have a text renderer, let's finish the gameplay mechanics.
Player lives
Instead of immediately resetting the game as soon as the ball reaches the bottom edge, we'd like to give the player a few extra chances. We do this in the form of player lives, where the player begins with an initial number of lives (say 3) and each time the ball touches the bottom edge, the player's life total is decreased by 1. Only when the player's life total becomes 0 we reset the game. This makes it easier for the player to finish a level while also building tension.
We keep count of the lives of a player by adding it to the game class (initialized within the constructor to a value of 3):
class Game
{
    [...]
    public:
        unsigned int Lives;
}
We then modify the game's 0:
void Game::Update(float dt)
{
    [...]
    if (Ball->Position.y >= this->Height) // did ball reach bottom edge?
    {
        --this->Lives;
        // did the player lose all his lives? : Game over
        if (this->Lives == 0)
        {
            this->ResetLevel();
            this->State = GAME_MENU;
        }
        this->ResetPlayer();
    }
}
As soon as the player is game over (lives equals 0), we reset the level and change the game state to GAME_MENU which we'll get to later.
Don't forget to reset the player's life total as soon as we reset the game/level:
void Game::ResetLevel()
{
    [...]
    this->Lives = 3;
}
The player now has a working life total, but has no way of seeing how many lives he currently has while playing the game. That's where the text renderer comes in:
void Game::Render()
{
    if (this->State == GAME_ACTIVE)
    {
        [...]
        std::stringstream ss; ss << this->Lives;
        Text->RenderText("Lives:" + ss.str(), 5.0f, 5.0f, 1.0f);
    }
}
Here we convert the number of lives to a string, and display it at the top-left of the screen. It'll now look a bit like this:
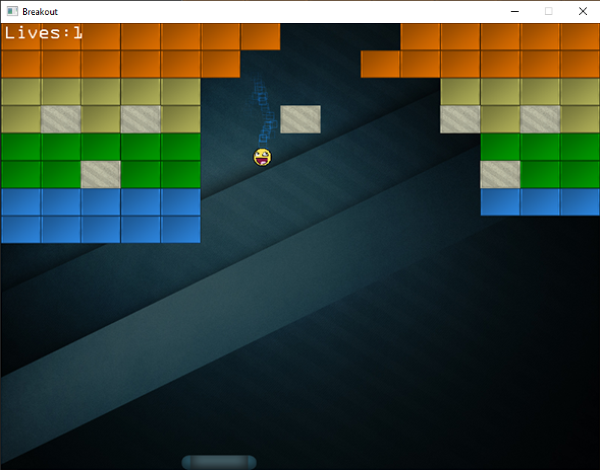
As soon as the ball touches the bottom edge, the player's life total is decreased which is instantly visible at the top-left of the screen.
Level selection
Whenever the user is in the game state GAME_MENU, we'd like to give the player the control to select the level he'd like to play in. With either the 'w' or 's' key the player should be able to scroll through any of the levels we loaded. Whenever the player feels like the chosen level is indeed the level he'd like to play in, he can press the enter key to switch from the game's GAME_MENU state to the GAME_ACTIVE state.
Allowing the player to choose a level is not too difficult. All we have to do is increase or decrease the game class's Level variable based on whether he pressed 'w' or 's' respectively:
if (this->State == GAME_MENU)
{
    if (this->Keys[GLFW_KEY_ENTER])
        this->State = GAME_ACTIVE;
    if (this->Keys[GLFW_KEY_W])
        this->Level = (this->Level + 1) % 4;
    if (this->Keys[GLFW_KEY_S])
    {
        if (this->Level > 0)
            --this->Level;
        else
            this->Level = 3;
    }
}
We use the modulus operator (%) to make sure the Level variable remains within the acceptable level range (between 0 and 3).
We also want to define what we want to render when we're in the menu state. We'd like to give the player some instructions in the form of text and also display the selected level in the background.
void Game::Render()
{
    if (this->State == GAME_ACTIVE || this->State == GAME_MENU)
    {
        [...] // Game state's rendering code
    }
    if (this->State == GAME_MENU)
    {
        Text->RenderText("Press ENTER to start", 250.0f, Height / 2, 1.0f);
        Text->RenderText("Press W or S to select level", 245.0f, Height / 2 + 20.0f, 0.75f);
    }
}
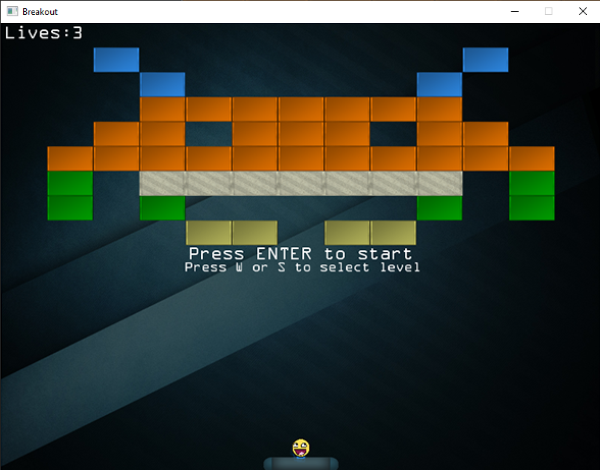
Here we render the game whenever we're in either the GAME_ACTIVE state or the GAME_MENU state, and whenever we're in the GAME_MENU state we also render two lines of text to inform the player to select a level and/or accept his choice. Note that for this to work when launching the game you do have to set the game's state as GAME_MENU by default.
It looks great, but once you try to run the code you'll probably notice that as soon as you press either the 'w' or the 's' key, the game rapidly scrolls through the levels making it difficult to select the level you want to play in. This happens because the game records the key press over frames until we release the key. This causes the
We can solve this issue with a little trick commonly found within GUI systems. The trick is to, not only record the keys currently pressed, but also store the keys that have been processed once, until released again. We then check (before processing) whether the key has not yet been processed, and if so, process this key after which we store this key as being processed. Once we want to process the same key again without the key having been released, we do not process the key. This probably sounds somewhat confusing, but as soon as you see it in practice it (probably) starts to make sense.
First we have to create another array of bool values to indicate which keys have been processed. We define this within the game class:
class Game
{
    [...]
    public:
        bool KeysProcessed[1024];
}
We then set the relevant key(s) to true as soon as they're processed and make sure to only process the key if it wasn't processed before (until released):
void Game::ProcessInput(float dt)
{
    if (this->State == GAME_MENU)
    {
        if (this->Keys[GLFW_KEY_ENTER] && !this->KeysProcessed[GLFW_KEY_ENTER])
        {
            this->State = GAME_ACTIVE;
            this->KeysProcessed[GLFW_KEY_ENTER] = true;
        }
        if (this->Keys[GLFW_KEY_W] && !this->KeysProcessed[GLFW_KEY_W])
        {
            this->Level = (this->Level + 1) % 4;
            this->KeysProcessed[GLFW_KEY_W] = true;
        }
        if (this->Keys[GLFW_KEY_S] && !this->KeysProcessed[GLFW_KEY_S])
        {
            if (this->Level > 0)
                --this->Level;
            else
                this->Level = 3;
            this->KeysProcessed[GLFW_KEY_S] = true;
        }
    }
    [...]
}
Now as soon as the key's value in the KeysProcessed array has not yet been set, we process the key and set its value to true. Next time we reach the if condition of the same key, it will have been processed so we'll pretend we never pressed the button until it's released again.
Within GLFW's key callback function we then need to reset the key's processed value as soon as it's released so we can process it again the next time it's pressed:
void key_callback(GLFWwindow* window, int key, int scancode, int action, int mode)
{
    [...]
    if (key >= 0 && key < 1024)
    {
        if (action == GLFW_PRESS)
            Breakout.Keys[key] = true;
        else if (action == GLFW_RELEASE)
        {
            Breakout.Keys[key] = false;
            Breakout.KeysProcessed[key] = false;
        }
    }
}
Launching the game gives us a neat level select screen that now precisely selects a single level per key press, no matter how long we press he key.
Winning
Currently the player is able to select levels, play the game, and fail in doing so to lose. It is kind of unfortunate if the player finds out after destroying all the bricks he cannot in any way win the game. So let's fix that.
The player wins when all of the non-solid blocks have been destroyed. We already created a function to check for this condition in the
bool GameLevel::IsCompleted()
{
    for (GameObject &tile : this->Bricks)
        if (!tile.IsSolid && !tile.Destroyed)
            return false;
    return true;
}
We check all bricks in the game level and if a single non-solid brick isn't yet destroyed we return false. All we have to do is check for this condition in the game's true we change the game state to GAME_WIN:
void Game::Update(float dt)
{
    [...]
    if (this->State == GAME_ACTIVE && this->Levels[this->Level].IsCompleted())
    {
        this->ResetLevel();
        this->ResetPlayer();
        Effects->Chaos = true;
        this->State = GAME_WIN;
    }
}
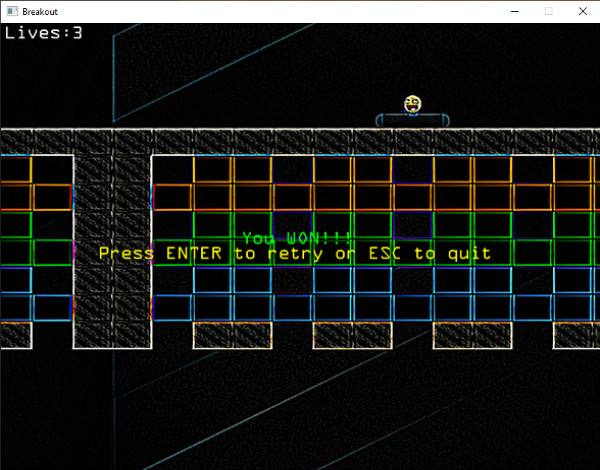
Whenever the level is completed while the game is active, we reset the game and display a small victory message in the GAME_WIN state. For fun we'll also enable the chaos effect while in the GAME_WIN screen. In the
void Game::Render()
{
    [...]
    if (this->State == GAME_WIN)
    {
        Text->RenderText(
            "You WON!!!", 320.0, Height / 2 - 20.0, 1.0, glm::vec3(0.0, 1.0, 0.0)
        );
        Text->RenderText(
            "Press ENTER to retry or ESC to quit", 130.0, Height / 2, 1.0, glm::vec3(1.0, 1.0, 0.0)
        );
    }
}
Then we of course have to actually catch the mentioned keys:
void Game::ProcessInput(float dt)
{
    [...]
    if (this->State == GAME_WIN)
    {
        if (this->Keys[GLFW_KEY_ENTER])
        {
            this->KeysProcessed[GLFW_KEY_ENTER] = true;
            Effects->Chaos = false;
            this->State = GAME_MENU;
        }
    }
}
If you're then good enough to actually win the game, you'd get the following image:
And that is it! The final piece of the puzzle of the Breakout game we've been actively working on. Try it out, customize it to your liking, and show it to all your family and friends!
You can find the final version of the game's code below:
Further reading
- 70+ Best Free Fonts for Designers: summarized list of a large group of fonts to use in your project for personal or commercial use.