


Shaders
Getting-started/Shaders
As mentioned in the Hello Triangle chapter, shaders are little programs that rest on the GPU. These programs are run for each specific section of the graphics pipeline. In a basic sense, shaders are nothing more than programs transforming inputs to outputs. Shaders are also very isolated programs in that they're not allowed to communicate with each other; the only communication they have is via their inputs and outputs.
In the previous chapter we briefly touched the surface of shaders and how to properly use them. We will now explain shaders, and specifically the OpenGL Shading Language, in a more general fashion.
GLSL
Shaders are written in the C-like language GLSL. GLSL is tailored for use with graphics and contains useful features specifically targeted at vector and matrix manipulation.
Shaders always begin with a version declaration, followed by a list of input and output variables, uniforms and its
A shader typically has the following structure:
#version version_number
in type in_variable_name;
in type in_variable_name;

out type out_variable_name;

uniform type uniform_name;

void main()
{
  // process input(s) and do some weird graphics stuff
  ...
  // output processed stuff to output variable
  out_variable_name = weird_stuff_we_processed;
}
When we're talking specifically about the vertex shader each input variable is also known as a
int nrAttributes;
glGetIntegerv(GL_MAX_VERTEX_ATTRIBS, &nrAttributes);
std::cout << "Maximum nr of vertex attributes supported: " << nrAttributes << std::endl;
This often returns the minimum of 16 which should be more than enough for most purposes.
Types
GLSL has, like any other programming language, data types for specifying what kind of variable we want to work with. GLSL has most of the default basic types we know from languages like C: int, float, double, uint and bool. GLSL also features two container types that we'll be using a lot, namely vectors and matrices. We'll discuss matrices in a later chapter.
Vectors
A vector in GLSL is a 2,3 or 4 component container for any of the basic types just mentioned. They can take the following form (n represents the number of components):
vecn: the default vector ofnfloats.bvecn: a vector ofnbooleans.ivecn: a vector ofnintegers.uvecn: a vector ofnunsigned integers.dvecn: a vector ofndouble components.
Most of the time we will be using the basic vecn since floats are sufficient for most of our purposes.
Components of a vector can be accessed via vec.x where x is the first component of the vector. You can use .x, .y, .z and .w to access their first, second, third and fourth component respectively. GLSL also allows you to use rgba for colors or stpq for texture coordinates, accessing the same components.
The vector datatype allows for some interesting and flexible component selection called
vec2 someVec;
vec4 differentVec = someVec.xyxx;
vec3 anotherVec = differentVec.zyw;
vec4 otherVec = someVec.xxxx + anotherVec.yxzy;
You can use any combination of up to 4 letters to create a new vector (of the same type) as long as the original vector has those components; it is not allowed to access the .z component of a vec2 for example. We can also pass vectors as arguments to different vector constructor calls, reducing the number of arguments required:
vec2 vect = vec2(0.5, 0.7);
vec4 result = vec4(vect, 0.0, 0.0);
vec4 otherResult = vec4(result.xyz, 1.0);
Vectors are thus a flexible datatype that we can use for all kinds of input and output. Throughout the book you'll see plenty of examples of how we can creatively manage vectors.
Ins and outs
Shaders are nice little programs on their own, but they are part of a whole and for that reason we want to have inputs and outputs on the individual shaders so that we can move stuff around. GLSL defined the in and out keywords specifically for that purpose. Each shader can specify inputs and outputs using those keywords and wherever an output variable matches with an input variable of the next shader stage they're passed along. The vertex and fragment shader differ a bit though.
The vertex shader should receive some form of input otherwise it would be pretty ineffective. The vertex shader differs in its input, in that it receives its input straight from the vertex data. To define how the vertex data is organized we specify the input variables with location metadata so we can configure the vertex attributes on the CPU. We've seen this in the previous chapter as layout (location = 0). The vertex shader thus requires an extra layout specification for its inputs so we can link it with the vertex data.
layout (location = 0) specifier and query for the attribute locations in your OpenGL code via
The other exception is that the fragment shader requires a vec4 color output variable, since the fragment shaders needs to generate a final output color. If you fail to specify an output color in your fragment shader, the color buffer output for those fragments will be undefined (which usually means OpenGL will render them either black or white).
So if we want to send data from one shader to the other we'd have to declare an output in the sending shader and a similar input in the receiving shader. When the types and the names are equal on both sides OpenGL will link those variables together and then it is possible to send data between shaders (this is done when linking a program object). To show you how this works in practice we're going to alter the shaders from the previous chapter to let the vertex shader decide the color for the fragment shader.
Vertex shader
#version 330 core
layout (location = 0) in vec3 aPos; // the position variable has attribute position 0

out vec4 vertexColor; // specify a color output to the fragment shader

void main()
{
    gl_Position = vec4(aPos, 1.0); // see how we directly give a vec3 to vec4's constructor
    vertexColor = vec4(0.5, 0.0, 0.0, 1.0); // set the output variable to a dark-red color
}
#version 330 core
out vec4 FragColor;

in vec4 vertexColor; // the input variable from the vertex shader (same name and same type)

void main()
{
    FragColor = vertexColor;
}
You can see we declared a vertexColor variable as a vec4 output that we set in the vertex shader and we declare a similar vertexColor input in the fragment shader. Since they both have the same type and name, the vertexColor in the fragment shader is linked to the vertexColor in the vertex shader. Because we set the color to a dark-red color in the vertex shader, the resulting fragments should be dark-red as well. The following image shows the output:

There we go! We just managed to send a value from the vertex shader to the fragment shader. Let's spice it up a bit and see if we can send a color from our application to the fragment shader!
Uniforms
To declare a uniform in GLSL we simply add the uniform keyword to a shader with a type and a name. From that point on we can use the newly declared uniform in the shader. Let's see if this time we can set the color of the triangle via a uniform:
#version 330 core
out vec4 FragColor;

uniform vec4 ourColor; // we set this variable in the OpenGL code.

void main()
{
    FragColor = ourColor;
}
We declared a uniform vec4 ourColor in the fragment shader and set the fragment's output color to the content of this uniform value. Since uniforms are global variables, we can define them in any shader stage we'd like so no need to go through the vertex shader again to get something to the fragment shader. We're not using this uniform in the vertex shader so there's no need to define it there.
The uniform is currently empty; we haven't added any data to the uniform yet so let's try that. We first need to find the index/location of the uniform attribute in our shader. Once we have the index/location of the uniform, we can update its values. Instead of passing a single color to the fragment shader, let's spice things up by gradually changing color over time:
float timeValue = glfwGetTime ();
float greenValue = (sin(timeValue) / 2.0f) + 0.5f;
int vertexColorLocation = glGetUniformLocation (shaderProgram, "ourColor");
glUseProgram (shaderProgram);
glUniform 4f(vertexColorLocation, 0.0f, greenValue, 0.0f, 1.0f);
First, we retrieve the running time in seconds via 0.0 - 1.0 by using the
Then we query for the location of the ourColor uniform using -1, it could not find the location. Lastly we can set the uniform value using the
Because OpenGL is in its core a C library it does not have native support for function overloading, so wherever a function can be called with different types OpenGL defines new functions for each type required;
f: the function expects afloatas its value.i: the function expects anintas its value.ui: the function expects anunsigned intas its value.3f: the function expects 3floats as its value.fv: the function expects afloatvector/array as its value.
fv version).
Now that we know how to set the values of uniform variables, we can use them for rendering. If we want the color to gradually change, we want to update this uniform every frame, otherwise the triangle would maintain a single solid color if we only set it once. So we calculate the greenValue and update the uniform each render iteration:
while(!glfwWindowShouldClose (window))
{
// input
processInput(window);
// render
// clear the colorbuffer
glClear ColorglClear (GL_COLOR_BUFFER_BIT);
// be sure to activate the shader
glUseProgram (shaderProgram);
// update the uniform color
float timeValue = glfwGetTime ();
float greenValue = sin(timeValue) / 2.0f + 0.5f;
int vertexColorLocation = glGetUniformLocation (shaderProgram, "ourColor");
glUniform 4f(vertexColorLocation, 0.0f, greenValue, 0.0f, 1.0f);
// now render the triangle
glBindVertexArray (VAO);
glDrawArrays (GL_TRIANGLES, 0, 3);
// swap buffers and poll IO events
glfwSwapBuffers (window);
glfwPollEvents ();
}
The code is a relatively straightforward adaptation of the previous code. This time, we update a uniform value each frame before drawing the triangle. If you update the uniform correctly you should see the color of your triangle gradually change from green to black and back to green.
Check out the source code here if you're stuck.
As you can see, uniforms are a useful tool for setting attributes that may change every frame, or for interchanging data between your application and your shaders, but what if we want to set a color for each vertex? In that case we'd have to declare as many uniforms as we have vertices. A better solution would be to include more data in the vertex attributes which is what we're going to do now.
More attributes!
We saw in the previous chapter how we can fill a VBO, configure vertex attribute pointers and store it all in a VAO. This time, we also want to add color data to the vertex data. We're going to add color data as 3 floats to the vertices array. We assign a red, green and blue color to each of the corners of our triangle respectively:
float vertices[] = {
    // positions         // colors
     0.5f, -0.5f, 0.0f,  1.0f, 0.0f, 0.0f,   // bottom right
    -0.5f, -0.5f, 0.0f,  0.0f, 1.0f, 0.0f,   // bottom left
     0.0f,  0.5f, 0.0f,  0.0f, 0.0f, 1.0f    // top
};
Since we now have more data to send to the vertex shader, it is necessary to adjust the vertex shader to also receive our color value as a vertex attribute input. Note that we set the location of the aColor attribute to 1 with the layout specifier:
#version 330 core
layout (location = 0) in vec3 aPos;   // the position variable has attribute position 0
layout (location = 1) in vec3 aColor; // the color variable has attribute position 1

out vec3 ourColor; // output a color to the fragment shader

void main()
{
    gl_Position = vec4(aPos, 1.0);
    ourColor = aColor; // set ourColor to the input color we got from the vertex data
}
Since we no longer use a uniform for the fragment's color, but now use the ourColor output variable we'll have to change the fragment shader as well:
#version 330 core
out vec4 FragColor;
in vec3 ourColor;

void main()
{
    FragColor = vec4(ourColor, 1.0);
}
Because we added another vertex attribute and updated the VBO's memory we have to re-configure the vertex attribute pointers. The updated data in the VBO's memory now looks a bit like this:
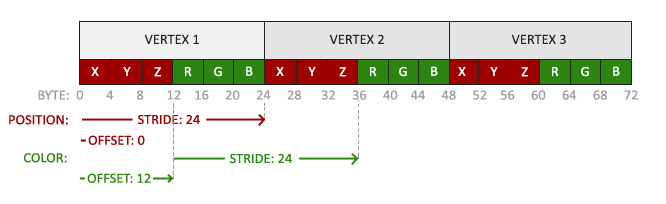
Knowing the current layout we can update the vertex format with
// position attribute
glVertexAttribPointer (0, 3, GL_FLOAT, GL_FALSE, 6 * sizeof(float), (void*)0);
glEnable VertexAttribArrayglVertexAttribPointer (1, 3, GL_FLOAT, GL_FALSE, 6 * sizeof(float), (void*)(3* sizeof(float)));
glEnable VertexAttribArray
The first few arguments of 1. The color values have a size of 3 floats and we do not normalize the values.
Since we now have two vertex attributes we have to re-calculate the stride value. To get the next attribute value (e.g. the next x component of the position vector) in the data array we have to move 6 floats to the right, three for the position values and three for the color values. This gives us a stride value of 6 times the size of a float in bytes (= 24 bytes).
Also, this time we have to specify an offset. For each vertex, the position vertex attribute is first so we declare an offset of 0. The color attribute starts after the position data so the offset is 3 * sizeof(float) in bytes (= 12 bytes).
Running the application should result in the following image:

Check out the source code here if you're stuck.
The image may not be exactly what you would expect, since we only supplied 3 colors, not the huge color palette we're seeing right now. This is all the result of something called
Based on these positions, it 70% of the line, its resulting color input attribute would then be a linear combination of green and blue; to be more precise: 30% blue and 70% green.
This is exactly what happened at the triangle. We have 3 vertices and thus 3 colors, and judging from the triangle's pixels it probably contains around 50000 fragments, where the fragment shader interpolated the colors among those pixels. If you take a good look at the colors you'll see it all makes sense: red to blue first gets to purple and then to blue. Fragment interpolation is applied to all the fragment shader's input attributes.
Our own shader class
Writing, compiling and managing shaders can be quite cumbersome. As a final touch on the shader subject we're going to make our life a bit easier by building a shader class that reads shaders from disk, compiles and links them, checks for errors and is easy to use. This also gives you a bit of an idea how we can encapsulate some of the knowledge we learned so far into useful abstract objects.
We will create the shader class entirely in a header file, mainly for learning purposes and portability. Let's start by adding the required includes and by defining the class structure:
#ifndef SHADER_H
#define SHADER_H

#include <glad/glad.h> // include glad to get all the required OpenGL headers

#include <string>
#include <fstream>
#include <sstream>
#include <iostream>


class Shader
{
public:
    // the program ID
    unsigned int ID;

    // constructor reads and builds the shader
    Shader(const char* vertexPath, const char* fragmentPath);
    // use/activate the shader
    void use();
    // utility uniform functions
    void setBool(const std::string &name, bool value) const;
    void setInt(const std::string &name, int value) const;
    void setFloat(const std::string &name, float value) const;
};

#endif
The shader class holds the ID of the shader program. Its constructor requires the file paths of the source code of the vertex and fragment shader respectively that we can store on disk as simple text files. To add a little extra we also add several utility functions to ease our lives a little:
Reading from file
We're using C++ filestreams to read the content from the file into several string objects:
Shader(const char* vertexPath, const char* fragmentPath)
{
    // 1. retrieve the vertex/fragment source code from filePath
    std::string vertexCode;
    std::string fragmentCode;
    std::ifstream vShaderFile;
    std::ifstream fShaderFile;
    // ensure ifstream objects can throw exceptions:
    vShaderFile.exceptions (std::ifstream::failbit | std::ifstream::badbit);
    fShaderFile.exceptions (std::ifstream::failbit | std::ifstream::badbit);
    try
    {
        // open files
        vShaderFile.open(vertexPath);
        fShaderFile.open(fragmentPath);
        std::stringstream vShaderStream, fShaderStream;
        // read file's buffer contents into streams
        vShaderStream << vShaderFile.rdbuf();
        fShaderStream << fShaderFile.rdbuf();
        // close file handlers
        vShaderFile.close();
        fShaderFile.close();
        // convert stream into string
        vertexCode   = vShaderStream.str();
        fragmentCode = fShaderStream.str();
    }
    catch(std::ifstream::failure e)
    {
        std::cout << "ERROR::SHADER::FILE_NOT_SUCCESFULLY_READ" << std::endl;
    }
    const char* vShaderCode = vertexCode.c_str();
    const char* fShaderCode = fragmentCode.c_str();
    [...]
Next we need to compile and link the shaders. Note that we're also reviewing if compilation/linking failed and if so, print the compile-time errors. This is extremely useful when debugging (you are going to need those error logs eventually):
// 2. compile shaders
unsigned int vertex, fragment;
int success;
char infoLog[512];
// vertex Shader
vertex = glCreateShader (GL_VERTEX_SHADER);
glShaderSource (vertex, 1, &vShaderCode, NULL);
glCompileShader (vertex);
// print compile errors if any
glGetShaderiv (vertex, GL_COMPILE_STATUS, &success);
if(!success)
{
glGetShaderInfoLog (vertex, 512, NULL, infoLog);
std::cout << "ERROR::SHADER::VERTEX::COMPILATION_FAILED\n" << infoLog << std::endl;
};
// similiar for Fragment Shader
[...]
// shader Program
ID = glCreateProgram ();
glAttachShader (ID, vertex);
glAttachShader (ID, fragment);
glLinkProgram (ID);
// print linking errors if any
glGetProgramiv (ID, GL_LINK_STATUS, &success);
if(!success)
{
glGetProgramInfoLog(ID, 512, NULL, infoLog);
std::cout << "ERROR::SHADER::PROGRAM::LINKING_FAILED\n" << infoLog << std::endl;
}
// delete the shaders as they're linked into our program now and no longer necessary
glDeleteShader (vertex);
glDeleteShader (fragment);
The
void use()
{
glUseProgram (ID);
}
Similarly for any of the uniform setter functions:
void setBool(const std::string &name, bool value) const
{
glUniform 1i(glGetUniformLocation (ID, name.c_str()), (int)value);
}
void setInt(const std::string &name, int value) const
{
glUniform 1i(glGetUniformLocation (ID, name.c_str()), value);
}
void setFloat(const std::string &name, float value) const
{
glUniform 1f(glGetUniformLocation (ID, name.c_str()), value);
}
And there we have it, a completed shader class. Using the shader class is fairly easy; we create a shader object once and from that point on simply start using it:
Shader ourShader("path/to/shaders/shader.vs", "path/to/shaders/shader.fs");
[...]
while(...)
{
    ourShader.use();
    ourShader.setFloat("someUniform", 1.0f);
    DrawStuff();
}
Here we stored the vertex and fragment shader source code in two files called shader.vs and shader.fs. You're free to name your shader files however you like; I personally find the extensions .vs and .fs quite intuitive.
You can find the source code here using our newly created shader class. Note that you can click the shader file paths to find the shaders' source code.
Exercises
- Adjust the vertex shader so that the triangle is upside down: solution.
- Specify a horizontal offset via a uniform and move the triangle to the right side of the screen in the vertex shader using this offset value: solution.
- Output the vertex position to the fragment shader using the
outkeyword and set the fragment's color equal to this vertex position (see how even the vertex position values are interpolated across the triangle). Once you managed to do this; try to answer the following question: why is the bottom-left side of our triangle black?: solution.