


Stencil testing
Advanced-OpenGL/Stencil-testing
Once the fragment shader has processed the fragment a so called
A stencil buffer (usually) contains 8 bits per 256 different stencil values per pixel. We can set these stencil values to values of our liking and we can discard or keep fragments whenever a particular fragment has a certain stencil value.
A simple example of a stencil buffer is shown below (pixels not-to-scale):
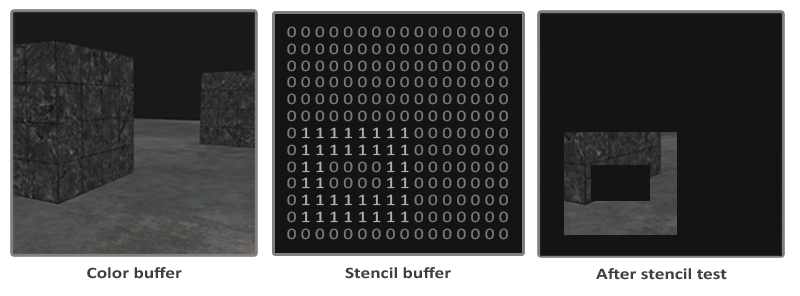
The stencil buffer is first cleared with zeros and then an open rectangle of 1s is stored in the stencil buffer. The fragments of the scene are then only rendered (the others are discarded) wherever the stencil value of that fragment contains a 1.
Stencil buffer operations allow us to set the stencil buffer at specific values wherever we're rendering fragments. By changing the content of the stencil buffer while we're rendering, we're writing to the stencil buffer. In the same (or following) frame(s) we can read these values to discard or pass certain fragments. When using stencil buffers you can get as crazy as you like, but the general outline is usually as follows:
- Enable writing to the stencil buffer.
- Render objects, updating the content of the stencil buffer.
- Disable writing to the stencil buffer.
- Render (other) objects, this time discarding certain fragments based on the content of the stencil buffer.
By using the stencil buffer we can thus discard certain fragments based on the fragments of other drawn objects in the scene.
You can enable stencil testing by enabling GL_STENCIL_TEST. From that point on, all rendering calls will influence the stencil buffer in one way or another.
glEnable (GL_STENCIL_TEST);
Note that you also need to clear the stencil buffer each iteration just like the color and depth buffer:
glClear (GL_COLOR_BUFFER_BIT | GL_DEPTH_BUFFER_BIT | GL_STENCIL_BUFFER_BIT);
Also, just like the depth testing's ANDed with the stencil value about to be written to the buffer. By default this is set to a bitmask of all 1s not affecting the output, but if we were to set this to 0x00 all the stencil values written to the buffer end up as 0s. This is equivalent to depth testing's
glStencilMask (0xFF); // each bit is written to the stencil buffer as is
glStencilMask (0x00); // each bit ends up as 0 in the stencil buffer (disabling writes)
Most of the cases you'll only be using 0x00 or 0xFF as the stencil mask, but it's good to know there are options to set custom bit-masks.
Stencil functions
Similar to depth testing, we have a certain amount of control over when a stencil test should pass or fail and how it should affect the stencil buffer. There are a total of two functions we can use to configure stencil testing:
The
func: sets the stencil test function that determines whether a fragment passes or is discarded. This test function is applied to the stored stencil value and theglStencilFunc refvalue. Possible options are: GL_NEVER, GL_LESS, GL_LEQUAL, GL_GREATER, GL_GEQUAL, GL_EQUAL, GL_NOTEQUAL and GL_ALWAYS. The semantic meaning of these is similar to the depth buffer's functions.ref: specifies the reference value for the stencil test. The stencil buffer's content is compared to this value.mask: specifies a mask that isANDed with both the reference value and the stored stencil value before the test compares them. Initially set to all1s.
So in the case of the simple stencil example we've shown at the start, the function would be set to:
glStencilFunc (GL_EQUAL, 1, 0xFF)
This tells OpenGL that whenever the stencil value of a fragment is equal (GL_EQUAL) to the reference value 1, the fragment passes the test and is drawn, otherwise discarded.
But
The
sfail: action to take if the stencil test fails.dpfail: action to take if the stencil test passes, but the depth test fails.dppass: action to take if both the stencil and the depth test pass.
Then for each of the options you can take any of the following actions:
| Action | Description |
|---|---|
GL_KEEP |
The currently stored stencil value is kept. |
GL_ZERO |
The stencil value is set to 0. |
GL_REPLACE |
The stencil value is replaced with the reference value set with |
GL_INCR |
The stencil value is increased by 1 if it is lower than the maximum value. |
GL_INCR_WRAP |
Same as GL_INCR, but wraps it back to 0 as soon as the maximum value is exceeded. |
GL_DECR |
The stencil value is decreased by 1 if it is higher than the minimum value. |
GL_DECR_WRAP |
Same as GL_DECR, but wraps it to the maximum value if it ends up lower than 0. |
GL_INVERT |
Bitwise inverts the current stencil buffer value. |
By default the (GL_KEEP, GL_KEEP, GL_KEEP) so whatever the outcome of any of the tests, the stencil buffer keeps its values. The default behavior does not update the stencil buffer, so if you want to write to the stencil buffer you need to specify at least one different action for any of the options.
So using
Object outlining
It would be unlikely if you completely understood how stencil testing works from the previous sections alone so we're going to demonstrate a particular useful feature that can be implemented with stencil testing alone called
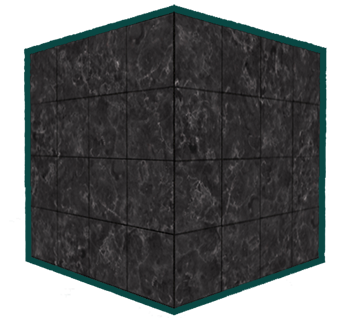
Object outlining does exactly what it says it does. For each object (or only one) we're creating a small colored border around the (combined) objects. This is a particular useful effect when you want to select units in a strategy game for example and need to show the user which of the units were selected. The routine for outlining your objects is as follows:
- Enable stencil writing.
- Set the stencil op to GL_ALWAYS before drawing the (to be outlined) objects, updating the stencil buffer with
1s wherever the objects' fragments are rendered. - Render the objects.
- Disable stencil writing and depth testing.
- Scale each of the objects by a small amount.
- Use a different fragment shader that outputs a single (border) color.
- Draw the objects again, but only if their fragments' stencil values are not equal to
1. - Enable depth testing again and restore stencil func to GL_KEEP.
This process sets the content of the stencil buffer to 1s for each of the object's fragments and when it's time to draw the borders, we draw scaled-up versions of the objects only where the stencil test passes. We're effectively discarding all the fragments of the scaled-up versions that are part of the original objects' fragments using the stencil buffer.
So we're first going to create a very basic fragment shader that outputs a border color. We simply set a hardcoded color value and call the shader shaderSingleColor:
void main()
{
    FragColor = vec4(0.04, 0.28, 0.26, 1.0);
}
Using the scene from the previous chapter we're going to add object outlining to the two containers, so we'll leave the floor out of it. We want to first draw the floor, then the two containers (while writing to the stencil buffer), and then draw the scaled-up containers (while discarding the fragments that write over the previously drawn container fragments).
We first need to enable stencil testing:
glEnable (GL_STENCIL_TEST);
And then in each frame we want to specify the action to take whenever any of the stencil tests succeed or fail:
glStencilOp (GL_KEEP, GL_KEEP, GL_REPLACE);
If any of the tests fail we do nothing; we simply keep the currently stored value that is in the stencil buffer. If both the stencil test and the depth test succeed however, we want to replace the stored stencil value with the reference value set via 1.
We clear the stencil buffer to 0s at the start of the frame and for the containers we update the stencil buffer to 1 for each fragment drawn:
glStencilOp (GL_KEEP, GL_KEEP, GL_REPLACE);
glStencilFunc (GL_ALWAYS, 1, 0xFF); // all fragments should pass the stencil test
glStencilMask (0xFF); // enable writing to the stencil buffer
normalShader.use();
DrawTwoContainers();
By using GL_REPLACE as the stencil op function we make sure that each of the containers' fragments update the stencil buffer with a stencil value of 1. Because the fragments always pass the stencil test, the stencil buffer is updated with the reference value wherever we've drawn them.
Now that the stencil buffer is updated with 1s where the containers were drawn we're going to draw the upscaled containers, but this time with the appropriate test function and disabling writes to the stencil buffer:
glStencilFunc (GL_NOTEQUAL, 1, 0xFF);
glStencilMask (0x00); // disable writing to the stencil buffer
glDisable(GL_DEPTH_TEST);
shaderSingleColor.use();
DrawTwoScaledUpContainers();
We set the stencil function to GL_NOTEQUAL to make sure that we're only drawing parts of the containers that are not equal to 1. This way we only draw the part of the containers that are outside the previously drawn containers. Note that we also disable depth testing so the scaled up containers (e.g. the borders) do not get overwritten by the floor. Make sure to enable the depth buffer again once you're done.
The total object outlining routine for our scene looks something like this:
glEnable (GL_DEPTH_TEST);
glStencilOp (GL_KEEP, GL_KEEP, GL_REPLACE);
glClear (GL_COLOR_BUFFER_BIT | GL_DEPTH_BUFFER_BIT | GL_STENCIL_BUFFER_BIT);
glStencilMask (0x00); // make sure we don't update the stencil buffer while drawing the floor
normalShader.use();
DrawFloor()
glStencilFunc (GL_ALWAYS, 1, 0xFF);
glStencilMask (0xFF);
DrawTwoContainers();
glStencilFunc (GL_NOTEQUAL, 1, 0xFF);
glStencilMask (0x00);
glDisable(GL_DEPTH_TEST);
shaderSingleColor.use();
DrawTwoScaledUpContainers();
glStencilMask (0xFF);
glStencilFunc (GL_ALWAYS, 1, 0xFF);
glEnable (GL_DEPTH_TEST);
As long as you understand the general idea behind stencil testing this shouldn't be too hard to understand. Otherwise try to carefully read the previous sections again and try to completely understand what each of the functions does now that you've seen an example of it can be used.
The result of the outlining algorithm then looks like this:
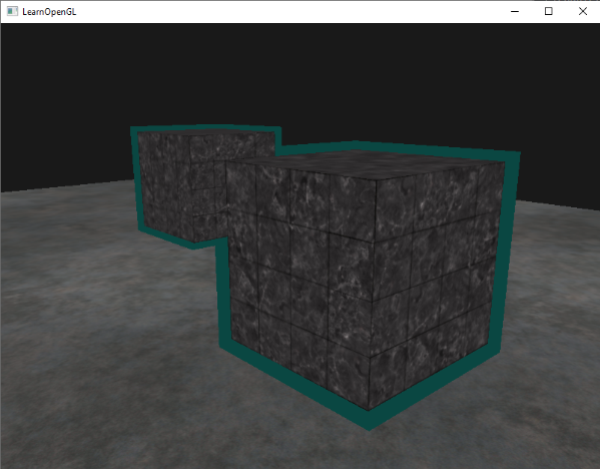
Check the source code here to see the complete code of the object outlining algorithm.
The object outlining algorithm you've seen is commonly used in games to visualize selected objects (think of strategy games) and an algorithm like this can easily be implemented within a model class. You could set a boolean flag within the model class to draw either with borders or without. If you want to be creative you could even give the borders a more natural look with the help of post-processing filters like Gaussian Blur.
Stencil testing has many more purposes (beside outlining objects) like drawing textures inside a rear-view mirror so it neatly fits into the mirror shape, or rendering real-time shadows with a stencil buffer technique called