


Cubemaps
Advanced-OpenGL/Cubemaps
We've been using 2D textures for a while now, but there are more texture types we haven't explored yet and in this chapter we'll discuss a texture type that is a combination of multiple textures mapped into one: a
A cubemap is a texture that contains 6 individual 2D textures that each form one side of a cube: a textured cube. You may be wondering what the point is of such a cube? Why bother combining 6 individual textures into a single entity instead of just using 6 individual textures? Well, cube maps have the useful property that they can be indexed/sampled using a direction vector. Imagine we have a 1x1x1 unit cube with the origin of a direction vector residing at its center. Sampling a texture value from the cube map with an orange direction vector looks a bit like this:
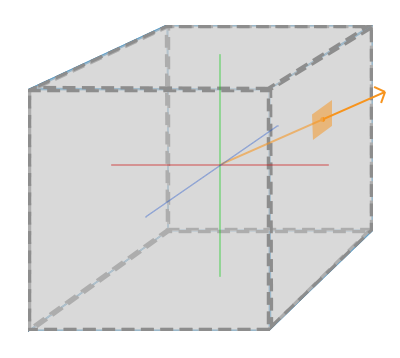
If we imagine we have a cube shape that we attach such a cubemap to, this direction vector would be similar to the (interpolated) local vertex position of the cube. This way we can sample the cubemap using the cube's actual position vectors as long as the cube is centered on the origin. We thus consider all vertex positions of the cube to be its texture coordinates when sampling a cubemap. The result is a texture coordinate that accesses the proper individual
Creating a cubemap
A cubemap is a texture like any other texture, so to create one we generate a texture and bind it to the proper texture target before we do any further texture operations. This time binding it to GL_TEXTURE_CUBE_MAP:
unsigned int textureID;
glGenTextures (1, &textureID);
glBindTexture (GL_TEXTURE_CUBE_MAP, textureID);
Because a cubemap contains 6 textures, one for each face, we have to call
Since we have 6 faces OpenGL gives us 6 special texture targets for targeting a face of the cubemap:
| Texture target | Orientation |
|---|---|
GL_TEXTURE_CUBE_MAP_POSITIVE_X |
Right |
GL_TEXTURE_CUBE_MAP_NEGATIVE_X |
Left |
GL_TEXTURE_CUBE_MAP_POSITIVE_Y |
Top |
GL_TEXTURE_CUBE_MAP_NEGATIVE_Y |
Bottom |
GL_TEXTURE_CUBE_MAP_POSITIVE_Z |
Back |
GL_TEXTURE_CUBE_MAP_NEGATIVE_Z |
Front |
Like many of OpenGL's enums, their behind-the-scenes
int width, height, nrChannels;
unsigned char *data;
for(unsigned int i = 0; i < textures_faces.size(); i++)
{
data = stbi_load(textures_faces[i].c_str(), &width, &height, &nrChannels, 0);
glTexImage2D (
GL_TEXTURE_CUBE_MAP_POSITIVE_X + i,
0, GL_RGB, width, height, 0, GL_RGB, GL_UNSIGNED_BYTE, data
);
}
Here we have a
Because a cubemap is a texture like any other texture, we will also specify its wrapping and filtering methods:
glTexParameter i(GL_TEXTURE_CUBE_MAP, GL_TEXTURE_MAG_FILTER, GL_LINEAR);
glTexParameter i(GL_TEXTURE_CUBE_MAP, GL_TEXTURE_MIN_FILTER, GL_LINEAR);
glTexParameter i(GL_TEXTURE_CUBE_MAP, GL_TEXTURE_WRAP_S, GL_CLAMP_TO_EDGE);
glTexParameter i(GL_TEXTURE_CUBE_MAP, GL_TEXTURE_WRAP_T, GL_CLAMP_TO_EDGE);
glTexParameter i(GL_TEXTURE_CUBE_MAP, GL_TEXTURE_WRAP_R, GL_CLAMP_TO_EDGE);
Don't be scared by the GL_TEXTURE_WRAP_R, this simply sets the wrapping method for the texture's R coordinate which corresponds to the texture's 3rd dimension (like z for positions). We set the wrapping method to GL_CLAMP_TO_EDGE since texture coordinates that are exactly between two faces may not hit an exact face (due to some hardware limitations) so by using GL_CLAMP_TO_EDGE OpenGL always returns their edge values whenever we sample between faces.
Then before drawing the objects that will use the cubemap, we activate the corresponding texture unit and bind the cubemap before rendering; not much of a difference compared to normal 2D textures.
Within the fragment shader we also have to use a different sampler of the type samplerCube that we sample from using the vec3 direction vector instead of a vec2. An example of fragment shader using a cubemap looks like this:
in vec3 textureDir; // direction vector representing a 3D texture coordinate
uniform samplerCube cubemap; // cubemap texture sampler

void main()
{
    FragColor = texture(cubemap, textureDir);
}
That is still great and all, but why bother? Well, it just so happens that there are quite a few interesting techniques that are a lot easier to implement with a cubemap. One of those techniques is creating a
Skybox
A skybox is a (large) cube that encompasses the entire scene and contains 6 images of a surrounding environment, giving the player the illusion that the environment he's in is actually much larger than it actually is. Some examples of skyboxes used in videogames are images of mountains, of clouds, or of a starry night sky. An example of a skybox, using starry night sky images, can be seen in the following screenshot of the third elder scrolls game:
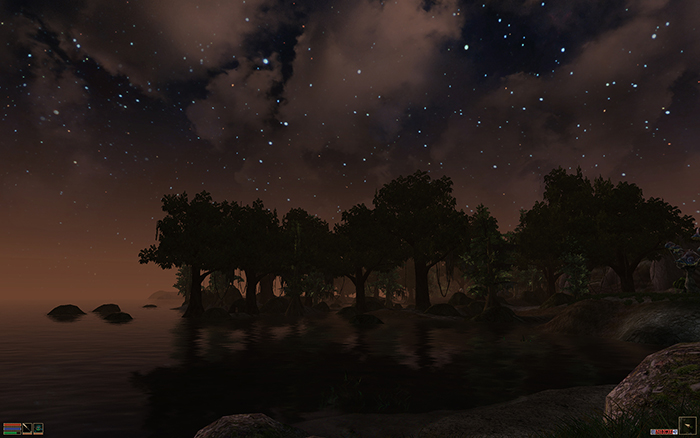
You probably guessed by now that skyboxes like this suit cubemaps perfectly: we have a cube that has 6 faces and needs to be textured per face. In the previous image they used several images of a night sky to give the illusion the player is in some large universe while he's actually inside a tiny little box.
There are usually enough resources online where you could find skyboxes like that. These skybox images usually have the following pattern:
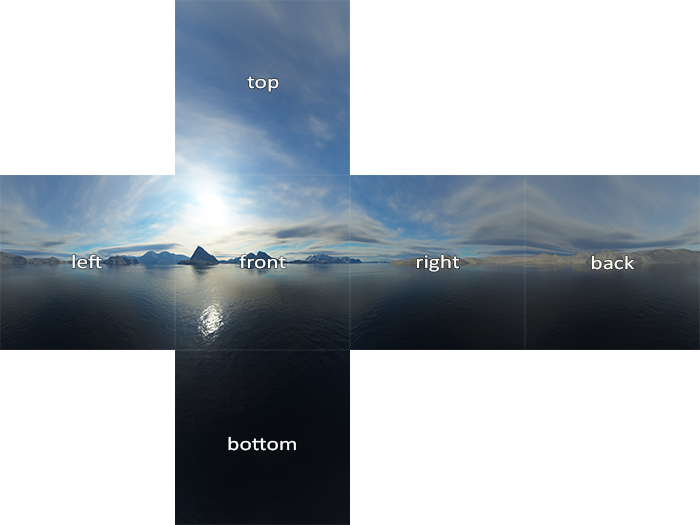
If you would fold those 6 sides into a cube you'd get the completely textured cube that simulates a large landscape. Some resources provide the skybox in a format like that in which case you'd have to manually extract the 6 face images, but in most cases they're provided as 6 single texture images.
This particular (high-quality) skybox is what we'll use for our scene and can be downloaded here.
Loading a skybox
Since a skybox is by itself just a cubemap, loading a skybox isn't too different from what we've seen at the start of this chapter. To load the skybox we're going to use the following function that accepts a
unsigned int loadCubemap(vector<std::string> faces)
{
unsigned int textureID;
glGenTextures (1, &textureID);
glBindTexture (GL_TEXTURE_CUBE_MAP, textureID);
int width, height, nrChannels;
for (unsigned int i = 0; i < faces.size(); i++)
{
unsigned char *data = stbi_load(faces[i].c_str(), &width, &height, &nrChannels, 0);
if (data)
{
glTexImage2D (GL_TEXTURE_CUBE_MAP_POSITIVE_X + i,
0, GL_RGB, width, height, 0, GL_RGB, GL_UNSIGNED_BYTE, data
);
stbi_image_free(data);
}
else
{
std::cout << "Cubemap tex failed to load at path: " << faces[i] << std::endl;
stbi_image_free(data);
}
}
glTexParameter i(GL_TEXTURE_CUBE_MAP, GL_TEXTURE_MIN_FILTER, GL_LINEAR);
glTexParameter i(GL_TEXTURE_CUBE_MAP, GL_TEXTURE_MAG_FILTER, GL_LINEAR);
glTexParameter i(GL_TEXTURE_CUBE_MAP, GL_TEXTURE_WRAP_S, GL_CLAMP_TO_EDGE);
glTexParameter i(GL_TEXTURE_CUBE_MAP, GL_TEXTURE_WRAP_T, GL_CLAMP_TO_EDGE);
glTexParameter i(GL_TEXTURE_CUBE_MAP, GL_TEXTURE_WRAP_R, GL_CLAMP_TO_EDGE);
return textureID;
}
The function itself shouldn't be too surprising. It is basically all the cubemap code we've seen in the previous section, but combined in a single manageable function.
Now, before we call this function we'll load the appropriate texture paths in a vector in the order as specified by the cubemap enums:
vector<std::string> faces;
{
    "right.jpg",
    "left.jpg",
    "top.jpg",
    "bottom.jpg",
    "front.jpg",
    "back.jpg"
};
unsigned int cubemapTexture = loadCubemap(faces);
We loaded the skybox as a cubemap with cubemapTexture as its id. We can now finally bind it to a cube to replace that lame clear color we've been using all this time.
Displaying a skybox
Because a skybox is drawn on a cube we'll need another VAO, VBO and a fresh set of vertices like any other 3D object. You can get its vertex data here.
A cubemap used to texture a 3D cube can be sampled using the local positions of the cube as its texture coordinates. When a cube is centered on the origin (0,0,0) each of its position vectors is also a direction vector from the origin. This direction vector is exactly what we need to get the corresponding texture value at that specific cube's position. For this reason we only need to supply position vectors and don't need texture coordinates.
To render the skybox we'll need a new set of shaders which aren't too complicated. Because we only have one vertex attribute the vertex shader is quite simple:
#version 330 core
layout (location = 0) in vec3 aPos;

out vec3 TexCoords;

uniform mat4 projection;
uniform mat4 view;

void main()
{
    TexCoords = aPos;
    gl_Position = projection * view * vec4(aPos, 1.0);
}
The interesting part of this vertex shader is that we set the incoming local position vector as the outcoming texture coordinate for (interpolated) use in the fragment shader. The fragment shader then takes these as input to sample a samplerCube:
#version 330 core
out vec4 FragColor;

in vec3 TexCoords;

uniform samplerCube skybox;

void main()
{
    FragColor = texture(skybox, TexCoords);
}
The fragment shader is relatively straightforward. We take the vertex attribute's interpolated position vector as the texture's direction vector and use it to sample the texture values from the cubemap.
Rendering the skybox is easy now that we have a cubemap texture, we simply bind the cubemap texture and the skybox sampler is automatically filled with the skybox cubemap. To draw the skybox we're going to draw it as the first object in the scene and disable depth writing. This way the skybox will always be drawn at the background of all the other objects since the unit cube is most likely smaller than the rest of the scene.
glDepthMask (GL_FALSE);
skyboxShader.use();
// ... set view and projection matrix
glBindVertexArray (skyboxVAO);
glBindTexture (GL_TEXTURE_CUBE_MAP, cubemapTexture);
glDrawArrays (GL_TRIANGLES, 0, 36);
glDepthMask (GL_TRUE);
// ... draw rest of the scene
If you run this you will get into difficulties though. We want the skybox to be centered around the player so that no matter how far the player moves, the skybox won't get any closer, giving the impression the surrounding environment is extremely large. The current view matrix however transforms all the skybox's positions by rotating, scaling and translating them, so if the player moves, the cubemap moves as well! We want to remove the translation part of the view matrix so only rotation will affect the skybox's position vectors.
You may remember from the basic lighting chapter that we can remove the translation section of transformation matrices by taking the upper-left 3x3 matrix of the 4x4 matrix. We can achieve this by converting the view matrix to a 3x3 matrix (removing translation) and converting it back to a 4x4 matrix:
glm::mat4 view = glm::mat4(glm::mat3(camera.GetViewMatrix()));
This removes any translation, but keeps all rotation transformations so the user can still look around the scene.
The result is a scene that instantly looks enormous due to our skybox. If you'd fly around the basic container you immediately get a sense of scale which dramatically improves the realism of the scene. The result looks something like this:
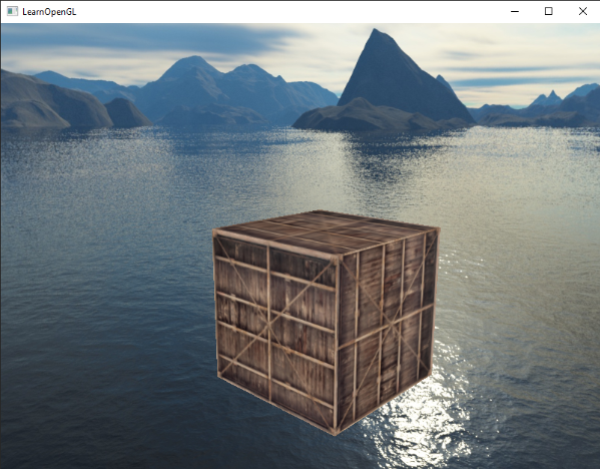
Try experimenting with different skyboxes and see how they can have an enormous impact on the look and feel of your scene.
An optimization
Right now we've rendered the skybox first before we rendered all the other objects in the scene. This works great, but isn't too efficient. If we render the skybox first we're running the fragment shader for each pixel on the screen even though only a small part of the skybox will eventually be visible; fragments that could have easily been discarded using
So to give us a slight performance boost we're going to render the skybox last. This way, the depth buffer is completely filled with all the scene's depth values so we only have to render the skybox's fragments wherever the early depth test passes, greatly reducing the number of fragment shader calls. The problem is that the skybox will most likely render on top of all other objects since it's only a 1x1x1 cube, succeeding most depth tests. Simply rendering it without depth testing is not a solution since the skybox will then still overwrite all the other objects in the scene as it's rendered last. We need to trick the depth buffer into believing that the skybox has the maximum depth value of 1.0 so that it fails the depth test wherever there's a different object in front of it.
In the coordinate systems chapter we said that perspective division is performed after the vertex shader has run, dividing the gl_Position's xyz coordinates by its w component. We also know from the depth testing chapter that the z component of the resulting division is equal to that vertex's depth value. Using this information we can set the z component of the output position equal to its w component which will result in a z component that is always equal to 1.0, because when the perspective division is applied its z component translates to w / w = 1.0:
void main()
{
    TexCoords = aPos;
    vec4 pos = projection * view * vec4(aPos, 1.0);
    gl_Position = pos.xyww;
}
The resulting normalized device coordinates will then always have a z value equal to 1.0: the maximum depth value. The skybox will as a result only be rendered wherever there are no objects visible (only then it will pass the depth test, everything else is in front of the skybox).
We do have to change the depth function a little by setting it to GL_LEQUAL instead of the default GL_LESS. The depth buffer will be filled with values of 1.0 for the skybox, so we need to make sure the skybox passes the depth tests with values less than or equal to the depth buffer instead of less than.
You can find the more optimized version of the source code here.
Environment mapping
We now have the entire surrounding environment mapped in a single texture object and we could use that information for more than just a skybox. Using a cubemap with an environment, we could give objects reflective or refractive properties. Techniques that use an environment cubemap like this are called
Reflection
Reflection is the property that an object (or part of an object)
The basics of reflection are not that difficult. The following image shows how we can calculate a

We calculate a reflection vector \(\color{green}{\bar{R}}\) around the object's normal vector \(\color{red}{\bar{N}}\) based on the view direction vector \(\color{gray}{\bar{I}}\). We can calculate this reflection vector using GLSL's built-in
Since we already have a skybox setup in our scene, creating reflections isn't too difficult. We'll change the fragment shader used by the container to give the container reflective properties:
#version 330 core
out vec4 FragColor;

in vec3 Normal;
in vec3 Position;

uniform vec3 cameraPos;
uniform samplerCube skybox;

void main()
{
    vec3 I = normalize(Position - cameraPos);
    vec3 R = reflect(I, normalize(Normal));
    FragColor = vec4(texture(skybox, R).rgb, 1.0);
}
We first calculate the view/camera direction vector I and use this to calculate the reflect vector R which we then use to sample from the skybox cubemap. Note that we have the fragment's interpolated Normal and Position variable again so we'll need to adjust the vertex shader as well:
#version 330 core
layout (location = 0) in vec3 aPos;
layout (location = 1) in vec3 aNormal;

out vec3 Normal;
out vec3 Position;

uniform mat4 model;
uniform mat4 view;
uniform mat4 projection;

void main()
{
    Normal = mat3(transpose(inverse(model))) * aNormal;
    Position = vec3(model * vec4(aPos, 1.0));
    gl_Position = projection * view * vec4(Position, 1.0);
}
We're using normal vectors so we'll want to transform them with a normal matrix again. The Position output vector is a world-space position vector. This Position output of the vertex shader is used to calculate the view direction vector in the fragment shader.
Because we're using normals you'll want to update the vertex data and update the attribute pointers as well. Also make sure to set the cameraPos uniform.
Then we also want to bind the cubemap texture before rendering the container:
glBindVertexArray (cubeVAO);
glBindTexture (GL_TEXTURE_CUBE_MAP, skyboxTexture);
glDrawArrays (GL_TRIANGLES, 0, 36);
Compiling and running your code gives you a container that acts like a perfect mirror. The surrounding skybox is perfectly reflected on the container:
You can find the full source code here.
When reflection is applied to an entire object (like the container) the object looks as if it has a high reflective material like steel or chrome. If we were to load a more interesting object (like the backpack model from the model loading chapters) we'd get the effect that the object looks to be entirely made out of chrome:

This looks quite awesome, but in reality most models aren't all completely reflective. We could for instance introduce
Refraction
Another form of environment mapping is called
Refraction is described by Snell's law that with environment maps looks a bit like this:
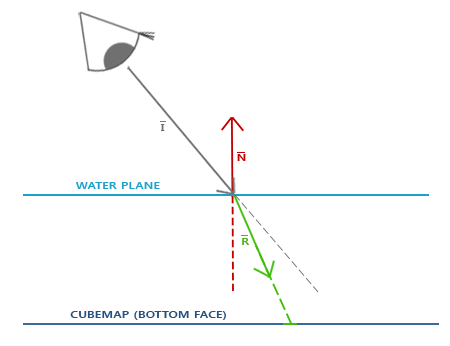
Again, we have a view vector \(\color{gray}{\bar{I}}\), a normal vector \(\color{red}{\bar{N}}\) and this time a resulting refraction vector \(\color{green}{\bar{R}}\). As you can see, the direction of the view vector is slightly bend. This resulting bended vector \(\color{green}{\bar{R}}\) is then used to sample from the cubemap.
Refraction is fairly easy to implement using GLSL's built-in
The refractive index determines the amount light distorts/bends in a material where each material has its own refractive index. A list of the most common refractive indices are given in the following table:
| Material | Refractive index |
|---|---|
| Air | 1.00 |
| Water | 1.33 |
| Ice | 1.309 |
| Glass | 1.52 |
| Diamond | 2.42 |
We use these refractive indices to calculate the ratio between both materials the light passes through. In our case, the light/view ray goes from air to glass (if we assume the object is made of glass) so the ratio becomes \(\frac{1.00}{1.52} = 0.658\).
We already have the cubemap bound, supplied the vertex data with normals, and set the camera position as a uniform. The only thing we have to change is the fragment shader:
void main()
{
    float ratio = 1.00 / 1.52;
    vec3 I = normalize(Position - cameraPos);
    vec3 R = refract(I, normalize(Normal), ratio);
    FragColor = vec4(texture(skybox, R).rgb, 1.0);
}
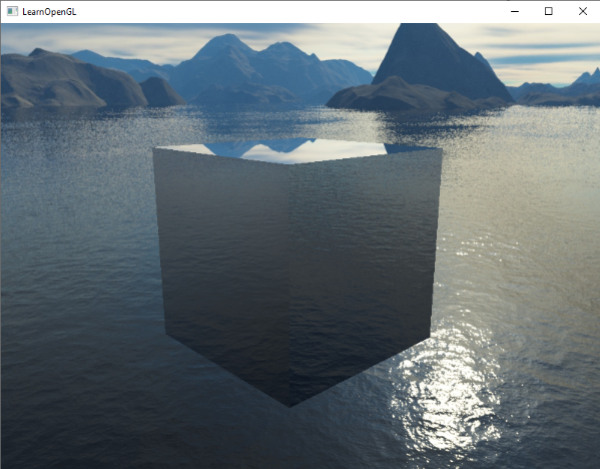
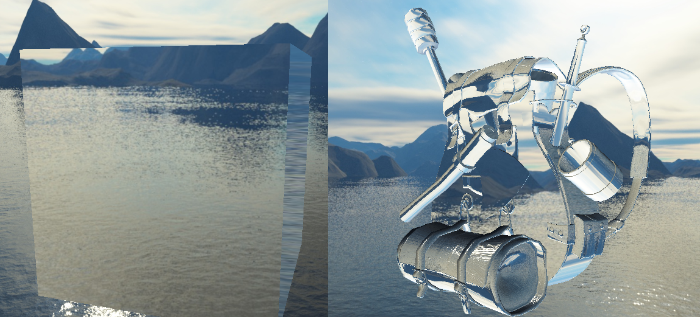
By changing the refractive indices you can create completely different visual results. Compiling the application and running the results on the container object is not so interesting though as it doesn't really show the effect refraction has aside that it acts as a magnifying glass right now. Using the same shaders on the loaded 3D model however does show us the effect we're looking for: a glass-like object.
You can imagine that with the right combination of lighting, reflection, refraction and vertex movement, you can create pretty neat water graphics. Do note that for physically accurate results we should refract the light again when it leaves the object; now we simply used single-sided refraction which is fine for most purposes.
Dynamic environment maps
Right now we've been using a static combination of images as the skybox, which looks great, but it doesn't include the actual 3D scene with possibly moving objects. We didn't really notice this so far, because we only used a single object. If we had a mirror-like objects with multiple surrounding objects, only the skybox would be visible in the mirror as if it was the only object in the scene.
Using framebuffers it is possible to create a texture of the scene for all 6 different angles from the object in question and store those in a cubemap each frame. We can then use this (dynamically generated) cubemap to create realistic reflection and refractive surfaces that include all other objects. This is called
While it looks great, it has one enormous disadvantage: we have to render the scene 6 times per object using an environment map, which is an enormous performance penalty on your application. Modern applications try to use the skybox as much as possible and where possible pre-render cubemaps wherever they can to still sort-of create dynamic environment maps. While dynamic environment mapping is a great technique, it requires a lot of clever tricks and hacks to get it working in an actual rendering application without too many performance drops.