


HDR
Advanced-Lighting/HDR
Brightness and color values, by default, are clamped between 0.0 and 1.0 when stored into a framebuffer. This, at first seemingly innocent, statement caused us to always specify light and color values somewhere in this range, trying to make them fit into the scene. This works oké and gives decent results, but what happens if we walk in a really bright area with multiple bright light sources that as a total sum exceed 1.0? The answer is that all fragments that have a brightness or color sum over 1.0 get clamped to 1.0, which isn't pretty to look at:

Due to a large number of fragments' color values getting clamped to 1.0, each of the bright fragments have the exact same white color value in large regions, losing a significant amount of detail and giving it a fake look.
A solution to this problem would be to reduce the strength of the light sources and ensure no area of fragments in your scene ends up brighter than 1.0; this is not a good solution as this forces you to use unrealistic lighting parameters. A better approach is to allow color values to temporarily exceed 1.0 and transform them back to the original range of 0.0 and 1.0 as a final step, but without losing detail.
Monitors (non-HDR) are limited to display colors in the range of 0.0 and 1.0, but there is no such limitation in lighting equations. By allowing fragment colors to exceed 1.0 we have a much higher range of color values available to work in known as
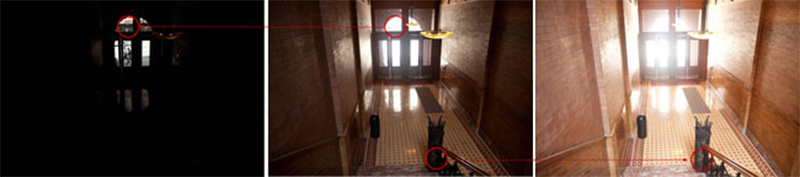
High dynamic range was originally only used for photography where a photographer takes multiple pictures of the same scene with varying exposure levels, capturing a large range of color values. Combining these forms a HDR image where a large range of details are visible based on the combined exposure levels, or a specific exposure it is viewed with. For instance, the following image (credits to Colin Smith) shows a lot of detail at brightly lit regions with a low exposure (look at the window), but these details are gone with a high exposure. However, a high exposure now reveals a great amount of detail at darker regions that weren't previously visible.
This is also very similar to how the human eye works and the basis of high dynamic range rendering. When there is little light, the human eye adapts itself so the darker parts become more visible and similarly for bright areas. It's like the human eye has an automatic exposure slider based on the scene's brightness.
High dynamic range rendering works a bit like that. We allow for a much larger range of color values to render to, collecting a large range of dark and bright details of a scene, and at the end we transform all the HDR values back to the 0.0, 1.0]. This process of converting HDR values to LDR values is called
When it comes to real-time rendering, high dynamic range allows us to not only exceed the LDR range of [0.0, 1.0] and preserve more detail, but also gives us the ability to specify a light source's intensity by their real intensities. For instance, the sun has a much higher intensity than something like a flashlight so why not configure the sun as such (e.g. a diffuse brightness of 100.0). This allows us to more properly configure a scene's lighting with more realistic lighting parameters, something that wouldn't be possible with LDR rendering as they'd then directly get clamped to 1.0.
As (non-HDR) monitors only display colors in the range between 0.0 and 1.0 we do need to transform the currently high dynamic range of color values back to the monitor's range. Simply re-transforming the colors back with a simple average wouldn't do us much good as brighter areas then become a lot more dominant. What we can do, is use different equations and/or curves to transform the HDR values back to LDR that give us complete control over the scene's brightness. This is the process earlier denoted as tone mapping and the final step of HDR rendering.
Floating point framebuffers
To implement high dynamic range rendering we need some way to prevent color values getting clamped after each fragment shader run. When framebuffers use a normalized fixed-point color format (like GL_RGB) as their color buffer's internal format, OpenGL automatically clamps the values between 0.0 and 1.0 before storing them in the framebuffer. This operation holds for most types of framebuffer formats, except for floating point formats.
When the internal format of a framebuffer's color buffer is specified as GL_RGB16F, GL_RGBA16F, GL_RGB32F, or GL_RGBA32F the framebuffer is known as a 0.0 and 1.0. This is perfect for rendering in high dynamic range!
To create a floating point framebuffer the only thing we need to change is its color buffer's internal format parameter:
glBindTexture (GL_TEXTURE_2D, colorBuffer);
glTexImage2D (GL_TEXTURE_2D, 0, GL_RGBA16F, SCR_WIDTH, SCR_HEIGHT, 0, GL_RGBA, GL_FLOAT, NULL);
The default framebuffer of OpenGL (by default) only takes up 8 bits per color component. With a floating point framebuffer with 32 bits per color component (when using GL_RGB32F or GL_RGBA32F) we're using 4 times more memory for storing color values. As 32 bits isn't really necessary (unless you need a high level of precision) using GL_RGBA16F will suffice.
With a floating point color buffer attached to a framebuffer we can now render the scene into this framebuffer knowing color values won't get clamped between 0.0 and 1.0. In this chapter's example demo we first render a lit scene into the floating point framebuffer and then display the framebuffer's color buffer on a screen-filled quad; it'll look a bit like this:
glBindFramebuffer (GL_FRAMEBUFFER, hdrFBO);
glClear (GL_COLOR_BUFFER_BIT | GL_DEPTH_BUFFER_BIT);
// [...] render (lit) scene
glBindFramebuffer (GL_FRAMEBUFFER, 0);
// now render hdr color buffer to 2D screen-filling quad with tone mapping shader
hdrShader.use();
glActiveTexture (GL_TEXTURE0);
glBindTexture (GL_TEXTURE_2D, hdrColorBufferTexture);
RenderQuad();
Here a scene's color values are filled into a floating point color buffer which can contain any arbitrary color value, possibly exceeding 1.0. For this chapter, a simple demo scene was created with a large stretched cube acting as a tunnel with four point lights, one being extremely bright positioned at the tunnel's end:
std::vector<glm::vec3> lightColors;
lightColors.push_back(glm::vec3(200.0f, 200.0f, 200.0f));
lightColors.push_back(glm::vec3(0.1f, 0.0f, 0.0f));
lightColors.push_back(glm::vec3(0.0f, 0.0f, 0.2f));
lightColors.push_back(glm::vec3(0.0f, 0.1f, 0.0f));
Rendering to a floating point framebuffer is exactly the same as we would normally render into a framebuffer. What is new is hdrShader's fragment shader that renders the final 2D quad with the floating point color buffer texture attached. Let's first define a simple pass-through fragment shader:
#version 330 core
out vec4 FragColor;

in vec2 TexCoords;

uniform sampler2D hdrBuffer;

void main()
{
    vec3 hdrColor = texture(hdrBuffer, TexCoords).rgb;
    FragColor = vec4(hdrColor, 1.0);
}
Here we directly sample the floating point color buffer and use its color value as the fragment shader's output. However, as the 2D quad's output is directly rendered into the default framebuffer, all the fragment shader's output values will still end up clamped between 0.0 and 1.0 even though we have several values in the floating point color texture exceeding 1.0.
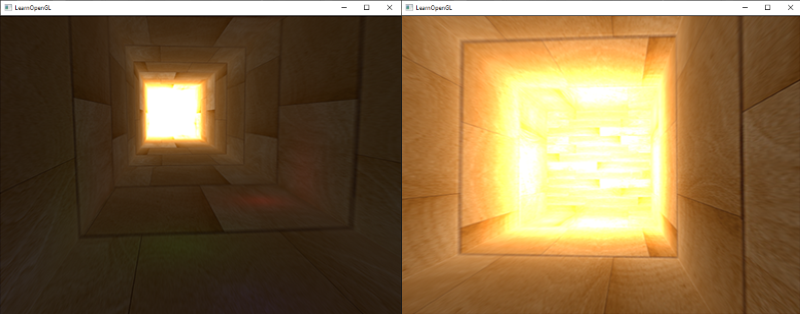
It becomes clear the intense light values at the end of the tunnel are clamped to 1.0 as a large portion of it is completely white, effectively losing all lighting details in the process. As we directly write HDR values to an LDR output buffer it is as if we have no HDR enabled in the first place. What we need to do is transform all the floating point color values into the 0.0 - 1.0 range without losing any of its details. We need to apply a process called
Tone mapping
Tone mapping is the process of transforming floating point color values to the expected [0.0, 1.0] range known as low dynamic range without losing too much detail, often accompanied with a specific stylistic color balance.
One of the more simple tone mapping algorithms is
void main()
{
    const float gamma = 2.2;
    vec3 hdrColor = texture(hdrBuffer, TexCoords).rgb;

    // reinhard tone mapping
    vec3 mapped = hdrColor / (hdrColor + vec3(1.0));
    // gamma correction
    mapped = pow(mapped, vec3(1.0 / gamma));

    FragColor = vec4(mapped, 1.0);
}
With Reinhard tone mapping applied we no longer lose any detail at the bright areas of our scene. It does tend to slightly favor brighter areas, making darker regions seem less detailed and distinct:
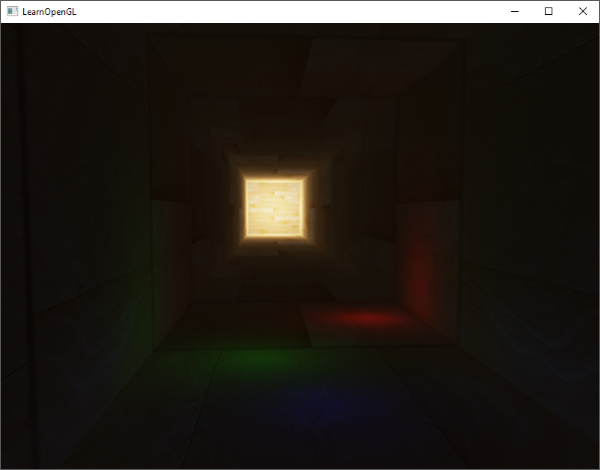
Here you can again see details at the end of the tunnel as the wood texture pattern becomes visible again. With this relatively simple tone mapping algorithm we can properly see the entire range of HDR values stored in the floating point framebuffer, giving us precise control over the scene's lighting without losing details.
Another interesting use of tone mapping is to allow the use of an exposure parameter. You probably remember from the introduction that HDR images contain a lot of details visible at different exposure levels. If we have a scene that features a day and night cycle it makes sense to use a lower exposure at daylight and a higher exposure at night time, similar to how the human eye adapts. With such an exposure parameter it allows us to configure lighting parameters that work both at day and night under different lighting conditions as we only have to change the exposure parameter.
A relatively simple exposure tone mapping algorithm looks as follows:
uniform float exposure;

void main()
{
    const float gamma = 2.2;
    vec3 hdrColor = texture(hdrBuffer, TexCoords).rgb;

    // exposure tone mapping
    vec3 mapped = vec3(1.0) - exp(-hdrColor * exposure);
    // gamma correction
    mapped = pow(mapped, vec3(1.0 / gamma));

    FragColor = vec4(mapped, 1.0);
}
Here we defined an exposure uniform that defaults at 1.0 and allows us to more precisely specify whether we'd like to focus more on dark or bright regions of the HDR color values. For instance, with high exposure values the darker areas of the tunnel show significantly more detail. In contrast, a low exposure largely removes the dark region details, but allows us to see more detail in the bright areas of a scene. Take a look at the image below to see the tunnel at multiple exposure levels:
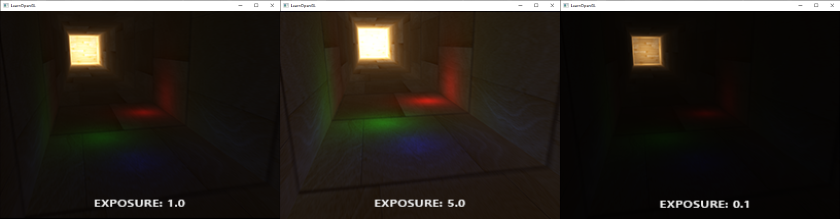
This image clearly shows the benefit of high dynamic range rendering. By changing the exposure level we get to see a lot of details of our scene, that would've been otherwise lost with low dynamic range rendering. Take the end of the tunnel for example. With a normal exposure the wood structure is barely visible, but with a low exposure the detailed wooden patterns are clearly visible. The same holds for the wooden patterns close by that are more visible with a high exposure.
You can find the source code of the demo here.
More HDR
The two tone mapping algorithms shown are only a few of a large collection of (more advanced) tone mapping algorithms of which each has their own strengths and weaknesses. Some tone mapping algorithms favor certain colors/intensities above others and some algorithms display both the low and high exposure colors at the same time to create more colorful and detailed images. There is also a collection of techniques known as
The real benefit of HDR rendering really shows itself in large and complex scenes with heavy lighting algorithms. As it is difficult to create such a complex demo scene for teaching purposes while keeping it accessible, the chapter's demo scene is small and lacks detail. While relatively simple it does show some of the benefits of HDR rendering: no details are lost in high and dark regions as they can be restored with tone mapping, the addition of multiple lights doesn't cause clamped regions, and light values can be specified by real brightness values not being limited by LDR values. Furthermore, HDR rendering also makes several other interesting effects more feasible and realistic; one of these effects is
Additional resources
- Does HDR rendering have any benefits if bloom won't be applied?: a stackexchange question that features a great lengthy answer describing some of the benefits of HDR rendering.
- What is tone mapping? How does it relate to HDR?: another interesting answer with great reference images to explain tone mapping.