


Deferred Shading
Advanced-Lighting/Deferred-Shading
The way we did lighting so far was called
Deferred shading is based on the idea that we defer or postpone most of the heavy rendering (like lighting) to a later stage. Deferred shading consists of two passes: in the first pass, called the
We use the textures from the G-buffer in a second pass called the
The image below nicely illustrates the process of deferred shading.

A major advantage of this approach is that whatever fragment ends up in the G-buffer is the actual fragment information that ends up as a screen pixel. The depth test already concluded this fragment to be the last and top-most fragment. This ensures that for each pixel we process in the lighting pass, we only calculate lighting once. Furthermore, deferred rendering opens up the possibility for further optimizations that allow us to render a much larger amount of light sources compared to forward rendering.
It also comes with some disadvantages though as the G-buffer requires us to store a relatively large amount of scene data in its texture color buffers. This eats memory, especially since scene data like position vectors require a high precision. Another disadvantage is that it doesn't support blending (as we only have information of the top-most fragment) and MSAA no longer works. There are several workarounds for this that we'll get to at the end of the chapter.
Filling the G-buffer (in the geometry pass) isn't too expensive as we directly store object information like position, color, or normals into a framebuffer with a small or zero amount of processing. By using
The G-buffer
The
- A 3D world-space position vector to calculate the (interpolated) fragment position variable used for lightDir and viewDir.
- An RGB diffuse color vector also known as
albedo . - A 3D normal vector for determining a surface's slope.
- A specular intensity float.
- All light source position and color vectors.
- The player or viewer's position vector.
With these (per-fragment) variables at our disposal we are able to calculate the (Blinn-)Phong lighting we're accustomed to. The light source positions and colors, and the player's view position, can be configured using uniform variables, but the other variables are all fragment specific. If we can somehow pass the exact same data to the final deferred lighting pass we can calculate the same lighting effects, even though we're rendering fragments of a 2D quad.
There is no limit in OpenGL to what we can store in a texture so it makes sense to store all per-fragment data in one or multiple screen-filled textures of the G-buffer and use these later in the lighting pass. As the G-buffer textures will have the same size as the lighting pass's 2D quad, we get the exact same fragment data we'd had in a forward rendering setting, but this time in the lighting pass; there is a one on one mapping.
In pseudocode the entire process will look a bit like this:
while(...) // render loop
{
// 1. geometry pass: render all geometric/color data to g-buffer
glBindFramebuffer (GL_FRAMEBUFFER, gBuffer);
glClear ColorglClear (GL_COLOR_BUFFER_BIT | GL_DEPTH_BUFFER_BIT);
gBufferShader.use();
for(Object obj : Objects)
{
ConfigureShaderTransformsAndUniforms();
obj.Draw();
}
// 2. lighting pass: use g-buffer to calculate the scene's lighting
glBindFramebuffer (GL_FRAMEBUFFER, 0);
lightingPassShader.use();
BindAllGBufferTextures();
SetLightingUniforms();
RenderQuad();
}
The data we'll need to store of each fragment is a position vector, a normal vector, a color vector, and a specular intensity value. In the geometry pass we need to render all objects of the scene and store these data components in the G-buffer. We can again use
For the geometry pass we'll need to initialize a framebuffer object that we'll call gBuffer that has multiple color buffers attached and a single depth renderbuffer object. For the position and normal texture we'd preferably use a high-precision texture (16 or 32-bit float per component). For the albedo and specular values we'll be fine with the default texture precision (8-bit precision per component). Note that we use GL_RGBA16F over GL_RGB16F as GPUs generally prefer 4-component formats over 3-component formats due to byte alignment; some drivers may fail to complete the framebuffer otherwise.
unsigned int gBuffer;
glGenFramebuffers (1, &gBuffer);
glBindFramebuffer (GL_FRAMEBUFFER, gBuffer);
unsigned int gPosition, gNormal, gColorSpec;
// - position color buffer
glGenTextures (1, &gPosition);
glBindTexture (GL_TEXTURE_2D, gPosition);
glTexImage2D (GL_TEXTURE_2D, 0, GL_RGBA16F, SCR_WIDTH, SCR_HEIGHT, 0, GL_RGBA, GL_FLOAT, NULL);
glTexParameter i(GL_TEXTURE_2D, GL_TEXTURE_MIN_FILTER, GL_NEAREST);
glTexParameter i(GL_TEXTURE_2D, GL_TEXTURE_MAG_FILTER, GL_NEAREST);
glFramebufferTexture2D (GL_FRAMEBUFFER, GL_COLOR_ATTACHMENT0, GL_TEXTURE_2D, gPosition, 0);
// - normal color buffer
glGenTextures (1, &gNormal);
glBindTexture (GL_TEXTURE_2D, gNormal);
glTexImage2D (GL_TEXTURE_2D, 0, GL_RGBA16F, SCR_WIDTH, SCR_HEIGHT, 0, GL_RGBA, GL_FLOAT, NULL);
glTexParameter i(GL_TEXTURE_2D, GL_TEXTURE_MIN_FILTER, GL_NEAREST);
glTexParameter i(GL_TEXTURE_2D, GL_TEXTURE_MAG_FILTER, GL_NEAREST);
glFramebufferTexture2D (GL_FRAMEBUFFER, GL_COLOR_ATTACHMENT1, GL_TEXTURE_2D, gNormal, 0);
// - color + specular color buffer
glGenTextures (1, &gAlbedoSpec);
glBindTexture (GL_TEXTURE_2D, gAlbedoSpec);
glTexImage2D (GL_TEXTURE_2D, 0, GL_RGBA, SCR_WIDTH, SCR_HEIGHT, 0, GL_RGBA, GL_UNSIGNED_BYTE, NULL);
glTexParameter i(GL_TEXTURE_2D, GL_TEXTURE_MIN_FILTER, GL_NEAREST);
glTexParameter i(GL_TEXTURE_2D, GL_TEXTURE_MAG_FILTER, GL_NEAREST);
glFramebufferTexture2D (GL_FRAMEBUFFER, GL_COLOR_ATTACHMENT2, GL_TEXTURE_2D, gAlbedoSpec, 0);
// - tell OpenGL which color attachments we'll use (of this framebuffer) for rendering
unsigned int attachments[3] = { GL_COLOR_ATTACHMENT0, GL_COLOR_ATTACHMENT1, GL_COLOR_ATTACHMENT2 };
glDrawBuffers(3, attachments);
// then also add render buffer object as depth buffer and check for completeness.
[...]
Since we use multiple render targets, we have to explicitly tell OpenGL which of the color buffers associated with GBuffer we'd like to render to with RGBA texture; this saves us from having to declare an additional color buffer texture. As your deferred shading pipeline gets more complex and needs more data you'll quickly find new ways to combine data in individual textures.
Next we need to render into the G-buffer. Assuming each object has a diffuse, normal, and specular texture we'd use something like the following fragment shader to render into the G-buffer:
#version 330 core
layout (location = 0) out vec3 gPosition;
layout (location = 1) out vec3 gNormal;
layout (location = 2) out vec4 gAlbedoSpec;

in vec2 TexCoords;
in vec3 FragPos;
in vec3 Normal;

uniform sampler2D texture_diffuse1;
uniform sampler2D texture_specular1;

void main()
{
    // store the fragment position vector in the first gbuffer texture
    gPosition = FragPos;
    // also store the per-fragment normals into the gbuffer
    gNormal = normalize(Normal);
    // and the diffuse per-fragment color
    gAlbedoSpec.rgb = texture(texture_diffuse1, TexCoords).rgb;
    // store specular intensity in gAlbedoSpec's alpha component
    gAlbedoSpec.a = texture(texture_specular1, TexCoords).r;
}
As we use multiple render targets, the layout specifier tells OpenGL to which color buffer of the active framebuffer we render to. Note that we do not store the specular intensity into a single color buffer texture as we can store its single float value in the alpha component of one of the other color buffer textures.
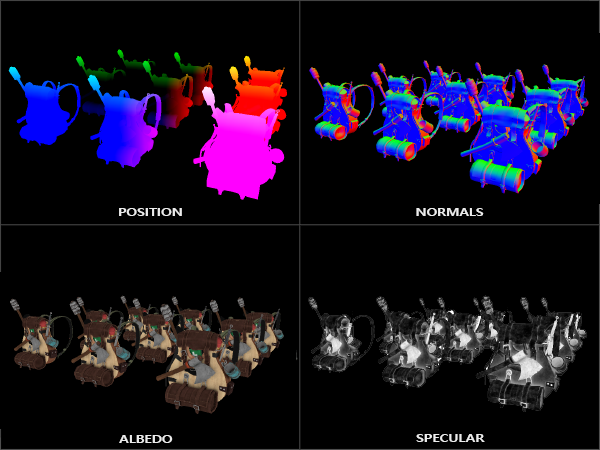
If we'd now were to render a large collection of backpack objects into the gBuffer framebuffer and visualize its content by projecting each color buffer one by one onto a screen-filled quad we'd see something like this:
Try to visualize that the world-space position and normal vectors are indeed correct. For instance, the normal vectors pointing to the right would be more aligned to a red color, similarly for position vectors that point from the scene's origin to the right. As soon as you're satisfied with the content of the G-buffer it's time to move to the next step: the lighting pass.
The deferred lighting pass
With a large collection of fragment data in the G-Buffer at our disposal we have the option to completely calculate the scene's final lit colors. We do this by iterating over each of the G-Buffer textures pixel by pixel and use their content as input to the lighting algorithms. Because the G-buffer texture values all represent the final transformed fragment values we only have to do the expensive lighting operations once per pixel. This is especially useful in complex scenes where we'd easily invoke multiple expensive fragment shader calls per pixel in a forward rendering setting.
For the lighting pass we're going to render a 2D screen-filled quad (a bit like a post-processing effect) and execute an expensive lighting fragment shader on each pixel:
glClear (GL_COLOR_BUFFER_BIT | GL_DEPTH_BUFFER_BIT);
glActiveTexture (GL_TEXTURE0);
glBindTexture (GL_TEXTURE_2D, gPosition);
glActiveTexture (GL_TEXTURE1);
glBindTexture (GL_TEXTURE_2D, gNormal);
glActiveTexture (GL_TEXTURE2);
glBindTexture (GL_TEXTURE_2D, gAlbedoSpec);
// also send light relevant uniforms
shaderLightingPass.use();
SendAllLightUniformsToShader(shaderLightingPass);
shaderLightingPass.setVec3("viewPos", camera.Position);
RenderQuad();
We bind all relevant textures of the G-buffer before rendering and also send the lighting-relevant uniform variables to the shader.
The fragment shader of the lighting pass is largely similar to the lighting chapter shaders we've used so far. What is new is the method in which we obtain the lighting's input variables, which we now directly sample from the G-buffer:
#version 330 core
out vec4 FragColor;

in vec2 TexCoords;

uniform sampler2D gPosition;
uniform sampler2D gNormal;
uniform sampler2D gAlbedoSpec;

struct Light {
    vec3 Position;
    vec3 Color;
};
const int NR_LIGHTS = 32;
uniform Light lights[NR_LIGHTS];
uniform vec3 viewPos;

void main()
{
    // retrieve data from G-buffer
    vec3 FragPos = texture(gPosition, TexCoords).rgb;
    vec3 Normal = texture(gNormal, TexCoords).rgb;
    vec3 Albedo = texture(gAlbedoSpec, TexCoords).rgb;
    float Specular = texture(gAlbedoSpec, TexCoords).a;

    // then calculate lighting as usual
    vec3 lighting = Albedo * 0.1; // hard-coded ambient component
    vec3 viewDir = normalize(viewPos - FragPos);
    for(int i = 0; i < NR_LIGHTS; ++i)
    {
        // diffuse
        vec3 lightDir = normalize(lights[i].Position - FragPos);
        vec3 diffuse = max(dot(Normal, lightDir), 0.0) * Albedo * lights[i].Color;
        lighting += diffuse;
    }

    FragColor = vec4(lighting, 1.0);
}
The lighting pass shader accepts 3 uniform textures that represent the G-buffer and hold all the data we've stored in the geometry pass. If we were to sample these with the current fragment's texture coordinates we'd get the exact same fragment values as if we were rendering the geometry directly. Note that we retrieve both the Albedo color and the Specular intensity from the single gAlbedoSpec texture.
As we now have the per-fragment variables (and the relevant uniform variables) necessary to calculate Blinn-Phong lighting, we don't have to make any changes to the lighting code. The only thing we change in deferred shading here is the method of obtaining lighting input variables.
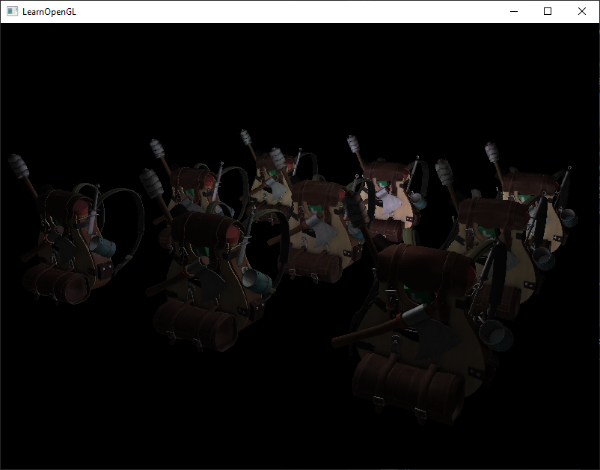
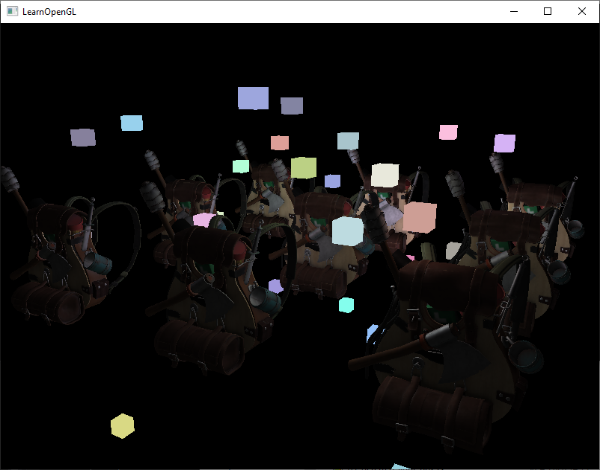
Running a simple demo with a total of 32 small lights looks a bit like this:
One of the disadvantages of deferred shading is that it is not possible to do blending as all values in the G-buffer are from single fragments, and blending operates on the combination of multiple fragments. Another disadvantage is that deferred shading forces you to use the same lighting algorithm for most of your scene's lighting; you can somehow alleviate this a bit by including more material-specific data in the G-buffer.
To overcome these disadvantages (especially blending) we often split the renderer into two parts: one deferred rendering part, and the other a forward rendering part specifically meant for blending or special shader effects not suited for a deferred rendering pipeline. To illustrate how this works, we'll render the light sources as small cubes using a forward renderer as the light cubes require a special shader (simply output a single light color).
Combining deferred rendering with forward rendering
Say we want to render each of the light sources as a 3D cube positioned at the light source's position emitting the color of the light. A first idea that comes to mind is to simply forward render all the light sources on top of the deferred lighting quad at the end of the deferred shading pipeline. So basically render the cubes as we'd normally do, but only after we've finished the deferred rendering operations. In code this will look a bit like this:
// deferred lighting pass
[...]
RenderQuad();
// now render all light cubes with forward rendering as we'd normally do
shaderLightBox.use();
shaderLightBox.setMat4("projection", projection);
shaderLightBox.setMat4("view", view);
for (unsigned int i = 0; i < lightPositions.size(); i++)
{
model = glm::mat4(1.0f);
model = glm::translate (model, lightPositions[i]);
model = glm::scale (model, glm::vec3(0.25f));
shaderLightBox.setMat4("model", model);
shaderLightBox.setVec3("lightColor", lightColors[i]);
RenderCube();
}
However, these rendered cubes do not take any of the stored geometry depth of the deferred renderer into account and are, as a result, always rendered on top of the previously rendered objects; this isn't the result we were looking for.
What we need to do, is first copy the depth information stored in the geometry pass into the default framebuffer's depth buffer and only then render the light cubes. This way the light cubes' fragments are only rendered when on top of the previously rendered geometry.
We can copy the content of a framebuffer to the content of another framebuffer with the help of
We stored the depth of all the objects rendered in the deferred geometry pass in the gBuffer FBO. If we were to copy the content of its depth buffer to the depth buffer of the default framebuffer, the light cubes would then render as if all of the scene's geometry was rendered with forward rendering. As briefly explained in the anti-aliasing chapter, we have to specify a framebuffer as the read framebuffer and similarly specify a framebuffer as the write framebuffer:
glBindFramebuffer (GL_READ_FRAMEBUFFER, gBuffer);
glBindFramebuffer (GL_DRAW_FRAMEBUFFER, 0); // write to default framebuffer
glBlitFramebuffer (
0, 0, SCR_WIDTH, SCR_HEIGHT, 0, 0, SCR_WIDTH, SCR_HEIGHT, GL_DEPTH_BUFFER_BIT, GL_NEAREST
);
glBindFramebuffer (GL_FRAMEBUFFER, 0);
// now render light cubes as before
[...]
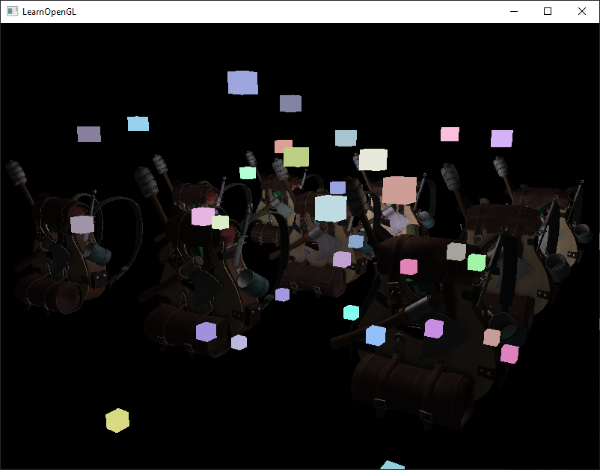
Here we copy the entire read framebuffer's depth buffer content to the default framebuffer's depth buffer; this can similarly be done for color buffers and stencil buffers. If we then render the light cubes, the cubes indeed render correctly over the scene's geometry:
You can find the full source code of the demo here.
With this approach we can easily combine deferred shading with forward shading. This is great as we can now still apply blending and render objects that require special shader effects, something that isn't possible in a pure deferred rendering context.
A larger number of lights
What deferred rendering is often praised for, is its ability to render an enormous amount of light sources without a heavy cost on performance. Deferred rendering by itself doesn't allow for a very large amount of light sources as we'd still have to calculate each fragment's lighting component for each of the scene's light sources. What makes a large amount of light sources possible is a very neat optimization we can apply to the deferred rendering pipeline: that of
Normally when we render a fragment in a large lit scene we'd calculate the contribution of each light source in a scene, regardless of their distance to the fragment. A large portion of these light sources will never reach the fragment, so why waste all these lighting computations?
The idea behind light volumes is to calculate the radius, or volume, of a light source i.e. the area where its light is able to reach fragments. As most light sources use some form of attenuation, we can use that to calculate the maximum distance or radius their light is able to reach. We then only do the expensive lighting calculations if a fragment is inside one or more of these light volumes. This can save us a considerable amount of computation as we now only calculate lighting where it's necessary.
The trick to this approach is mostly figuring out the size or radius of the light volume of a light source.
Calculating a light's volume or radius
To obtain a light's volume radius we have to solve the attenuation equation for when its light contribution becomes 0.0. For the attenuation function we'll use the function introduced in the light casters chapter:
What we want to do is solve this equation for when \(F_{light}\) is 0.0. However, this equation will never exactly reach the value 0.0, so there won't be a solution. What we can do however, is not solve the equation for 0.0, but solve it for a brightness value that is close to 0.0 but still perceived as dark. The brightness value of \(5/256\) would be acceptable for this chapter's demo scene; divided by 256 as the default 8-bit framebuffer can only display that many intensities per component.
The attenuation equation we have to solve becomes:
\[\frac{5}{256} = \frac{I_{max}}{Attenuation}\]Here \(I_{max}\) is the light source's brightest color component. We use a light source's brightest color component as solving the equation for a light's brightest intensity value best reflects the ideal light volume radius.
From here on we continue solving the equation:
\[\frac{5}{256} * Attenuation = I_{max} \] \[5 * Attenuation = I_{max} * 256 \] \[Attenuation = I_{max} * \frac{256}{5} \] \[K_c + K_l * d + K_q * d^2 = I_{max} * \frac{256}{5} \] \[K_q * d^2 + K_l * d + K_c - I_{max} * \frac{256}{5} = 0 \]The last equation is an equation of the form \(ax^2 + bx + c = 0\), which we can solve using the quadratic equation:
\[x = \frac{-K_l + \sqrt{K_l^2 - 4 * K_q * (K_c - I_{max} * \frac{256}{5})}}{2 * K_q} \]This gives us a general equation that allows us to calculate \(x\) i.e. the light volume's radius for the light source given a constant, linear, and quadratic parameter:
float constant  = 1.0;
float linear    = 0.7;
float quadratic = 1.8;
float lightMax  = std::fmaxf(std::fmaxf(lightColor.r, lightColor.g), lightColor.b);
float radius    =
  (-linear +  std::sqrtf(linear * linear - 4 * quadratic * (constant - (256.0 / 5.0) * lightMax)))
  / (2 * quadratic);
We calculate this radius for each light source of the scene and use it to only calculate lighting for that light source if a fragment is inside the light source's volume. Below is the updated lighting pass fragment shader that takes the calculated light volumes into account. Note that this approach is merely done for teaching purposes and not viable in a practical setting as we'll soon discuss:
struct Light {
    [...]
    float Radius;
};

void main()
{
    [...]
    for(int i = 0; i < NR_LIGHTS; ++i)
    {
        // calculate distance between light source and current fragment
        float distance = length(lights[i].Position - FragPos);
        if(distance < lights[i].Radius)
        {
            // do expensive lighting
            [...]
        }
    }
}
The results are exactly the same as before, but this time each light only calculates lighting for the light sources in which volume it resides.
You can find the final source code of the demo here.
How we really use light volumes
The fragment shader shown above doesn't really work in practice and only illustrates how we can sort of use a light's volume to reduce lighting calculations. The reality is that your GPU and GLSL are pretty bad at optimizing loops and branches. The reason for this is that shader execution on the GPU is highly parallel and most architectures have a requirement that for large collection of threads they need to run the exact same shader code for it to be efficient. This often means that a shader is run that executes all branches of an if statement to ensure the shader runs are the same for that group of threads, making our previous radius check optimization completely useless; we'd still calculate lighting for all light sources!
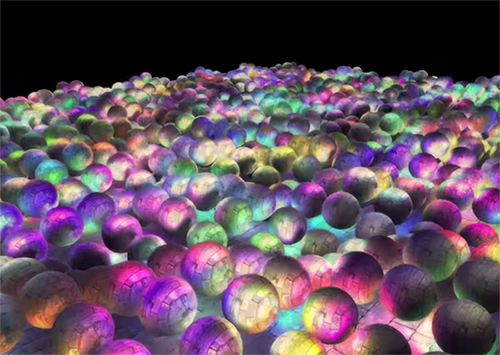
The appropriate approach to using light volumes is to render actual spheres, scaled by the light volume radius. The centers of these spheres are positioned at the light source's position, and as it is scaled by the light volume radius the sphere exactly encompasses the light's visible volume. This is where the trick comes in: we use the deferred lighting shader for rendering the spheres. As a rendered sphere produces fragment shader invocations that exactly match the pixels the light source affects, we only render the relevant pixels and skip all other pixels. The image below illustrates this:
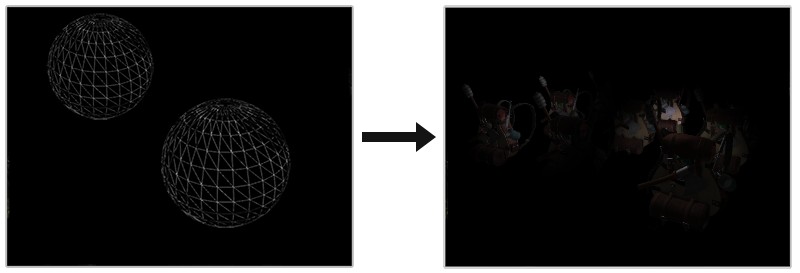
This is done for each light source in the scene, and the resulting fragments are additively blended together. The result is then the exact same scene as before, but this time rendering only the relevant fragments per light source. This effectively reduces the computations from nr_objects * nr_lights to nr_objects + nr_lights, which makes it incredibly efficient in scenes with a large number of lights. This approach is what makes deferred rendering so suitable for rendering a large number of lights.
There is still an issue with this approach: face culling should be enabled (otherwise we'd render a light's effect twice) and when it is enabled the user may enter a light source's volume after which the volume isn't rendered anymore (due to back-face culling), removing the light source's influence; we can solve that by only rendering the spheres' back faces.
Rendering light volumes does take its toll on performance, and while it is generally much faster than normal deferred shading for rendering a large number of lights, there's still more we can optimize. Two other popular (and more efficient) extensions on top of deferred shading exist called
Deferred rendering vs forward rendering
By itself (without light volumes), deferred shading is a nice optimization as each pixel only runs a single fragment shader, compared to forward rendering where we'd often run the fragment shader multiple times per pixel. Deferred rendering does come with a few disadvantages though: a large memory overhead, no MSAA, and blending still has to be done with forward rendering.
When you have a small scene and not too many lights, deferred rendering is not necessarily faster and sometimes even slower as the overhead then outweighs the benefits of deferred rendering. In more complex scenes, deferred rendering quickly becomes a significant optimization; especially with the more advanced optimization extensions. In addition, some render effects (especially post-processing effects) become cheaper on a deferred render pipeline as a lot of scene inputs are already available from the g-buffer.
As a final note I'd like to mention that basically all effects that can be accomplished with forward rendering can also be implemented in a deferred rendering context; this often only requires a small translation step. For instance, if we want to use normal mapping in a deferred renderer, we'd change the geometry pass shaders to output a world-space normal extracted from a normal map (using a TBN matrix) instead of the surface normal; the lighting calculations in the lighting pass don't need to change at all. And if you want parallax mapping to work, you'd want to first displace the texture coordinates in the geometry pass before sampling an object's diffuse, specular, and normal textures. Once you understand the idea behind deferred rendering, it's not too difficult to get creative.
Additional resources
- Tutorial 35: Deferred Shading - Part 1: a three-part deferred shading tutorial by OGLDev.
- Deferred Rendering for Current and Future Rendering Pipelines: slides by Andrew Lauritzen discussing high-level tile-based deferred shading and deferred lighting.