


Bloom
Advanced-Lighting/Bloom
Bright light sources and brightly lit regions are often difficult to convey to the viewer as the intensity range of a monitor is limited. One way to distinguish bright light sources on a monitor is by making them glow; the light then bleeds around the light source. This effectively gives the viewer the illusion these light sources or bright regions are intensely bright.
This light bleeding, or glow effect, is achieved with a post-processing effect called
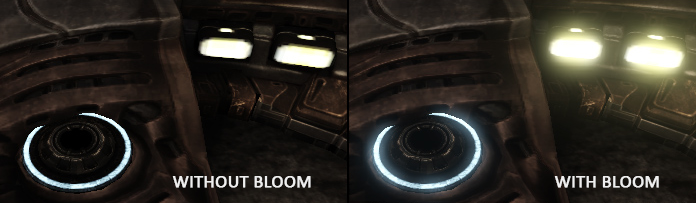
Bloom gives noticeable visual cues about the brightness of objects. When done in a subtle fashion (which some games drastically fail to do) Bloom significantly boosts the lighting of your scene and allows for a large range of dramatic effects.
Bloom works best in combination with HDR rendering. A common misconception is that HDR is the same as Bloom as many people use the terms interchangeably. They are however completely different techniques used for different purposes. It is possible to implement Bloom with default 8-bit precision framebuffers, just as it is possible to use HDR without the Bloom effect. It is simply that HDR makes Bloom more effective to implement (as we'll later see).
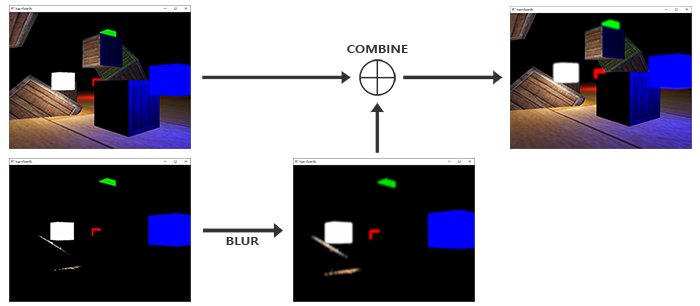
To implement Bloom, we render a lit scene as usual and extract both the scene's HDR color buffer and an image of the scene with only its bright regions visible. This extracted brightness image is then blurred and the result added on top of the original HDR scene image.
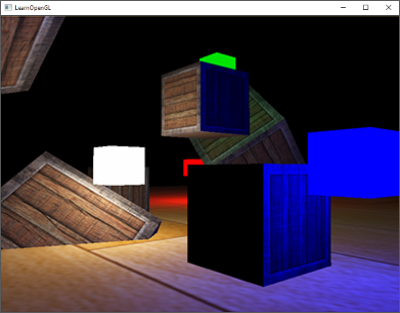
Let's illustrate this process in a step by step fashion. We render a scene filled with 4 bright light sources, visualized as colored cubes. The colored light cubes have a brightness values between 1.5 and 15.0. If we were to render this to an HDR color buffer the scene looks as follows:
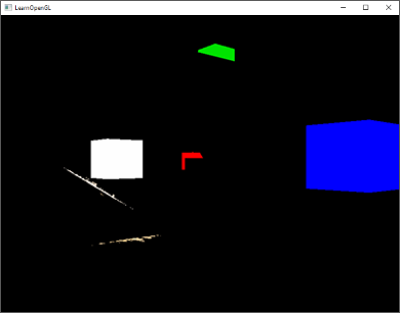
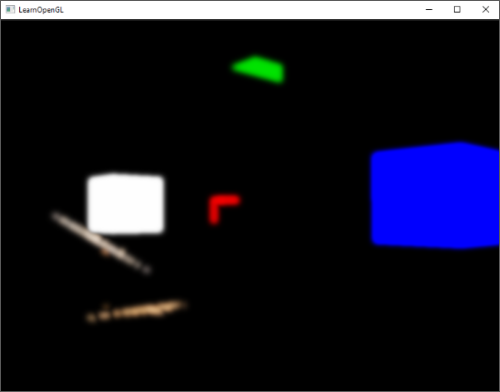
We take this HDR color buffer texture and extract all the fragments that exceed a certain brightness. This gives us an image that only show the bright colored regions as their fragment intensities exceeded a certain threshold:
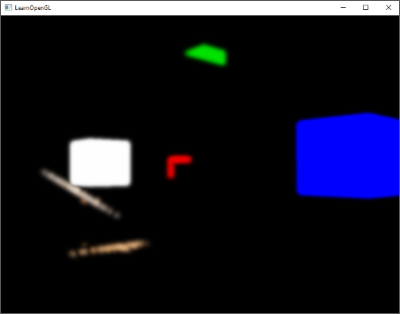
We then take this thresholded brightness texture and blur the result. The strength of the bloom effect is largely determined by the range and strength of the blur filter used.
The resulting blurred texture is what we use to get the glow or light-bleeding effect. This blurred texture is added on top of the original HDR scene texture. Because the bright regions are extended in both width and height due to the blur filter, the bright regions of the scene appear to glow or bleed light.

Bloom by itself isn't a complicated technique, but difficult to get exactly right. Most of its visual quality is determined by the quality and type of blur filter used for blurring the extracted brightness regions. Simply tweaking the blur filter can drastically change the quality of the Bloom effect.
Following these steps gives us the Bloom post-processing effect. The next image briefly summarizes the required steps for implementing Bloom:
The first step requires us to extract all the bright colors of a scene based on some threshold. Let's first delve into that.
Extracting bright color
The first step requires us to extract two images from a rendered scene. We could render the scene twice, both rendering to a different framebuffer with different shaders, but we can also use a neat little trick called
layout (location = 0) out vec4 FragColor;
layout (location = 1) out vec4 BrightColor;
This only works if we actually have multiple buffers to write to. As a requirement for using multiple fragment shader outputs we need multiple color buffers attached to the currently bound framebuffer object. You may remember from the framebuffers chapter that we can specify a color attachment number when linking a texture as a framebuffer's color buffer. Up until now we've always used GL_COLOR_ATTACHMENT0, but by also using GL_COLOR_ATTACHMENT1 we can have two color buffers attached to a framebuffer object:
// set up floating point framebuffer to render scene to
unsigned int hdrFBO;
glGenFramebuffers (1, &hdrFBO);
glBindFramebuffer (GL_FRAMEBUFFER, hdrFBO);
unsigned int colorBuffers[2];
glGenTextures (2, colorBuffers);
for (unsigned int i = 0; i < 2; i++)
{
glBindTexture (GL_TEXTURE_2D, colorBuffers[i]);
glTexImage2D (
GL_TEXTURE_2D, 0, GL_RGBA16F, SCR_WIDTH, SCR_HEIGHT, 0, GL_RGBA, GL_FLOAT, NULL
);
glTexParameter i(GL_TEXTURE_2D, GL_TEXTURE_MIN_FILTER, GL_LINEAR);
glTexParameter i(GL_TEXTURE_2D, GL_TEXTURE_MAG_FILTER, GL_LINEAR);
glTexParameter i(GL_TEXTURE_2D, GL_TEXTURE_WRAP_S, GL_CLAMP_TO_EDGE);
glTexParameter i(GL_TEXTURE_2D, GL_TEXTURE_WRAP_T, GL_CLAMP_TO_EDGE);
// attach texture to framebuffer
glFramebufferTexture2D (
GL_FRAMEBUFFER, GL_COLOR_ATTACHMENT0 + i, GL_TEXTURE_2D, colorBuffers[i], 0
);
}
We do have to explicitly tell OpenGL we're rendering to multiple colorbuffers via
unsigned int attachments[2] = { GL_COLOR_ATTACHMENT0, GL_COLOR_ATTACHMENT1 };
glDrawBuffers(2, attachments);
When rendering into this framebuffer, whenever a fragment shader uses the layout location specifier, the respective color buffer is used to render the fragment to. This is great as this saves us an extra render pass for extracting bright regions as we can now directly extract them from the to-be-rendered fragment:
#version 330 core
layout (location = 0) out vec4 FragColor;
layout (location = 1) out vec4 BrightColor;

[...]

void main()
{
    [...] // first do normal lighting calculations and output results
    FragColor = vec4(lighting, 1.0);
    // check whether fragment output is higher than threshold, if so output as brightness color
    float brightness = dot(FragColor.rgb, vec3(0.2126, 0.7152, 0.0722));
    if(brightness > 1.0)
        BrightColor = vec4(FragColor.rgb, 1.0);
    else
        BrightColor = vec4(0.0, 0.0, 0.0, 1.0);
}
Here we first calculate lighting as normal and pass it to the first fragment shader's output variable FragColor. Then we use what is currently stored in FragColor to determine if its brightness exceeds a certain threshold. We calculate the brightness of a fragment by properly transforming it to grayscale first (by taking the dot product of both vectors we effectively multiply each individual component of both vectors and add the results together). If the brightness exceeds a certain threshold, we output the color to the second color buffer. We do the same for the light cubes.
This also shows why Bloom works incredibly well with HDR rendering. Because we render in high dynamic range, color values can exceed 1.0 which allows us to specify a brightness threshold outside the default range, giving us much more control over what is considered bright. Without HDR we'd have to set the threshold lower than 1.0, which is still possible, but regions are much quicker considered bright. This sometimes leads to the glow effect becoming too dominant (think of white glowing snow for example).
With these two color buffers we have an image of the scene as normal, and an image of the extracted bright regions; all generated in a single render pass.

With an image of the extracted bright regions we now need to blur the image. We can do this with a simple box filter as we've done in the post-processing section of the framebufers chapter, but we'd rather use a more advanced (and better-looking) blur filter called
Gaussian blur
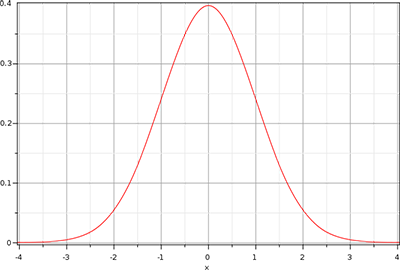
In the post-processing chapter's blur we took the average of all surrounding pixels of an image. While it does give us an easy blur, it doesn't give the best results. A Gaussian blur is based on the Gaussian curve which is commonly described as a bell-shaped curve giving high values close to its center that gradually wear off over distance. The Gaussian curve can be mathematically represented in different forms, but generally has the following shape:
As the Gaussian curve has a larger area close to its center, using its values as weights to blur an image give more natural results as samples close by have a higher precedence. If we for instance sample a 32x32 box around a fragment, we use progressively smaller weights the larger the distance to the fragment; this gives a better and more realistic blur which is known as a
To implement a Gaussian blur filter we'd need a two-dimensional box of weights that we can obtain from a 2 dimensional Gaussian curve equation. The problem with this approach however is that it quickly becomes extremely heavy on performance. Take a blur kernel of 32 by 32 for example, this would require us to sample a texture a total of 1024 times for each fragment!
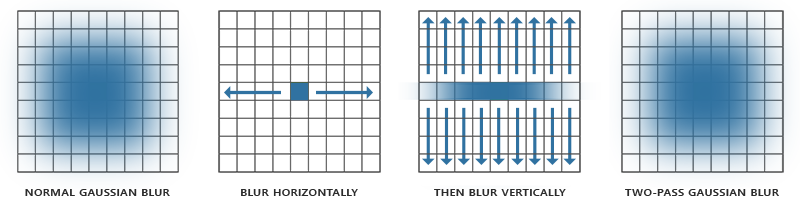
Luckily for us, the Gaussian equation has a very neat property that allows us to separate the two-dimensional equation into two smaller one-dimensional equations: one that describes the horizontal weights and the other that describes the vertical weights. We'd then first do a horizontal blur with the horizontal weights on the scene texture, and then on the resulting texture do a vertical blur. Due to this property the results are exactly the same, but this time saving us an incredible amount of performance as we'd now only have to do 32 + 32 samples compared to 1024! This is known as
This does mean we need to blur an image at least two times and this works best with the use of framebuffer objects. Specifically for the two-pass Gaussian blur we're going to implement ping-pong framebuffers. That is a pair of framebuffers where we render and swap, a given number of times, the other framebuffer's color buffer into the current framebuffer's color buffer with an alternating shader effect. We basically continuously switch the framebuffer to render to and the texture to draw with. This allows us to first blur the scene's texture in the first framebuffer, then blur the first framebuffer's color buffer into the second framebuffer, and then the second framebuffer's color buffer into the first, and so on.
Before we delve into the framebuffers let's first discuss the Gaussian blur's fragment shader:
#version 330 core
out vec4 FragColor;

in vec2 TexCoords;

uniform sampler2D image;

uniform bool horizontal;
uniform float weight[5] = float[] (0.227027, 0.1945946, 0.1216216, 0.054054, 0.016216);

void main()
{
    vec2 tex_offset = 1.0 / textureSize(image, 0); // gets size of single texel
    vec3 result = texture(image, TexCoords).rgb * weight[0]; // current fragment's contribution
    if(horizontal)
    {
        for(int i = 1; i < 5; ++i)
        {
            result += texture(image, TexCoords + vec2(tex_offset.x * i, 0.0)).rgb * weight[i];
            result += texture(image, TexCoords - vec2(tex_offset.x * i, 0.0)).rgb * weight[i];
        }
    }
    else
    {
        for(int i = 1; i < 5; ++i)
        {
            result += texture(image, TexCoords + vec2(0.0, tex_offset.y * i)).rgb * weight[i];
            result += texture(image, TexCoords - vec2(0.0, tex_offset.y * i)).rgb * weight[i];
        }
    }
    FragColor = vec4(result, 1.0);
}
Here we take a relatively small sample of Gaussian weights that we each use to assign a specific weight to the horizontal or vertical samples around the current fragment. You can see that we split the blur filter into a horizontal and vertical section based on whatever value we set the horizontal uniform. We base the offset distance on the exact size of a texel obtained by the division of 1.0 over the size of the texture (a vec2 from
For blurring an image we create two basic framebuffers, each with only a color buffer texture:
unsigned int pingpongFBO[2];
unsigned int pingpongBuffer[2];
glGenFramebuffers (2, pingpongFBO);
glGenTextures (2, pingpongBuffer);
for (unsigned int i = 0; i < 2; i++)
{
glBindFramebuffer (GL_FRAMEBUFFER, pingpongFBO[i]);
glBindTexture (GL_TEXTURE_2D, pingpongBuffer[i]);
glTexImage2D (
GL_TEXTURE_2D, 0, GL_RGBA16F, SCR_WIDTH, SCR_HEIGHT, 0, GL_RGBA, GL_FLOAT, NULL
);
glTexParameter i(GL_TEXTURE_2D, GL_TEXTURE_MIN_FILTER, GL_LINEAR);
glTexParameter i(GL_TEXTURE_2D, GL_TEXTURE_MAG_FILTER, GL_LINEAR);
glTexParameter i(GL_TEXTURE_2D, GL_TEXTURE_WRAP_S, GL_CLAMP_TO_EDGE);
glTexParameter i(GL_TEXTURE_2D, GL_TEXTURE_WRAP_T, GL_CLAMP_TO_EDGE);
glFramebufferTexture2D (
GL_FRAMEBUFFER, GL_COLOR_ATTACHMENT0, GL_TEXTURE_2D, pingpongBuffer[i], 0
);
}
Then after we've obtained an HDR texture and an extracted brightness texture, we first fill one of the ping-pong framebuffers with the brightness texture and then blur the image 10 times (5 times horizontally and 5 times vertically):
bool horizontal = true, first_iteration = true;
int amount = 10;
shaderBlur.use();
for (unsigned int i = 0; i < amount; i++)
{
glBindFramebuffer (GL_FRAMEBUFFER, pingpongFBO[horizontal]);
shaderBlur.setInt("horizontal", horizontal);
glBindTexture (
GL_TEXTURE_2D, first_iteration ? colorBuffers[1] : pingpongBuffers[!horizontal]
);
RenderQuad();
horizontal = !horizontal;
if (first_iteration)
first_iteration = false;
}
glBindFramebuffer (GL_FRAMEBUFFER, 0);
Each iteration we bind one of the two framebuffers based on whether we want to blur horizontally or vertically and bind the other framebuffer's color buffer as the texture to blur. The first iteration we specifically bind the texture we'd like to blur (brightnessTexture) as both color buffers would else end up empty. By repeating this process 10 times, the brightness image ends up with a complete Gaussian blur that was repeated 5 times. This construct allows us to blur any image as often as we'd like; the more Gaussian blur iterations, the stronger the blur.
By blurring the extracted brightness texture 5 times, we get a properly blurred image of all bright regions of a scene.
The last step to complete the Bloom effect is to combine this blurred brightness texture with the original scene's HDR texture.
Blending both textures
With the scene's HDR texture and a blurred brightness texture of the scene we only need to combine the two to achieve the infamous Bloom or glow effect. In the final fragment shader (largely similar to the one we used in the HDR chapter) we additively blend both textures:
#version 330 core
out vec4 FragColor;

in vec2 TexCoords;

uniform sampler2D scene;
uniform sampler2D bloomBlur;
uniform float exposure;

void main()
{
    const float gamma = 2.2;
    vec3 hdrColor = texture(scene, TexCoords).rgb;
    vec3 bloomColor = texture(bloomBlur, TexCoords).rgb;
    hdrColor += bloomColor; // additive blending
    // tone mapping
    vec3 result = vec3(1.0) - exp(-hdrColor * exposure);
    // also gamma correct while we're at it
    result = pow(result, vec3(1.0 / gamma));
    FragColor = vec4(result, 1.0);
}
Interesting to note here is that we add the Bloom effect before we apply tone mapping. This way, the added brightness of bloom is also softly transformed to LDR range with better relative lighting as a result.
With both textures added together, all bright areas of our scene now get a proper glow effect:
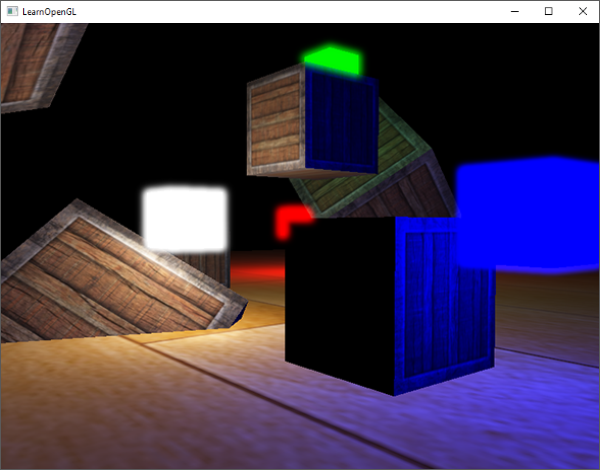
The colored cubes now appear much more bright and give a better illusion as light emitting objects. This is a relatively simple scene so the Bloom effect isn't too impressive here, but in well lit scenes it can make a significant difference when properly configured. You can find the source code of this simple demo here.
For this chapter we used a relatively simple Gaussian blur filter where we only take 5 samples in each direction. By taking more samples along a larger radius or repeating the blur filter an extra number of times we can improve the blur effect. As the quality of the blur directly correlates to the quality of the Bloom effect, improving the blur step can make a significant improvement. Some of these improvements combine blur filters with varying sized blur kernels or use multiple Gaussian curves to selectively combine weights. The additional resources from Kalogirou and Epic Games discuss how to significantly improve the Bloom effect by improving the Gaussian blur.
Additional resources
- Efficient Gaussian Blur with linear sampling: descirbes the Gaussian blur very well and how to improve its performance using OpenGL's bilinear texture sampling.
- Bloom Post Process Effect: article from Epic Games about improving the Bloom effect by combining multiple Gaussian curves for its weights.
- How to do good Bloom for HDR rendering: Article from Kalogirou that describes how to improve the Bloom effect using a better Gaussian blur method.